K 4 Premium OPERATOR MANUAL High-Pressure Washer . . . . . . . . . 2 MANUEL D’UTILISATION Nettoyeur haute pression . . . . . 19 MANUAL DE USUARIO Limpiador de alta presión . . . . . 38 59670270 (2015.
HIGH-PRESSURE WASHER OPERATOR MANUAL Model Overview 3 Owner/User Responsibility Important Safety Instructions 4 Assembly Instructions 6 Operating Instructions 8 Using the Accessories 10 Working with Detergents 10 The owner and/or user must have an understanding of the manufacturer’s operating instructions and warnings before using this pressure washer. Warning information should be emphasized and understood.
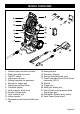
MODEL OVERVIEW 1 2 3 4 5 6 7 8 9 10 11 12 13 Garden hose connector (female) Water inlet with connector ON/OFF switch High-pressure hose Dosage regulator for detergent Storage for trigger gun High-pressure hose drum Transport handle Hand crank for hose drum Screws (Philips style) Hose retention clip Holder bracket Detergent suction tube with filter and cap 14 15 16 17 18 19 20 21 22 23 Detergent tank Accessory storage Storage hook for power cord Power cord with Ground Fault Circuit Interrupter (GFCI) Whe
IMPORTANT SAFETY INSTRUCTIONS WARNING When using this product basic precautions should always be followed, including the following: Read all the instructions before using the product. To reduce the risk of injury, close supervision is necessary when a product is used near children. Know how to stop the product and bleed pressures quickly. Be thoroughly familiar with the controls. Stay alert – watch what you are doing.
OPERATE THIS PUMP WITH COMPONENTS RATED LESS THAN 1900 PSI WORKING PRESSURE (INCLUDING BUT NOT LIMITED TO SPRAY GUNS, HOSE AND HOSE CONNECTIONS). BEFORE SERVICING, CLEANING OR REMOVING ANY PARTS, SHUT OFF POWER AND RELIEVE PRESSURE. IF CONNECTION IS MADE TO A POTABLE WATER SYSTEM, THE SYSTEM SHALL BE PROTECTED AGAINST BACK FLOW. GROUNDING INSTRUCTIONS This product must be grounded.
ASSEMBLY INSTRUCTIONS For more detailed information on how to assemble this high-pressure washer, please visit www.karcherresidential.com/assembly Required tools Install the storage for trigger gun STEP 2: Place the bottom holder into the recesses and push forward until it audibly locks in. Insert the top holder and push down all the way. A Philips Screwdriver, medium size (not supplied) for final assembly Assembly Mount loose parts delivered with appliance prior to start-up.
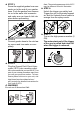
Install the high- pressure hose drum STEP 6: Slide the free end of the coiled highpressure hose through the recesses on the dosage regulator. Insert the hose drum into the intakes on the transport handle. Insert the axle of the hand crank into the guides. Rotate and press until the crank locks in. Install the dosage regulator for detergent STEP 5: Insert detergent suction tube onto the tube fitting. Install the dosage regulator and connect using 2 screws.
Install high- pressure hose to hose drum STEP 7: Slide the retention clip on the reel (as indicated by “1” below) then completely push the high- pressure hose in (as indicated by “2” below) until you hear a click. Tug on the hose before proceeding to make sure it is securely installed. It should not come loose when you tug on it. Connect the high-pressure hose to the trigger gun STEP 8: Push the high-pressure hose into the trigger gun until it locks audibly.
STEP 3: Screw the supplied garden hose connector on to the end of your garden hose. Push the garden hose connector on to the water inlet connector and make sure you hear it click into place before proceeding. Note: The actual appearance of the GFCI may be different from this illustration. STEP 6: Unlock the trigger gun safety lock. Trigger the gun to eliminate trapped air, wait for a steady flow of water to emerge from the spray nozzle.
USING THE ACCESSORIES WARNING Not recommended for soft materials, siding, painted surfaces, decks or autos. To avoid serious injury never point spray nozzle at yourself, other persons or animals. Always test an inconspicuous area before cleaning with high-pressure. Vario Power Spray Wand The Vario Power Spray Wand allows you to adjust the cleaning pressure. Before cleaning any surface an in- conspicuous area should be cleaned to test spray pattern and distance for maximum cleaning results.
STEP 1: Install the Vario Power Spray Wand. Set the spray wand to the low-pressure setting (Mix). STEP 5: STEP 2: Fill the detergent tank with Karcher detergent and position the tank into its storage area. Insert the suction tube with filter into the tank and close it with the cap. To rinse, move the VPS out of "Mix" position and pull trigger to operate unit.
SHUTTING DOWN & CLEAN-UP STEP 1: Turn the switch to OFF (0) position and unplug cord from outlet. STEP 5: Disconnect the garden hose from the water inlet on the unit. 몇 CAUTION When disconnecting the supply or highpressure hose, warm water may leak from the connector after operation. STEP 2: Turn off the water source. STEP 3: Press trigger to release water pressure. STEP 4: Release trigger and engage gun safety lock.
CARE AND MAINTENANCE INSTRUCTIONS Cleaning the water inlet filter STEP 1: Pull out water inlet filter with flat-nose pliers. STEP 2: Rinse out water inlet filter in warm water. STEP 3: Reinsert water inlet filter into the water inlet. CLEANING TIPS 몇 CAUTION Before cleaning any surface an in- conspicuous area should be cleaned to test spray pattern and distance for maximum cleaning results.
House Siding (with or without detergent). Pre-rinse cleaning surface with fresh water. If using detergent, apply to surface at low pressure (for best results, limit your work area to sections of approximately 1.8 m (6 ft.) and always apply detergent from bottom to top). Allow detergent to remain on surface 1-3 minutes. Do not allow detergent to dry on surface, if surface appears to be drying, simply wet down surface with fresh water.
OPTIONAL CLEANING ACCESSORIES Optional accessories are available to further enhance your cleaning capabilities. These accessories are accurate as of the printing date of this manual. Please check our website for pricing and up-to-date information. Pump Guard Specially formulated to protect your pressure washer from freezing, corrosion and premature wear. The Pump Guard also adds lubrication to valves and seals to prevent sticking. Highly recommended for all Kärcher ® pressure washers! Part No. 9.558-998.
Wet Sandblasting Kit (bayonet) Why spend hours stripping old paint and rust by hand using harsh chemicals? Let the Kärcher ® Wet Sandblasting Kit do the work! Attach the kit to your pressure washer, add abrasive material and attack the rust and paint with our ecofriendly alternative. Fits most Kärcher ® pressure washers up to 2300 PSI. (bayonet) Part No. 2.638-792.0 Detergent Foamer Attachment Ideal for applications which require a thick foam.
TROUBLESHOOTING WARNING Disconnect the unit from the power source before making any repair. Issue Cause Motor will not start On/Off switch is in the “OFF” (0) position. Power cord is not plugged in. Electrical outlet does not supply adequate power. Tripped GFCI plug. Tripped circuit breaker. Unit does not reach high-pressure. Diameter of garden hose is too small. Water supply is restricted. Not enough inlet water supply. Water inlet filter is clogged. Output pressure varies high and low.
Issue No detergent. Cause Solution Detergent siphon tube not Check connection. properly connected to the machine. Detergent is too thick. Dilute detergent, for best results use Kärcher detergent. Filter on detergent siphon tube Run warm water through filter is clogged. to remove debris. Damaged or clogged detergent Remove obstruction or replace siphon tube. detergent siphon tube. Spray wand is in high-pressure Turn spray wand tip to lowposition. pressure position.