
Operating instructions

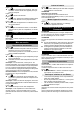
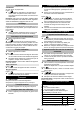
Table Of Contents
- Deutsch
- English
- Français
- Italiano
- Nederlands
- Español
- Português
- Dansk
- Norsk
- Svenska
- Suomi
- Ελληνικά
- Türkçe
- Русский
- Magyar
- Čeština
- Slovenščina
- Polski
- Româneşte
- Slovenčina
- Hrvatski
- Srpski
- Български
- Eesti
- Latviešu
- Lietuviškai
- Українська
- Қазақша
- فهرس المحتويات
- إرشادات عامة
- إرشادات السلامة
- وصف الجهاز
- التركيب
- شحن علبة البطارية
- التشغيل
- إرشادات عامة للاستعمال
- الاستخدام
- النقل
- العناية والصيانة
- المساعدة عند حدوث أعطال
- البيانات الفنية
- Leere Seite
- Leere Seite

– 8
Illustration
Push the suction hose into the connection on the
appliance, it snaps in place.
In order to disconnect it, push down with your
thumb and pull the suction hose out.
Illustration
Connect the handle with the suction hose until it
snaps in place.
Put both suction tubes together and connect them
with the handle.
Note: Accessories, such as suction brushes (optional)
can be directly attached to the connecting piece and
thus connected to the suction hose.
For convenient working even in tight spaces.
The removable handle can be attached between the ac-
cessories and the suction hose if necessary.
Recommendation: In order to vacuum the floor, attach
the handle to the suction hose.
Illustration
To remove the handle from the suction hose, press
the button with your thumb and index and remove
handle
Note: Due to removing the handle, accessories can be
directly attached to the suction hose.
Illustration
Connect the floor nozzle with the suction pipe.
Note: For vacuuming dry dirt or water off the floor - al-
ways work with the insert (brush strip and rubber lip) in
the floor nozzle.
Illustration
Push the battery pack from the top into the battery
holder and lock it.
ATTENTION
Damage to the device
Only use battery packs from the KÄRCHER Battery
Power (+) platform with 36 V nominal voltage.
Illustration
Position I: Vacuum and blowing function.
Position 0: Appliance is switched off
ATTENTION
The metal container can become statically charged
when vacuuming large amounts of fine dust particles
and then discharge upon contact.
ATTENTION
The batter holder area must be kept clean.
If there is too much dirt in this area, it is possible
that the battery pack is not inserted/locked into
place.
Similarly, it may be the case that battery pack can
no longer be taken out of the device because the
eject lever can no longer be moved.
ATTENTION
Always work with an inserted cartridge filter during wet
as well as dry vacuum cleaning!
ATTENTION
Check the filter for damage prior to installation and re-
place as necessary.
Work with a dry cartridge filter only!
Illustration
Recommendation: To vacuum fine dust, use the
filter bag.
– The filling level of the filter bag depends on the dirt
that is sucked in.
– The filter bag needs to be replaced more frequently
while sucking in fine dust, sand, etc.
– Clogged filter bags can burst - therefore make sure
to replace the filter bag in a timely manner!
ATTENTION
Vacuum cold ashes only when using a pre-filter.
For information about accessories and spare parts,
please visit www.kaercher.com.
ATTENTION
Do not use a filter bag!
Illustration
For vacuuming up moisture or liquids pay attention
to the correct floor nozzle insert and connect the
corresponding accessories.
Note: If the container is full, a float closes the suction
opening, and the appliance works at a higher speed.
Switch off the appliance immediately, and empty the
container.
Cleaning hard to reach locations or, where vacuuming
is not possible, like leaves from a gravel bed.
Illustration
Connect the suction hose to the blower connection,
this will activate the blower function.
Turn off the appliance.
Illustration
Hook the floor nozzle into the parking position.
Note:
If it is necessary to remove the suction head when
wor
k
is interrupted, the battery pack may become stuck.
The battery pack is locked in tightly and cannot fall out.
Turn off the appliance.
Illustration
Push the battery release button forwards and re-
move the battery pack from the device.
If necessary, recharge battery pack (see chapter
“Charging battery pack”).
Recommendation: Remove the battery pack from the
device after completing the work.
Illustration
Remove the appliance head and empty the reser-
voir.
Illustration
Store the accessories on the appliance and store
the appliance in dry rooms.
Commissioning
Connect accessories
Inserting the battery pack
Turning on the Appliance
General information on the operation
Operation
Dry vacuum cleaning
Information filter bag
Wet vacuum cleaning
Blowing function
Interrupting operation
Finish operation
Empty the container
Storing the appliance
13EN