
Operating instructions
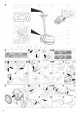

Table Of Contents
- Deutsch
- English
- Contents
- Safety instructions
- Function
- Proper use
- Environmental protection
- Control elements
- Initial Start-Up
- Charging the battery
- Operation
- Transport
- Storage
- Care and maintenance
- Faults
- Accessories
- Accessories and Spare Parts
- Warranty
- EU Declaration of Conformity
- Technical specifications
- Français
- Table des matières
- Consignes de sécurité
- Fonction
- Utilisation conforme
- Protection de l’environnement
- Eléments de commande
- Première mise en service
- Charger l'accumulateur
- Fonctionnement
- Transport
- Entreposage
- Entretien et maintenance
- Pannes
- Accessoires
- Accessoires et pièces de rechange
- Garantie
- Déclaration UE de conformité
- Caractéristiques techniques
- Italiano
- Indice
- Norme di sicurezza
- Funzione
- Uso conforme a destinazione
- Protezione dell’ambiente
- Dispositivi di comando
- Prima messa in funzione
- Caricare la batteria
- Funzionamento
- Trasporto
- Supporto
- Cura e manutenzione
- Guasti
- Accessori
- Accessori e ricambi
- Garanzia
- Dichiarazione di conformità UE
- Dati tecnici
- Nederlands
- Español
- Índice de contenidos
- Indicaciones de seguridad
- Función
- Uso previsto
- Protección del medio ambiente
- Elementos de mando
- Primera puesta en marcha
- Cargar la batería
- Funcionamiento
- Transporte
- Almacenamiento
- Cuidados y mantenimiento
- Averías
- Accesorios
- Accesorios y piezas de repuesto
- Garantía
- Declaración UE de conformidad
- Datos técnicos
- Português
- Índice
- Avisos de segurança
- Funcionamento
- Utilização conforme o fim a que se destina a máquina
- Proteção do meio-ambiente
- Elementos de manuseamento
- Primeira colocação em funcionamento
- Carregar bateria acumuladora
- Funcionamento
- Transporte
- Armazenamento
- Conservação e manutenção
- Avarias
- Acessórios
- Acessórios e peças sobressalentes
- Garantia
- Declaração UE de conformidade
- Dados técnicos
- Dansk
- Norsk
- Svenska
- Suomi
- Ελληνικά
- Πίνακας περιεχομένων
- Υποδείξεις ασφαλείας
- Λειτουργία
- Χρήση σύμφωνα με τους κανονισμούς
- Προστασία περιβάλλοντος
- Στοιχεία χειρισμού
- Θέση σε λειτουργία για πρώτη φορά
- Φόρτιση συσσωρευτή
- Λειτουργία
- Μεταφορά
- Αποθήκευση
- Φροντίδα και συντήρηση
- Βλάβες
- Εξαρτήματα
- Εξαρτήματα και ανταλλακτικά
- Εγγύηση
- Δήλωση Συμμόρφωσης των ΕE
- Τεχνικά χαρακτηριστικά
- Türkçe
- İçindekiler
- Güvenlik uyarıları
- Fonksiyon
- Kurallara uygun kullanım
- Çevre koruma
- Kumanda elemanları
- İlk çalıştırma
- Aküyü şarj edin
- Çalıştırma
- Taşıma
- Depolama
- Koruma ve Bakım
- Arızalar
- Aksesuar
- Aksesuarlar ve yedek parçalar
- Garanti
- AB uygunluk bildirisi
- Teknik Bilgiler
- Русский
- Оглавление
- Указания по технике безопасности
- Назначение
- Использование по назначению
- Защита окружающей среды
- Элементы управления
- Первый ввод в эксплуатацию
- Зарядить аккумулятор
- Эксплуатация
- Транспортировка
- Хранение
- Уход и техническое обслуживание
- Неполадки
- Принадлежности
- Принадлежности и запасные детали
- Гарантия
- Заявление о соответствии ЕU
- Технические данные
- Magyar
- Tartalomjegyzék
- Biztonsági tanácsok
- Funkció
- Rendeltetésszerű használat
- Környezetvédelem
- Kezelési elemek
- Első üzembevétel
- Az akkumulátor töltése
- Üzem
- Szállítás
- Tárolás
- Ápolás és karbantartás
- Üzemzavarok
- Tartozékok
- Tartozékok és alkatrészek
- Garancia
- EU konformitási nyiltakozat
- Műszaki adatok
- Čeština
- Obsah
- Bezpečnostní pokyny
- Funkce
- Používání v souladu s určením
- Ochrana životního prostředí
- Ovládací prvky
- První uvedení do provozu
- Akumulátor nabijte
- Provoz
- Přeprava
- Ukládání
- Ošetřování a údržba
- Poruchy
- Příslušenství
- Příslušenství a náhradní díly
- Záruka
- EU prohlášení o shodě
- Technické údaje
- Slovenščina
- Vsebinsko kazalo
- Varnostna navodila
- Delovanje
- Namenska uporaba
- Varstvo okolja
- Upravljalni elementi
- Prvi zagon
- Napolnite akumulator
- Obratovanje
- Transport
- Skladiščenje
- Vzdrževanje
- Motnje
- Pribor
- Pribor in nadomestni deli
- Garancija
- Izjava EU o skladnosti
- Tehnični podatki
- Polski
- Spis treści
- Wskazówki bezpieczeństwa
- Funkcja
- Użytkowanie zgodne z przeznaczeniem
- Ochrona środowiska
- Elementy obsługi
- Pierwsze uruchomienie
- Ładowanie akumulatora
- Działanie
- Transport
- Przechowywanie
- Czyszczenie i konserwacja
- Usterki
- Akcesoria
- Wyposażenie dodatkowe i części zamienne
- Gwarancja
- Deklaracja zgodności UE
- Dane techniczne
- Româneşte
- Cuprins
- Măsuri de siguranţă
- Funcţionarea
- Utilizarea corectă
- Protecţia mediului înconjurător
- Elemente de operare
- Prima punere în funcțiune
- Încărcaţi acumulatorului
- Funcţionarea
- Transport
- Depozitarea
- Îngrijirea şi întreţinerea
- Defecţiuni
- Accesorii
- Accesorii şi piese de schimb
- Garanţie
- Declaraţie UE de conformitate
- Date tehnice
- Slovenčina
- Obsah
- Bezpečnostné pokyny
- Funkcia
- Používanie výrobku v súlade s jeho určením
- Ochrana životného prostredia
- Ovládacie prvky
- Prvé uvedenie do prevádzky
- Nabíjanie akumulátora
- Prevádzka
- Transport
- Uskladnenie
- Starostlivosť a údržba
- Poruchy
- Príslušenstvo
- Príslušenstvo a náhradné diely
- Záruka
- EÚ Vyhlásenie o zhode
- Technické údaje
- Hrvatski
- Pregled sadržaja
- Sigurnosni napuci
- Funkcija
- Namjensko korištenje
- Zaštita okoliša
- Komandni elementi
- Prvo puštanje u rad
- Punjenje baterije
- U radu
- Transport
- Skladištenje
- Njega i održavanje
- Smetnje
- Pribor
- Pribor i pričuvni dijelovi
- Jamstvo
- EU izjava o suklađnosti
- Tehnički podaci
- Srpski
- Pregled sadržaja
- Sigurnosne napomene
- Funkcija
- Namensko korišćenje
- Zaštita životne sredine
- Komandni elementi
- Prvo puštanje u rad
- Punjenje baterije
- Rad
- Transport
- Skladištenje
- Nega i održavanje
- Smetnje
- Pribor
- Pribor i rezervni delovi
- Garancija
- Izjava o usklađenosti sa propisima EU
- Tehnički podaci
- Български
- Съдържание
- Указания за безопасност
- Функция
- Употреба по предназначение
- Опазване на околната среда
- Обслужващи елементи
- Първоначално пускане в експлоатация
- Зареждане на акумулиращата батерия
- Експлоатация
- Tранспoрт
- Съхранение
- Грижи и поддръжка
- Повреди
- Принадлежности
- Принадлежности и резервни части
- Гаранция
- EC Декларация за съответствие
- Технически данни
- Eesti
- Latviešu
- Lietuviškai
- Turinys
- Saugos reikalavimai
- Veikimas
- Naudojimas pagal paskirtį
- Aplinkos apsauga
- Valdymo elementai
- Naudojimo pradžia
- Baterijos įkrovimas
- Naudojimas
- Transportavimas
- Laikymas
- Priežiūra ir aptarnavimas
- Gedimai
- Dalys
- Priedai ir atsarginės dalys
- Garantija
- ES atitikties deklaracija
- Techniniai duomenys
- Українська
- Перелік
- Правила безпеки
- Призначення
- Правильне застосування
- Захист навколишнього середовища
- Елементи керування
- Перше введення в експлуатацію
- Зарядити акумулятор
- Експлуатація
- Транспортування
- Зберігання
- Догляд та технічне обслуговування
- Неполадки
- Аксесуари
- Приладдя й запасні деталі
- Гарантія
- Заява при відповідність Європейського співтовариства
- Технічні характеристики
- فهرس المحتويات
- إرشادات السلامة
- الوظيفة
- الاستخدام المطابق للتعليمات
- حماية البيئة
- عناصر الاستعمال
- التشغيل الأولي
- شحن البطارية
- التشغيل
- النقل
- التخزين
- العناية والصيانة
- الأعطال
- الملحقات التكميلية
- الملحقات وقطع الغيار
- الضمان
- البيانات الفنية

- 2
Fully charge the battery prior to initial
commissioning.
Figure 3, see cover page
1 Switch charger
2 LED red, charging state
glows red: Battery is being charged
off: Battery is fully charged
3 LED green, power supply
Set the appliance switch to "0".
Squeeze the battery unlocking mecha-
nisms and pull the battery out of the de-
vice.
Plug in the mains plug of the charger.
Position the charger switch to "1" - the
green LED glows.
Insert the battery into the charger - the
red LED glows.
The battery is fully charged if the red LED
goes out.
Note:
The battery can remain in the charger after
the charging process has finished.
Remove the battery from the charger.
Push the battery into the device until
unlocking mechanisms snap into place.
Figure 4, see cover page
Swivel the device up.
Push the brush onto the driver as far as
it will go.
Set the appliance switch to "0".
Pull the steering device unlocking
mechanism upwards and hold it.
Change the inclination of the steering
device.
Release the unlocking mechanism for
the steering device.
Set the appliance switch to "0".
Figure 5, see cover page
Swivel the two locks downwards.
Lift the waste water tank.
몇 CAUTION
Risk of damage. Only use the recommend-
ed detergents. With other detergents, the
operator bears the increased risk regarding
the operational safety, risk of accident and
reduced service life of the appliance. Only
use detergents that are free of solvents, hy-
drochloric acid and hydrofluoric acid.
Follow the safety instructions for using de-
tergents.
Note:
Do not use highly foaming detergents.
Observe the dosing notes.
Recommended detergents:
Figure 6, see cover page
1 Fresh water tank
2 Drain outlet fresh water tank
3 Fresh water tank cover
4 Fresh water reservoir filler neck
Remove the waste water tank.
Remove the fresh water reservoir from
the appliance.
Check whether the drain opening has
been closed correctly.
Open the cover of the fresh water reser-
voir.
Pour in water/detergent mixture. Maxi-
mum temperature of the liquid 50 °C.
Close the cover of the fresh water res-
ervoir.
Insert the fresh water container into the
appliance.
Attach and lock the waste water tank.
Figure 7, see cover page
1 Vacuum bar rotary knob
2 Power switch
3 Safety button
4 "ECO mode" button
Turn the rotary knob for lowering the
vacuum bar in an anti-clockwise direc-
tion - the vacuum bar is lowered.
Set the appliance switch to "I".
Pull the safety switch towards the steer-
ing device - the brush drive and suction
are switched on.
The device will move forwards.
At the start of cleaning, the device is in
ECO mode. "ECO" is shown in the display.
The "ECO mode" button switches back and
forth between ECO mode and increased
cleaning performance.
Release the safety switch.
Press the "ECO mode" button.
Pull the safety switch towards the steer-
ing device.
Press the Detergent solution button
when the device is running.
The dosing is shown in the display.
Dosing is continued by one stage each
time the button is pressed.
Figure 8, see cover page
1 Detergent solution dosing OFF
2 Detergent solution dosing stage 3
Press the steering device downwards
so that the brush is raised - the vacuum
bar turns to the front side of the device.
Lower the device.
Pull the device backwards.
Set the appliance switch to "0".
Swivel the vacuum bar centrally under
the device.
Raise the vacuum bar, press the vacu-
um bar rotary knob in and turn it clock-
wise.
Set the appliance switch to "I".
Press the Suction button - suction is
switched off after approx. 5 seconds.
Perform the cleaning operation.
Release the safety switch.
Set the appliance switch to "0".
Raise the vacuum bar, press the vacu-
um bar rotary knob in and turn it clock-
wise.
Pull the steering device unlocking
mechanism upwards and hold it.
Put the steering column in a vertical po-
sition.
Release the unlocking mechanism for
the steering device.
Note:
If the waste water tank is full, the float clos-
es the suction channel. The suction opera-
tion is interrupted. Empty the waste water
tank.
몇 WARNING
Please observe the local provisions regard-
ing the wastewater treatment.
Switch the device off (see section
"Completing cleaning").
Figure 9, see cover page
1Lock
2 Cover dirt water reservoir
3 waste water tank
4 Fresh water tank
5 Closure waste water tank
Swivel the two locks upwards.
Remove the lid.
Symbols on the machine
Release, battery
Carrying handle
Vacuum bar raised
Vacuum bar lowered
Drain opening, wastewater
Do not swivel the device up-
wards when the tanks are full.
Initial Start-Up
Charging the battery
Operation
Insert the battery
Install the brush
Adjusting the steering device
Removing the waste water tank
Fill fresh water reservoir
Application Deter-
gent
Dosage
Everday cleaner, alka-
li-based
RM 743 0,5 - 2,0%
Everyday cleaner,
acidic, for sanitary ap-
plications, swimming
pools, etc. Removes
limestone deposits.
RM 738 0,5 - 3,0%
Wipe care EXTRA RM 780 0,5 - 2,0%
Cleaning
Selecting the cleaning performance
Dispensing the detergent solution
Suction during reverse movement
Cleaning without suction
Complete cleaning
Emptying the waste Water tank
8 EN