
Operating instructions


- 5
Push the appliance forward for an-
other 1-2 m to draw off residual wa-
ter.
Release the brush drive button.
Press the pedal to lower the vacu-
um bar.
Place the slider vertically - the
brushes are elevated.
Disconnect the mains plug.
몇 WARNING
Danger of deforming the brushes.
When switching off the appliance, take
the load off the appliance by placing
the slider vertically.
Open the locks for the fresh water
reservoir.
Tilt the carrying handle for the
waste water tank towards the side.
Lift up the fresh water reservoir and
carry it to the disposal site.
몇 WARNING
Please observe the local provisions re-
garding the wastewater treatment.
Remove the cover of the fresh wa-
ter reservoir and pour out the liquid
via the notch.
NOTICE
If the waste water tank is full the float
closes the suction channel. The suc-
tion operation is interrupted. Empty the
waste water tank.
Remove the fresh water reservoir,
as described above.
Lift up the waste water tank and
carry it to the disposal site.
몇 WARNING
Please observe the local provisions re-
garding the wastewater treatment.
Pour out dirty water.
Rinse the waste water tank with
clear water.
If you want to transport the appli-
ance on a vehicle secure it from
slipping.
To reduce the required space, the
pushing handle can be folded or disas-
sembled:
Release the star grips of the push-
ing handle fastening.
Unscrew the star grips, remove the
screws and take off the upper push
handle half.
DANGER
Risk of injury!
Pull the plug from the mains before
carrying out any tasks on the appli-
ance.
몇 Warning
Risk of damage to the appliance on ac-
count of water leakage. Drain out dirty
water and the remaining free water be-
fore working at the machine.
몇 Warning
Risk of damage. Do not wash down the
appliance with water and do not use
aggressive detergents.
Pour out dirty water.
Rinse the waste water tank with
clear water.
Empty the fresh water reservoir.
Fill the fresh water tank with clear
water and rinse the appliance to
avoid residue buildup.
Remove the remaining water from
the fresh water tank.
Check the seal in the ball valve in
the fresh water reservoir.
Check the fluff filter, clean if re-
quired.
Let the reservoirs dry prior to clos-
ing them to prevent odor creation.
Clean the outside of the appliance
with a damp cloth which has been
soaked in mild detergent.
Clean the vacuum lips, check for
wear and replace the vacuum bar if
required.
Check the brushes for wear, re-
place if required.
Clean the water distribution bars
above the brushes.
Check the condition of the seals be-
tween the appliance and the waste
water tank; replace if required.
Clean the brush tunnel.
Have the prescribed inspection car-
ried out by the customer service.
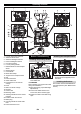
Lift the vacuum bar by activating
the pedal for the vacuum bar lower-
ing.
Press the push-button for the vacu-
um bar change toward the inside -
the vacuum bar will release.
Pull off the vacuum bar downwards.
Remove the screw springs and in-
stall the new vacuum bar.
Align the new vacuum bar so that
the locking nose points toward the
centre of the appliance.
Insert the screw springs into the
pickups on the appliance.
Insert the vacuum bar into the appli-
ance and lock it in.
Repeat process on the second bar.
NOTICE
Regular exchanges of the two vacuum
bars will improve the scraping effect
and will prolong their life.
Lay the device on its side.
Press the brush change button and
simultaneously tilt the brush roller
downwards.
Pull out the brush roller.
Place the new brush roller on the
driver and lock into place.
To ensure a reliable operation of the
appliance maintenance contracts can
be concluded with the competent
Kärcher sales office.
In case of danger of frost:
Empty the fresh and waste water
tank.
Push the button for detergent solu-
tion until no more water is expelled.
Store the appliance in a frost-pro-
tected room.
DANGER
Risk of injury!
Pull the plug from the mains before
carrying out any tasks on the appli-
ance.
몇 Warning
Risk of damage to the appliance on ac-
count of water leakage. Drain out dirty
water and the remaining free water be-
fore working at the machine.
In case of faults that cannot be reme-
died using the table below please con-
tact the customer service.
Emptying the Fresh Water Res-
ervoir
Emptying the waste Water tank
Transport
Maintenance and care
Maintenance schedule
After the work
Monthly
Yearly
Maintenance Works
Replacing the vacuum bar
Replacing the brush rollers
Maintenance contract
Frost protection
Faults
7EN