
Product Manual


4 English
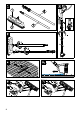
Fasten the PS 40 to the high-pressure gun
using the extension pipes.
Î Illustration
1 Screw the extension pipe (3) all the way
onto the thread of the PS 40 screws.
2 Connect the extension pipe (4) to the
extension pipe (3).
Î Illustration
1 Press the extension pipe (4) into the
bayonet catch of the high pressure gun.
2 Turn it by 90° until it locks into place.
3 Firmly turn the safety sleeve onto the
high pressure gun.
Note: In the unpressurised state, the exten-
sion pipe can be aligned to the PS 40. In
the high-pressure mode the extension tube
is fixed.
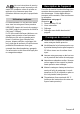
Illustration
Î Place the PS 40 onto the surface to be
cleaned.
Î Turn your high pressure cleaner on and
pull the lever of the high pressure gun.
Illustration
Î Wet, smooth surfaces can be dried us-
ing the built-in pull-off lip.
Risk of injury
Always switch off the appliance and pull out
the mains plug before care and mainte-
nance work.
Check and clean the built-in high pressure
nozzles and filters of your PS 40.
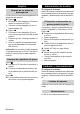
Illustration
Î Remove the high pressure nozzles and
the filters.
1 Remove the clip.
2 Pull out the high pressure nozzle and fil-
ter.
Î Clean the filter and high pressure noz-
zle under running water.
Î Rinse the PS 40 with clear water.
Illustration
Î Reinstall the high pressure nozzles and
the filters.
1 Insert the high pressure nozzles with
the filter.
2 Re-insert the clip.
Risk of injury
Always switch off the appliance and pull out
the mains plug before care and mainte-
nance work.
Use a moist cloth and clean the PS 40 after
use.
The PS 40 is maintenance-free.
Application
Attaching the extension tubes
Cleaning floor surfaces
Troubleshooting
High pressure cleaner does not
build up the pressure or is vibrating.
Maintenance and care
Care
Maintenance