FC 7 Cordless Operating Instructions Please read the operating instructions carefully before using the unit. Register your product www.kaercher.
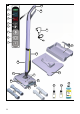
A A 9 8 10 7 6 5 4 21 3 2 1 20 11 18 17 13 16 14 14 2 13 19 12 15 22 23 24 RM 536 RM 537 25 RM 536
B C D a a b b 4h E F G b a b a c H I J a b a ON a b c K L M MIN MAX + + 3
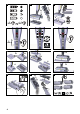
N b O P 6.76 oz / 200 ml b a a ~5 min ~ 1,5 min Q R S 3 sec ca.
Z AA AB AC AD AE AG AH a b AF a b AI AJ b a 5
Contents Intended use........................................................ Environmental protection..................................... Accessories and spare parts ............................... Scope of delivery ................................................. Warranty .............................................................. Safety instructions ............................................... Symbols on the maschine ................................... Description of the device ..................
ATTENTION ● Indication of a potentially dangerous situation that may lead to damage to property. Electrical components DANGER ● Do not immerse the device in water. ● Never insert conductive objects, e.g. screwdrivers or similar, into the charging socket on the appliance. ● Never touch contacts or lines. ● Do not damage the mains connection cable by running it over, crushing it or pulling it across sharp edges. ● Only connect the device to alternating current.
the socket using the power supply cable. ATTENTION ● Only use and store the charger in dry rooms. Battery DANGER ● Do not expose the battery to strong sunlight, heat or fire. 몇 WARNING ● Only charge the appliance using the original charger enclosed or with a charger approved by KÄRCHER. Use the following adapter: PS07 WARNING ● Short circuit hazard. Do not open the battery. Irritating vapours or corrosive liquids can also escape. ATTENTION ● This device contains non-replaceable batteries.
몇 CAUTION ● Do not use the appliance if it has been dropped beforehand, is visibly damaged or if it is leaking. ● Only operate or store the device in accordance with the description or figure. ● Accidents or damage due to the device falling over. Before all actions with or on the device, you must make sure that it is stable. ● Never leave the device unsupervised while it is in operation. ATTENTION ● Device damage.
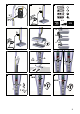
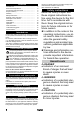
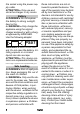
8 "Battery" indicator (green) Indicates the charging state of the battery 9 Wall anti-slip handle Fitting the waste water tank 1. Place the device in the middle of the waste water tank so that it is positioned between the rollers and then audibly clicks into place. The position of the tank is not important because it can be inserted in both longitudinal directions in the device. Illustration F The waste water tank must sit tightly in the device.
speed and water volume are increased when the boost function is activated. The Boost function can be activated at cleaning level 1 and cleaning level 2. The indicator for the corresponding cleaning level flashes when the Boost function is activated. Allow the device to slide slowly over the floor without exerting any pressure on the device. Illustration K Various different rollers are available, depending on the scope of delivery.
ATTENTION Adhering dirt deposits Adhering dirt deposits can damage the device in the long term. It is recommended to clean the device completely after each application. 3. Clean the device (see Chapter Care and service). Storing the device ATTENTION Liquids/moist dirt Unpleasant odours can develop if the device contains liquids/moist dirt when stored. Completely empty the fresh water tank and waste water tank before storing the device.
3. Alternatively, the waste water tank can be cleaned in a dishwasher. Note The rubber inlays of the waste water tank flap can become sticky when cleaned in a dishwasher. This does not affect their sealing ability. Cleaning the rollers ATTENTION Detergent residue in the rollers Foaming Wash the rollers under running water or clean them in a washing machine each time after using the device.
Rollers do not turn and the the cleaning level 1 and cleaning level 2 indicators flash simultaneously The device has a motor blockage, e.g. due to excessive pressure on the rollers or through movement into a wall/ corner. Switch the device off and on again. The rollers are blocked. Remove the rollers and check if an object has become stuck in the rollers. Check that the rollers are screwed in as far as they will go onto the roller holder.
Removing the handle ATTENTION Frequent removal of the handle The handle components can be damaged by repeated removal. Do not remove the handle from the basic device after assembly. The handle may only be removed from the basic device when the device is sent out for service purposes. ATTENTION Incorrect removal of the handle Device damage Take care to ensure that the connection cable between the basic unit and the handle is not damaged.
THANK YOU! ! MERCI! DANKE! GRACIAS! vielen Vorteilen. advantages. avantages. Registre su producto y aproveche de muchas ventajas. www.kaercher.com/welcome Bewerten Sie Ihr Produkt und sagen Sie uns Ihre Meinung. Rate your product and tell us your opinion. Évaluer votre produit et dites-nous votre opinion. Reseñe su producto y díganos su opinión. www.kaercher.com/dealersearch Alfred Kärcher SE & Co. KG Alfred-Kärcher-Str. 28-40 71364 Winnenden (Germany) Tel.