
Operation Manual
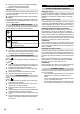
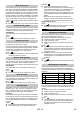
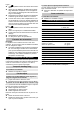
Table Of Contents
- Deutsch
- English
- Français
- Italiano
- Indice
- Avvertenze generali
- Dispositivi di sicurezza
- Descrizione dell’apparecchio
- Istruzioni brevi
- Funzionamento
- Uso degli accessori
- Cura e manutenzione
- Guida alla risoluzione dei guasti
- Dati tecnici
- Accessori optional
- Nederlands
- Español
- Índice de contenidos
- Indicaciones generales
- Dispositivos de seguridad
- Descripción del aparato
- Descripción breve
- Funcionamiento
- Empleo de los accesorios
- Cuidados y mantenimiento
- Ayuda en caso de avería
- Datos técnicos
- Accesorios especiales
- Português
- Dansk
- Norsk
- Svenska
- Suomi
- Ελληνικά
- Περιεχόμενα
- Γενικές υποδείξεις
- Διατάξεις ασφαλείας
- Περιγραφή συσκευής
- Σύντομες οδηγίες
- Λειτουργία
- Χρήση των εξαρτημάτων
- Φροντίδα και συντήρηση
- Αντιμετώπιση βλαβών
- Τεχνικά χαρακτηριστικά
- Πρόσθετα εξαρτήματα
- Türkçe
- İçindekiler
- Genel bilgiler
- Güvenlik tertibatları
- Cihaz tanımı
- Kısa Kullanım Talimatı
- Çalıştırma
- Aksesuarların kullanımı
- Koruma ve Bakım
- Arızalarda yardım
- Teknik Bilgiler
- Özel aksesuar
- Русский
- Содержание
- Общие указания
- Защитные устройства
- Описание прибора
- Краткое руководство
- Эксплуатация
- Использование принадлежностей
- Уход и техническое обслуживание
- Помощь в случае неполадок
- Технические данные
- Специальные принадлежности
- Magyar
- Čeština
- Slovenščina
- Polski
- Româneşte
- Cuprins
- Observaţii generale
- Dispozitive de siguranţă
- Descrierea aparatului
- Instrucţiuni pe scurt
- Funcţionarea
- Utilizarea accesoriilor
- Îngrijirea şi întreţinerea
- Remedierea defecţiunilor
- Date tehnice
- Accesorii opţionale
- Slovenčina
- Hrvatski
- Srpski
- Български
- Eesti
- Latviešu
- Saturs
- Vispārējas piezīmes
- Drošības iekārtas
- Aparāta apraksts
- Īsā pamācība
- Darbība
- Pierīču lietošana
- Kopšana un tehniskā apkope
- Palīdzība darbības traucējumu gadījumā
- Tehniskie dati
- Speciālie piederumi
- Lietuviškai
- Українська
- Зміст
- Загальні вказівки
- Захисні пристрої
- Опис пристрою
- Коротка інструкція
- Експлуатація
- Застосування приладдя
- Догляд та технічне обслуговування
- Допомога у випадку неполадок
- Технічні характеристики
- Спеціальне допоміжне обладнання
- Қазақша
- Мазмұны
- Жалпы нұсқаулар
- Қауіпсіздік құралдары
- Бұйым сипаттамасы
- Қысқаша нұсқаулық
- Қолдану
- Жабдықтарды қолдану
- Күту мен техникалық тексеру жұмыстары
- Кедергілер болғанда көмек алу
- Техникалық мағлұматтар
- Арнайы жабдықтар
- المحتويات
- إرشادات عامة
- تجهيزات الأمان
- وصف الجهاز
- الدليل المختصر
- التشغيل
- استخدام الملحقات
- العناية والصيانة
- المساعدة عند حدوث أعطال
- البيانات الفنية
- ملحقات خاصة

– 6
Illustrations on fold-out page 4!
Illustrations on Page 2
Illustration
Fill the water reservoir up to the "MAX" marking.
Illustration
Plug in the mains plug.
Turn on the appliance.
Illustration
Indicator lamp "heating on" is blinking (green)
Once the indicator lamp (heater) lights up perma-
nently, the steam cleaner is ready to use.
Illustration
Connect the accessories to the steam gun.
Operate steam lever.
Illustrations on fold-out page 3!
Illustration
Insert steering roller and running wheels and lock
them.
Illustration
Illustration
Connect the required accessories (see Chapter
"How to use the accessories“) to the steam gun. In-
sert the open end of the accessory on the steam
gun and push onto the steam gun until the unlock-
ing button of the steam gun locks into place.
Illustration
Use the extension tubes if necessary. To do so,
connect one or both extension tubes to the steam
gun. Insert the required accessories on the free
end of the extension tube.
Move the selector switch for the steam volume
back (steam lever locked).
Illustration
To detach the accessory parts, press the unlocking
button and pull the items apart.
The water reservoir may be refilled at any time.
ATTENTION
Do not use condensation water from the drier!
Do not fill with detergent or other additives (for example
fragrances)!
Do not use pure distilled water! Max. 50% distilled water
and 50% tap water.
Do not use collected rain water!
You can remove the water reservoir to fill it or you can
fill it directly on the appliance.
Pull the water reservoir straight up.
Fill the water reservoir up to the "MAX" marking
while positioned vertically under the water tap.
Insert the water reservoir and press downwards un-
til it arrests.
Pour water from a container into the funnel inlet. Fill
up to the "MAX" marking.
Place the unit securely on a firm surface.
Insert the mains plug into a socket.
Press the ON switch to turn on the appliance.
Note
If there is no or not enough water in the steam boiler, the
water pump starts and supplies water from the reservoir
into the steam boiler. The filling process may take sev-
eral minutes.
Wait until the indicator lamp (heater) lights up per-
manently.
The steam cleaner is ready to use.
Description of the Appliance
A1 Water reservoir
A2 Fresh water reservoir filler neck
A3 Switch - ON
A4 Switch - OFF
A5 Indicator lamp - heating (GREEN)
A6 Indicator lamp "water shortage" (RED)
A7 Carrying handle
A8 Holder for accessories
A9 Holder for accessories
A10 Maintenance lock
A11 Storage for mains connection cable
A12 Storage holder for floor nozzle
A13 Mains cable with mains plug
A14 Running wheels (2 ea.)
A15 Steering roller
B1 Steam gun
B2 Steam lever
B3 Unlocking button
B4 Selector switch for the steam volume (with child
protection)
B5 Steam hose
C1 Detail nozzle
C2 Round brush Black
C3 Round brush Red
C4 Power nozzle
C5 Round brush Large
D1 Hand nozzle
D2 Terry cloth cover
D3 Microfibre cloth cover
E1 Extension tubes (two tubes)
E2 Unlocking button
F1 Floor nozzle
F2 Side-flaps
F3 Microfibre floor cloth
F4 Microfibre floor cloth 2 pieces
G1 Decalcifying sticks
Quick Reference
Operation
Attaching the Accessories
Removing the Accessories
Filling the Water Reservoir
Take off water reservoir
Directly on the appliance
Turning on the Appliance
12 EN