Owners Manual Submersible Light Kits Models LED3125 & LED6125 Contents Important Safety. . . . General Instructions. . . . Parts Included. . . . LED3125 Assembly Instructions. . . . Instructions For Mounting LED6125. . . . Maintenance Recommendations. . . . Warranty Policy. . . . Troubleshooting Tips. . . . Replacement Parts. . . . Customer Repair Form. . . . Registration Information. . . . Kasco Marine, Inc. 800 Deere Rd. Prescott, WI 54021 PH (715) 262-4488 FAX (715) 262-4487 www.
THANKS We at Kasco Marine, Inc. would like to both thank and congratulate you on your purchase of the Submersible LED Light Kit. This kit will illuminate your fountain for a beautiful display. We thank you for choosing Kasco for your fountain and aeration needs and want you to be completely satisfied with your purchase. Important Safety Please read and follow these extremely important safety and handling instructions for your Kasco equipment.
LED6125 • A. Includes two (2) sets of LED3125 (see parts included in LED3125 • B. Lower float brackets (6) • C. 3/8” washers (3) TOOLS & SUPPLIES NEEDED • • 3. Place rubber caps over the light fixtures as shown. Ensure the rubber cap is seated all the way down onto the fixture housing. If this is not on a new light kit, make sure the fixture and lens are clean before installing the rubber cap. Fig 3 A. Two 7/16” Wrenches (or one wrench & a 7/16 socket with driver) B.
6. Adjust the angle of the light as desired and tighten the two brass thumb screws on the sides of the fixture until snug. Do not over tighten. It is best to have all three fixtures at the same angle. Fig 8 7. Repeat steps 1 through 4 for the remaining fixtures. Assembled light fixtures are pictured in Figure 6. Note the orientation of the lights. Fig 6 8. Connect each fixture cord to the power cord’s waterproof connectors.
. Install the 1/4” Flat Washer, 1/4” Lock Washer and 1/4” Nut as shown in Figure 10. Tighten the nut until snug using the 7/16” Wrench. Fig 11 Check for orange oring Fig 10 Fig 12 flat washer lock washer 1/4” nut 6. Adjust the angle of the light as desired and tighten the two brass thumb screws on the sides of the fixture until snug. Do not over tighten. It is best to have all three fixtures at the same angle. 7. Repeat steps 1 through 4 for the remaining fixtures.
1. Turn the unit upside down. Loosen and remove the 3/8” nuts on the three 9” bolts that are closest to the motor unit. Place 2 Lower Float Brackets(Part #1) and one 3/8” washer(Part #2) on each of the 9” bolts over the bottom screen clips and replace the 3/8” nut. can also alert you to electrical leaks in the equipment. If you have repeat, consistent trips of the ground fault device, the equipment should be disconnected and removed from the water.
Warranty Policy 1 Year Limited Warranty: Kasco® Marine, Inc. warrants this Light Kit to be free from defects in material or workmanship under normal use and service. The Kasco Marine, Inc. obligation under this warranty is limited to replacing or repairing free of charge any defective part within one (1) year from the date of shipment. Customer shall pay shipping charges for returning the unit to Kasco.
Troubleshooting Tips Troubleshooting tips - light kit The following is provided to help diagnose a probable source of trouble. It is a guideline only and may not show all causes for all problems. For additional troubleshooting help contact your local distributor or visit www.kascomarine.com for additional help. NOTE: you may need to refer to your owners manual that was provided with your fountain for additional control panel settings and adjustments.
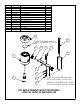
Replacement Parts ITEM NO. 1 2 3 4 5 6 7 8 9 10 11 12 13 14 PART NUMBER 345105 345007 345042 771037 345043 345035 584692 258476 840537 840536 345046 345047 345051 345053 DESCRIPTION LED FIXTURE, 1M CORD BRACKET SCREW, #10-32 X 1/2", HEX HEAD WASHER, #10 SPLIT LOCK 10-32 THUMB NUT O-RING, LED CORD CONNECTOR 1/4-20 X 1-3/8" BOLT FLAT WASHER, 1/4" LOCK WASHER, 1/4" NUT, 1/4-20 SCREW, 1/4-20 X 5", HEX HEAD SPACER, ROUND, 4INCH CAP, LENS KIT, LED COLORED LENS QTY.
800 Deere Rd. Prescott, WI 54021 Phone: 715-262-4488 - Fax: 715-262-4487 www.KascoMarine.com Sales@KascoMarine.com Customer Repair Form * Important Reminders * • All repairs sent in MUST be accompanied by a copy of this completed sheet! • Address your Repair to Kasco Marine, Attn: Repairs (or to your Authorized Repair Center. • Shipping to Kasco or an Authorized Repair Center is paid for by the customer.
Registration Information Fill in the information below and keep for your records. Model # (Ex. LED3125)_______________________________ Serial # (Ex. 2101LEDA3001)____________________________ Purchase Date:_____________________ Purchased From:___________________________________ Registration Date: ___________________________ Kasco Marine, Inc. 800 Deere Rd. Prescott, WI 54021 Phone (715) 262-4488 • Fax (715) 262-4487 www.kascomarine.com • sales@kascomarine.