
User guide

K A S P E R S K Y A N T I - V I R U S 2 0 1 0
44
Before attempting to disinfect or delete an infected object, Kaspersky Anti-Virus creates a backup copy of it to allow later
restoration or disinfection.
If you are working in automatic mode (see section "Step 2. Selecting protection mode" on page 28), Kaspersky Anti-Virus
will automatically apply the action recommended by Kaspersky Lab's specialists when dangerous objects are detected.
For malicious objects this action is Disinfect. Delete if disinfection fails, for suspicious objects – Skip.
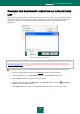
To change the specified action to be performed on detected objects:
1. Open the main application window and click the Settings link in the top part of the window.
2. In the window that will open, in the Protection section select the File Anti-Virus component.
3. Specify the required action for the component you have selected.
CREATING A PROTECTION SCOPE
A protection scope should be understood not only as the location of the objects to be scanned, but also the type of files to
be scanned. By default, Kaspersky Anti-Virus scans only potentially infectable files started from any hard drive, network
drive or removable media.
You can expand or narrow down the protection scope by adding / removing objects to be scanned, or by changing the
type of files to be scanned. For example, you wish to scan only exe files run from network drives. However, you should
make sure that you will not expose your computer to the threat of infection when narrowing down the protection scope.
When selecting file types you should remember the following:
Some file formats (e.g., txt) have a low risk of containing malicious code which could subsequently be activated.
At the same time, there are formats that contain or may contain an executable code (exe, dll, doc). The risk of
activating malicious code in such files is quite high.
The intruder can send a virus to your computer with the extension txt, which could be an executable file
renamed as txt file. If you have selected the Files scanned by extension option, such a file will be skipped
by the scan. If the Files scanned by format setting has been selected, then, regardless of the extension,
File Anti-Virus will analyze the file header, uncover that the file is an .exe file, and scan it for viruses.
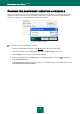
To edit the object scan list:
1. Open the main application window and in the top part click the Settings link.
2. In the window that will open, in the Protection section select the File Anti-Virus component.
3. Click the Settings button for the component you have selected.
4. In the window that will open, on the General tab, in the Protection scope section click the Add link.
5. In the Select object to scan window select an object and click the Add button.
6. After you have added all required objects, click the OK button in the Select object to scan window.
7. To exclude any objects from the list of objects to be scanned, uncheck the boxes next to them.
To change the type of scanned objects:
1. Open the main application window and click the Settings link in the top part of the window.
2. In the window that will open, in the Protection section select the File Anti-Virus component.