
User guide


K A S P E R S K Y A N T I - V I R U S
12
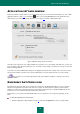
Once the components are selected, please click the Install button and enter the administrator's password to
confirm the installation.
To restore the default installation settings, click the Standard installation button.
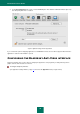
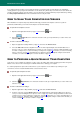
5. Completing the installation.
The last window of the installation assistant displays information about the successful completion of the
installation process. To exit the installation assistant, click the Close button.
When the installation assistant is closed, Kaspersky Anti-Virus runs automatically. The computer does not
need to be restarted.
To remove Kaspersky Anti-Virus from your computer,
run the installation file (*.dmg) and select the Kaspersky Anti-Virus Uninstaller assistant.
The uninstallation assistant is a sequence of steps. You can switch between them using the Continue (go to the
next step of installation) and Go Back (go one step back) buttons. Let us take a closer look at the application
uninstallation procedure:
1. Reading important information.
Note that removing Kaspersky Anti-Virus exposes your computer to the risk of infection.
It is recommended that you process all objects stored in quarantine and backup, before starting the
uninstallation procedure. All stored objects that have not been processed will be deleted without any
opportunity to restore them in the future.
To start the uninstallation procedure, click the Delete button and enter the administrator's password to
confirm. The application will then be uninstalled.
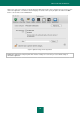
2. Completing the uninstallation procedure.
The last window of the uninstallation assistant displays the information about the successful completion of
the uninstallation process. To exit the uninstallation assistant, click the Finish button. The computer does
not have to be restarted after the uninstallation.