
Operating instructions


27
Connection and setup
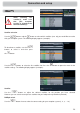
Use the
buttons to select the frequency range to be changed (low, high or limit frequency).
Use the
buttons or the number keys to set the exact frequency for which your LNB was confi gured.
Then press the
button to save your LNB selection.
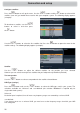
Stop on signal
Use the
buttons to select “Stop on signal”. Use the
buttons to select here whether
the motorised antenna should stop its rotary movement immediately on receipt of a signal from
the desired satellite. You can choose between “Yes” and “No”.
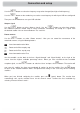
Rotate antenna
Use the
buttons to select “Rotate antenna”. Here you can control the movements of the
motorised antenna, using the following buttons:
Start slow rotation to the West
Rotate to the West step by step
Rotate to the East step by step
Start slow rotation to the East
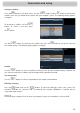
Set the turntable so that both of the bars “Signal-Strength” and “Signal-Quality” on the right of the
screen show the highest available percentage values. When you have reached the best available
reception signal, use the
buttons to switch to “Save” and press the
button. The receiver will
now save this satellite. You have now completed all settings for the fi rst satellite. Press the
button
to return to the “Satellite Selection Menu” and perform the settings in the same way for the remaining
satellites.
When you have fi nished confi guring the satellite, press the
$
(green) button. The receiver then
automatically calls up the selection menu for the channel search. Continue the fi rst installation by
selecting “Execute Channel search”.