DIGITAL PIANO CN290 OWNER'S MANUAL
Thank you for choosing this Kawai CN290 Digital Piano. Your new CN290 is a high-quality instrument offering the very latest in leading-edge music technology. This manual contains valuable information that will help you make full use of your CN piano’s many capabilities. Please read it carefully and keep it handy for further reference. TABLE OF CONTENTS Page Important Safety Instructions . . . . . . . . . . . . . . . . . . . . . . . . . . . . . . . . . . 3 Assembling The Stand . . . . . . . . . . . . . . .
Important Safety Instructions SAVE THESE INSTRUCTIONS INSTRUCTIONS PERTAINING TO A RISK OF FIRE, ELECTRIC SHOCK, OR INJURY TO PERSONS WARNING TO REDUCE THE RISK OF FIRE OR ELECTRIC SHOCK, DO NOT EXPOSE THIS PRODUCT TO RAIN OR MOISTURE. CAUTION RISK OF ELECTRIC SHOCK DO NOT OPEN AVIS : RISQUE DE CHOC ELECTRIQUE - NE PAS OUVRIR. TO REDUCE THE RISK OF ELECTRIC SHOCK, DO NOT REMOVE COVER (OR BACK). NO USER-SERVICEABLE PARTS INSIDE. REFER SERVICING TO QUALIFIED SERVICE PERSONNEL.
Do not lean against the keyboard. Doing so may cause the product to fall over, resulting in injury. Do not disassemble, repair or modify the product. Doing so may result in product breakdown, electric shock or short-circuit. When disconnecting the AC power cord's plug, always hold the plug and pull it to remove it. ● Pulling the AC power cord itself may damage the cord, causing a fire, electric shock or short-circuit.
Do not wipe the product with benzene or thinner. ● Doing so may result in discoloration or deformation of the product. ● When cleaning the product, put a soft cloth in lukewarm water, squeeze it well, then wipe the product. Do not stand on the product or exert excessive force. ● Doing so may cause the product to become deformed or fall over, resulting in breakdown or injury. The product should be located so that its location or position does not interfere with its proper ventilation.
ASSEMBLING THE STAND Be sure that all parts are included before starting to assemble your unit. PARTS PROVIDED Side Panel (A) . . . . . . . . Back Panel (B) . . . . . . . Pedal Board (C) . . . . . . Screw (D) . . . . . . . . . . . Screw (E) . . . . . . . . . . . Bolt (F) . . . . . . . . . . . . . Adjuster (G) . . . . . . . . . Cord Clamp (H) . . . . . . 2 pcs. 1 pc. 1 pc. 2 pcs. 4 pcs. 8 pcs. 1 pc. 1 pc. (D) Bottom View (F) (G) (A) (E) (F) (H) 1.
(F) Hand or Finger catching hazard 3. Place the piano on the front half of the stand so that the metal fitting holes are seen when viewed from the top. Slide the piano backward while holding it with one hand so that it does not incline and fall from the stand. The hooks on the piano are then engaged with the metal fittings on the Side Panels. Pay attention so that your hand or fingers are not caught between the stand and piano. Fasten the piano and the stand with four bolts(F).
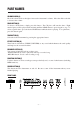
PART NAMES VOLUME SLIDER (A) Move the volume slider to the right to increase the instrument’s volume. Move the slider to the left to decrease the volume. DEMO BUTTON (B) To listen to all the demos, simply press this button. The CN piano will start the demo. Eight musical pieces will be played back randomly until the DEMO button is pressed again to stop. To select a specific demo, press the desired TONE button while the demo is playing. To stop the demo, press this button again.
SOFT PEDAL ( H) Pressing this pedal softens the sound and also reduces its volume. * The soft pedal can be used as the sostenuto pedal by turning on the power while depressing this pedal. H I SOSTENUTO PEDAL Depressing this pedal after pressing the keyboard and before releasing the keys sustains the sound of only the keys just played. SUSTAIN PEDAL (I) Pressing this pedal sustains the sound even after you remove your hands from the keyboard.
GETTING STARTED 1. BASIC OPERATIONS (1) Turn on the power. (2) Adjust the volume. Play a note on the keyboard and adjust the volume. (Moving the slider to the right raises the volume while moving to the left lowers it.) (3) Choose a tone. Pressing a TONE button automatically changes the sound made by the CN piano. The LED above the selected tone button will light to indicate which tone is currently in being used. (4) Play. Experiment by playing the different tones.
2. TRANSPOSE KEY (1) Press the TRANSPOSE button and the LED above it will be lit. The LED above the current key button (TONE button) will also be lit. If the key of “C” is selected the TRANSPOSE button will not light. (When power is first turned “on”, the key is set to C.) When any key other than “C” is selected the TRANSPOSE LED will light. C D E F G A B E-flat (2) While holding down the TRANSPOSE button, press the key button (TONE button) for the key you would like to transpose to.
DIGITAL RECORDING FUNCTIONS 1. EASY RECORDING (1) Press the REC button. The CN piano will be ready for recording. To cancel the recording, press the REC button again. (2) Begin playing some music on the piano. The CN piano will automatically start recording with the first note you play. You can also start recording by pressing the PLAY/STOP button. (3) Press the PLAY/STOP button when you have finished recording. NOTE: Starting another recording will delete the song you previously recorded.
3. ADVANCED RECORDING/PLAYBACK FUNCTIONS RECORDING MORE SONGS The CN piano can record and store a maximum of 3 songs. Please follow the steps below to save your songs: (1) While holding down the REC button, press the MODERN PIANO (Song 2) button. The LED will light to show the current song number (while the REC button is held down). The piano will be ready to record (Song 2). To cancel without recording, press the REC button again. (2) Play the piano.
You can adjust the tempo. Before pressing the PLAY/STOP button, press the STRINGS button while holding down the TOUCH and TRANSPOSE buttons to make the tempo slower or press the CHOIR button while holding down the TOUCH and TRANSPOSE buttons to make the tempo faster. (5) Let’s record the right-hand part while listening to the left-hand part. While holding down the REC button, press the CHOIR (Part 2) button.
4. DELETING A SONG/TRACK This function allows you to delete songs that were not recorded correctly or songs that you do not want to listen to any more. (1) Simultaneously hold down the PLAY/STOP and REC buttons. (2) The LEDs will light to show you where songs have been recorded. While holding down both the PLAY/STOP and REC buttons, press the song button that corresponds to the song you want to delete.
PROGRAMMING MODE The Programming Mode gives you access to many other useful features on your CN piano. To use the Programming Mode functions, press a key on the keyboard while holding down the TOUCH and TRANSPOSE buttons. To exit the Programming Mode, release the TOUCH and TRANSPOSE buttons.
(1) To select the “LIGHT”, “CONSTANT” or “HEAVY” Touch Type, press one of the following keys on the keyboard while holding down the TOUCH and TRANSPOSE buttons. Any C key: Selects the “LIGHT” Touch Type Any D key: Selects the “HEAVY” Touch Type Any E key: Selects the “CONSTANT” Touch Type (2) Release both hands after selecting the Touch Type to exit the programming mode. When the TOUCH LED is off, the “NORMAL” Touch Type is automatically selected.
4. TRANSMIT MIDI PROGRAM CHANGE ON/OFF You can use 8 tone buttons to transmit Program Change Numbers via MIDI. Please refer to the list below for assignment of tone and program number. TONE NAME CLASSIC GRAND MODERN PIANO E.
6. MIDI LOCAL CONTROL ON/OFF This function is used to control whether or not the sound from the piano will be heard when you play the keyboard. When MIDI LOCAL CONTROL is set to on you will hear the CN piano when you play. When MIDI LOCAL CONTROL is set to off you will not hear any sound from the CN piano when you play but the CN piano’s keyboard data will be transmitted through the MIDI jacks to an external MIDI device.
MIDI The term MIDI is an acronym for Musical Instrument Digital Interface, an international standard for connecting synthesizers, sequencers (digital recorders) and other electronic instruments so that they can exchange performance data. The CN290 is equipped with two MIDI jacks for exchanging data: MIDI IN and MIDI OUT. Each uses a special cable with a DIN connector. MIDI IN: For receiving note, program change and other data. MIDI OUT: For sending note, program change and other data.
(2) Connection to an external sequencer and sound generator module When connected as shown in the illustration, you can record songs played on the CN290 with a sequencer, and use the CN290’s tones (such as piano, harpsichord and vibraphone, etc.) controlled by the CN290’s MULTI-TIMBRAL MODE function to create a multi-layer MIDI recording.
SPECIFICATIONS Keyboard Touch Type Max Polyphony Tones Effects Digital Recorder Other Functions Pedals Jacks Speakers Dimensions Weight 88 Weighted Keys with Advanced Hammer Action III 4 Types (Normal, Light, Heavy, Constant) 32 Notes 8 Tones (CLASSIC GRAND, MODERN PIANO, E.
MIDI IMPLEMENTATION CHART KAWAI DIGITAL PIANO MODEL: CN290 FUNCTION Basic Channel (Default) (Changed) Mode (Default) (Message) (Altered) Note Number (True Voice) Velocity (Note ON) (Note OFF) After Touch Key’s Channel’s Pitch Bend Control Change 7 64 66 67 Program Change True System Exclusive Common (Song Position) (Song Select) (Tune) System: Real Time (Clock) (Commands) Others (Local ON/OFF) (All Notes OFF) (Active Sense) (Reset) Date: December 2002 Version: 1.
CN290 Owner's Manual OM964E-L0210 Printed in Japan