Digital Piano CN390 Owner’s Manual
KAWAI DIGITAL PIANO CN390
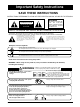
Important Safety Instructions SAVE THESE INSTRUCTIONS INSTRUCTIONS PERTAINING TO A RISK OF FIRE, ELECTRIC SHOCK, OR INJURY TO PERSONS WARNING TO REDUCE THE RISK OF FIRE OR ELECTRIC SHOCK, DO NOT EXPOSE THIS PRODUCT TO RAIN OR MOISTURE. CAUTION RISK OF ELECTRIC SHOCK DO NOT OPEN AVIS : RISQUE DE CHOC ELECTRIQUE - NE PAS OUVRIR. TO REDUCE THE RISK OF ELECTRIC SHOCK, DO NOT REMOVE COVER (OR BACK). NO USER-SERVICEABLE PARTS INSIDE. REFER SERVICING TO QUALIFIED SERVICE PERSONNEL.
Do not lean against the keyboard. Doing so may cause the product to fall over, resulting in injury. Do not disassemble, repair or modify the product. Doing so may result in product breakdown, electric shock or short-circuit. When disconnecting the AC power cord's plug, always hold the plug and pull it to remove it. ● Pulling the AC power cord itself may damage the cord, causing a fire, electric shock or short-circuit.
Do not wipe the product with benzene or thinner. ● Doing so may result in discoloration or deformation of the product. ● When cleaning the product, put a soft cloth in lukewarm water, squeeze it well, then wipe the product. Do not stand on the product or exert excessive force. ● Doing so may cause the product to become deformed or fall over, resulting in breakdown or injury. The product should be located so that its location or position does not interfere with its proper ventilation.
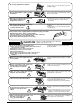
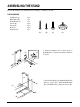
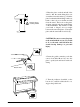
ASSEMBLING THE STAND Be sure that all parts are included before starting to assemble your unit. PARTS PROVIDED Side Panel (A) Back Panel (B) Pedal Board (C) Screw (D) Screw (E) Bolt (F) Adjuster (G) 2 pcs. 1 pc. 1 pc. 2 pcs. 4 pcs. 8 pcs. 1 pc. (D) Bottom View (F) (G) (A) (E) (F) (G) 1. Insert the Adjuster (G) on the bottom of Pedal Board (C). Fasten (A) and (C) with four bolts (F). (C) (A) (D) (C) 2. Fasten Side Panel (A) and Back Panel (B) with two screws (D).
(F) Hand or Finger catching hazard 3. Place the piano on the front half of the stand so that the metal fitting holes are seen when viewed from the top. Slide the piano backward while holding it with one hand so that it does not incline and fall from the stand. The hooks on the piano are then engaged with the metal fittings on the Side Panels. Pay attention so that your hand or fingers are not caught between the stand and piano. Fasten the piano and the stand with four bolts (F).
THANK YOU FOR PURCHASING A KAWAI DIGITAL PIANO! The Kawai digital piano is a revolutionary new keyboard instrument that combines the latest in electronic advances with traditional craftsmanship inherited from Kawai’s many years of experience in building fine pianos. Its keyboard provides the touch response and full dynamic range required for a superb performance on the piano, harpsichord, organ, and other instruments.
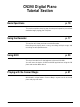
CN390 Digital Piano Tutorial Section Basic Operations p. 10 This section explains step by step the setup and operation procedures needed to begin playing your CN piano. Using the Recorder p. 17 This section will show you how to use the Recorder. Recording and playing back a song, recording multiple songs, and recording on two separate tracks. Using MIDI p. 23 This is an introduction for the beginner to the world of MIDI.
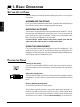
1. BASIC OPERATIONS SETTING UP THE PIANO ASSEMBLING THE STAND Basic Operations TUTORIAL The first thing you’ll need to do before playing the piano is to set up the instrument. First, you need to assemble the stand unit. Assemble the stand following the instructions that came in the package with the stand. SUPPLYING AC POWER The CN piano is equipped with stereo speakers and an amplifier. You do not need any other equipment to play your piano. You can enjoy the CN piano wherever AC power is available.
musical instrument. The initial touch sensitivity setting has been adjusted to the standard of an acoustic piano. You can however, select a different type of touch sensitivity on the CN piano if you are not comfortable with the standard setting. For more detail, please read “Selecting the touch sensitivity” on page 51. Sostenuto Sustain Soft PLAYING WITH MORE SOUNDS You have already heard the CN’s main piano sound.
TUTORIAL Basic Operations Press the DEMO button and the demo songs for the Classic Grand category will start. After the Classic Grand demo songs are finished playing, the demo songs for another sound category will be selected at random. If you would like to listen to the demos for a particular category, just press the desired SOUND SELECT button while the demo is playing. When you press the button, the demo songs for the newly selected category will be played.
You can adjust the volume balance between the two sounds. Use the Dual/Split Balance slider to adjust the balance. Move the slider to the right to increase the volume of the upper sound and decrease the volume of the lower sound. The balance changes in the opposite way when the slider is moved to the left. The CN piano is capable of playing up to 64 notes simultaneously (64note polyphony).
ROTARY This effect simulates the sound of the Rotary Speaker cabinet commonly used with electronic organs. There are two types of rotary available (rotary 1-2). Rotary 1 is normal rotary and Rotary 2 is with distortion effect. The soft pedal is used to change the speed of the rotor between SLOW and FAST. Basic Operations TUTORIAL TREMOLO This is a vibrato type effect. TO ADD REVERB Press the REVERB button. The LED indicator will be turned on to indicate that reverb is in use.
USING THE METRONOME Press the TEMPO button. You will see the LED indicator turn on and hear the metronome begin counting with a steady beat. The LED display shows the tempo in beats per minute To change the tempo, use the VALUE buttons to increase or decrease the tempo within the range of 30 - 300 beats per minute. (60-600 BPM with 6/8). To stop the metronome, press the TEMPO button again.
So far, you have learned the basic operations and terms needed to become familiar with the CN piano. There are, however, some other functions that will help you to make full use of the CN piano’s many capabilities. You may continue on from here, or skip ahead to the chapters you are interested in. Basic Operations TUTORIAL NEXT STEP TO MAKE If you would like to learn more about the recorder, go to chapter 2. “Using the Recorder” page 17.
2. USING THE RECORDER The CN piano’s recorder records your playing much like a tape recorder, and it is just as easy to use. The CN piano records a song as digital data instead of audio data and stores the song inside the instrument. Because the song is stored as digital information you can modify the song when you play it back. You can, for example, adjust the tempo without changing the pitch or use a different effect setting from one you have recorded.
BASICS OF THE RECORDER Let’s take a brief look at the recorders features. TUTORIAL Using the Recorder TWO-TRACK FIVE-SONG RECORDER The CN piano’s recorder is a 2-track 5-song recorder. This means you can record up to five different songs, store them in memory, and play them back as you like. Each song has two separate tracks called “Parts” that can be recorded separately.
RECORDING MORE THAN ONE SONG The CN piano is capable of recording up to five different songs. Let’s try recording a second song. If you followed the procedure in the previous section you have already recorded Song 1, so now let’s record Song 2. Now let’s play back the song that you have just recorded. Hold down the PLAY/STOP button to see which song is selected for play back. You will see the LED indicator for MODERN PIANO start flashing. This means that Song 2 is going to be played back.
SONG STATUS AND LED INDICATOR You have probably noticed that some of the LED indicators are flashing, some are turned on, and some are turned off. The LED indicates the status of recording and play back as shown below. The LED that is on indicates that the song or part has already been recorded. TUTORIAL Using the Recorder The flashing LED indicates that the song or part is selected to record or play back. The LED that is off indicates that the song or part is empty.
If you want to start recording the second part from the beginning of the song, just play the keyboard. You will hear the first part playing back while you record the second part. If you would like to play back the first part and then start recording the second part from a certain point later in the song, press the PLAY/STOP button instead of playing the keyboard to start playback of the first part and then begin recording the second part from any point you like.
ERASING UNNECESSARY SONG DATA To erase a specific song and part, first hold down both the REC and PLAY/STOP buttons. The LED indicators will display which songs have been recorded. Select the desired song and part to erase by pressing the appropriate SOUND SELECT buttons while continuing to hold down both the REC and the PLAY/STOP buttons. On releasing both the REC and PLAY/STOP buttons, the CN piano will erase from memory the song and part you have chosen.
3. USING MIDI UNDERSTANDING MIDI WHAT IS MIDI? The letters MIDI stand for Musical Instrument Digital Interface, an international standard for connecting MIDI equipped synthesizers, drum machines, and other electronic instruments so that they can exchange data. Personal computers can also be equipped for MIDI communication. Electronic instruments equipped with MIDI can transmit and receive performance data such as, notes, what sound to play, pedal information, volume, etc.
multiple channels. With MIDI instruments equipped with multi-timbral capabilities, you can receive multiple parts on multiple channels each played with a different sound simultaneously. For example, a MIDI instrument might receive the melody on channel 1, the chords on 2, the bass on 3, and assign a different instrument to each channel. Piano for channel 1, strings for 2, electric bass for 3. In this way, the CN piano can play up to 16 different parts each with a different sound.
While it is beyond the scope of this manual to explain the entire world of MIDI we do encourage you to visit your local music store or contact a music publisher for a listing of available books on MIDI applications to learn more. Let’s explore some MIDI applications using an external MIDI devices connected to the CN piano. USING THE CN PIANO AS CONTROLLER First let’s play sounds from an external MIDI device using the CN piano’s keyboard.
Connect the LINE IN jacks of the CN piano and the LINE OUT jacks of your external MIDI device with a pair of audio cables (see the illustration above). Now you will be able to hear the CN piano’s sound and your external MIDI device’s sound together through the CN’s speakers. Use the volume knob on your external MIDI device to balance it’s volume with the CN piano. Now You’re ready to play. Play the CN piano’s keyboard. You should hear both instruments as you play.
Program # 1 2 3 4 5 6 7 8 9 10 11 12 CN390 Classic Grand Classic Grand (Var.) Modern Piano Modern Piano (Var.) Electric Piano Electric Piano (Var.) Drawbar Drawbar (Var.) Church Organ Church Organ (Var.) Harpsichord Harpsichord (Var.
Play the keyboard and you will hear only the sound from your external MIDI device. To change the sound from the CN piano, select the desired number as explained in the Reference section and send it from the CN piano to your external MIDI device. It may be possible to change preset sounds directly on your external MIDI device. In this case, you may want to set the CN piano so that it does not transmit program changes. Read “4.
MIDI CHANNEL The next step is to match your MIDI channels. When receiving MIDI data on the CN piano in multi-timbral mode ON, it is not necessary to specify a MIDI channel to use because the CN piano can receive data on multiple MIDI channels at once. You do have to be careful to match MIDI channels between each part. A MIDI channel can only have one sound assigned to it at a time.
Let’s see how this works using an external MIDI device. If you have a keyboard connected to the CN piano try playing some notes. You should hear the CN piano as you play. If you have a MIDI song player or personal computer with MIDI software connected try sending some MIDI song data with one or more different musical parts to the CN. Again you should hear the CN piano playing all the parts.
4. PLAYING WITH CONCERT MAGIC The great German composer Johann Sebastian Bach once said, “Playing the keyboard is simple. Just strike right keys at the right time.” Many people wish it were that simple. The reality is very different of course. However, there is a way to make playing the keyboard very simple. You don’t even have to strike right keys thanks to Concert Magic.
If you want to listen to a different song, repeat the same procedure to select a song. When you are finished listening to the song, press the PLAY/STOP button again to stop. PERFORMING A SONG Now you’re ready to play yourself. Tap out the rhythm of the selected song on any one of the 88 black or white keys on your piano keyboard. As you tap harder, the notes will get louder; as you tap softer, the notes will get quieter.
Key on x x x x x x x x x x x x x x œ# œ œ # œ œ œ n œ œ j œ 3 &8 Œ ?3 8 ∑ ∑ œ ≈ x x x x x x œ Jœ œ œ œ œ ≈ ‰ œ ≈ œ œ #œ œ #œ ≈ ‰ MELODY PLAY These songs are also quite easy to play, especially if they are familiar to you. To perform them, tap out the rhythm of the melody on any one of the keys on your piano keyboard. Singing along as you tap the rhythm can be helpful.
“Waltz of The Flowers” shown below. It may take some practice to get them just right. A good way to learn these songs is to listen to them first, and then try to tap out the rhythms that you hear. ◆ NOTE In the song list in the reference section on page 68, the arrangement type is marked next to each song title as “EB” for Easy Beat, “MP” for Melody Play and “SK” for Skillful.
CN390 Digital Piano Reference Section Operation by the Panel Components p. 36 This section describes the operation of the panel components-buttons, sliders, and jacks. If you are familiar with playing a digital piano, reading this section first may help you understand the CN piano faster. In this section you can look into the particular functions for detailed information and operation instead of reading through the manual from the beginning. 1. CONCERT MAGIC BUTTON . . . . . . . . . . . . . . . . . . . .
1. CONCERT MAGIC BUTTON Thanks to CONCERT MAGIC, absolutely anyone can sit at the CN390 and make real music… even if you’ve never taken a piano lesson in your life. To enjoy performing by yourself, you have only to select your favorite piece from 88 preprogrammed songs and tap any key with a steady rhythm and tempo. CONCERT MAGIC will provide the correct melody and accompaniment notes, regardless of which keys you press.
PERFORMING THE SELECTED SONG After following the song selection procedure, tap out the rhythm of the selected song on any one of the 88 black or white keys on your piano keyboard. As you tap harder, the notes will get louder; as you tap softer, the notes will get quieter. As you tap faster, the notes speed up; as you tap slower, they will slow down correspondingly. When performing fast songs on Concert Magic, it is sometimes easier to tap two different keys with two fingers alternating.
STEADY BEAT (C-2) With Steady Beat you can play any Concert Magic song by just tapping any key with a steady beat regardless of which arrangement type the song is.
2. DEMO BUTTON The CN piano has nineteen demo songs built in. Each demo song presents a brief musical piece to introduce the different preset instruments. The 88 Concert Magic songs can be demonstrated as well. PRESET SOUND DEMO To listen to all the demo songs, simply press the DEMO button. The CN piano will begin the demo. The demo songs for the sounds in the Classic Grand category will begin the demo. All of the Classic Grand demo songs will be played back in order.
3. SOUND SELECT BUTTONS SELECTING A SOUND These buttons are used to select the desired instrument to play. Press the appropriate button and the LED indicator of it will be turned on to indicate that it is selected. The Sound Select buttons have two sounds assigned to them. Repeatedly pressing these Sound Select buttons switches between the two sounds. When you select the variation sounds, the dots in the LED display will light up. DUAL You can layer any two preset sounds (Dual) .
SELECTING A DEMO SONG When listening to the demo songs, these buttons are used to select the different demo songs. Use one of the ten buttons to select a desired preset sound to demonstrate after pressing the DEMO button. 4. VALUE BUTTONS CHANGING VALUE These two buttons are used to change the value for certain functions. First select the function or option which you would like to change the value for by pressing the appropriate button (s), then use the VALUE buttons.
5. EFFECT BUTTONS SELECTING AN EFFECT (EFFECTS BUTTON) Use the EFFECTS button to add an effect to the sound. There are seven digital effects; Chorus, Delay1–3, Tremolo and a Rotary1-2 effect that can be used to enhance the sound of the preset tone. ❏ OPERATION Chorus To add an effect to the sound, press the EFFECTS button. The LED indicator will be turned on and the LED display will show you which effect is currently selected.
6. DUAL/SPLIT BALANCE SLIDER DUAL BALANCE When playing in dual mode, this slider controls the volume balance of the two sounds. Move the slider to the right to increase the volume of the rightmost preset sound of the pair and decrease the volume of the leftmost preset sound. The balance changes in the opposite way when the slider is moved to the left. SPLIT BALANCE You can adjust the volume balance between the two sounds. Use the DUAL/SPLIT BALANCE slider to adjust the balance.
7. SPLIT BUTTON SELECTING SPLIT SOUNDS The split function divides the keyboard into two sections-upper and lower—and lets you play each part with a different sound. First press the desired SOUND SELECT button to select the upper sound. Then, while holding down the SPLIT button, press the desired SOUND SELECT button to select the lower sound. The LED Indicator for a lower sound will start flashing. To adjust the volume balance of the two sounds, use the DUAL/ SPLIT BALANCE slider.
8. METRONOME BUTTONS CHANGING TEMPO (TEMPO BUTTON) The TEMPO button is used to activate the metronome and control the tempo. ❏ OPERATION Tempo 120 After pressing the TEMPO button, the metronome starts counting and turns on the LED indicator above it. The LED display gives tempo value in number of quarter note per minute ( q = 120, for example). To change tempo, use the VALUE buttons to increase or decrease the value within the range of 30–300 (60–600 when in 6/8 rhythm). The initial value is 120.
CHANGING THE TIME SIGNATURE (BEAT BUTTON) The BEAT button is used to activate the metronome and select your desired time signature. The CN piano has six settings to choose: 1/4, 2/4, 3/4, 4/4, 5/4 and 6/8. ❏ OPERATION 4/4 After pressing the BEAT button, the metronome starts counting and turns on the LED indicator above it. The LED display gives a time signature (4-4, for example). Use the VALUE buttons to select the desired time signature. Press the BEAT button again to stop the metronome.
9. RECORDER BUTTON RECORDING (REC BUTTON) The REC button is used for recording. ❏ OPERATION Press the REC button to enable the CN piano to record. The LED indicator above the button starts flashing to tell you that the piano is ready to record. Begin playing some music on the keyboard. The CN piano automatically begins recording on the first note you play. When you are finished recording, press the PLAY/STOP button. The piano will stop recording and save your song to memory.
STATUS OF SONG AND PART Some of the LED indicators will be turned on or will flash while the REC button is held down. The LED indicates the status of the song and the part. An LED that is on indicates that the song or part have already been recorded. A flashing LED indicates that the song or part is selected for recording. An LED that is off indicates a song or part that has nothing recorded on it. EXAMPLE: The LED indicator shows the status while the REC button is held down.
INFORMATION TO RECORD The recorder remembers all the notes you play, usage of the pedals and the sound selection. If you record in a transposed key, the song will be played back in the same key you heard when recording, not in the key that you played with the keyboard. MEMORY CAPACITY The total memory capacity of the recorder is approximately 10,000 notes. When the memory becomes full, the recorder will automatically stop at that moment. The data recorded before the interruption will be retained.
ERASING SONG DATA This function allows you to erase any song and part you do not want to listen to. ❏ OPERATION While holding down both the REC and PLAY/STOP button, press the SOUND SELECT button labeled with the song number and the part number you wish to erase. Releasing the buttons will erase the desired song data. ERASING ALL THE SONGS Reference Section To erase all the songs at once, first turn off the power then turn it back on again while holding down both the REC and PLAY/STOP buttons.
10. FUNCTION BUTTONS SELECTING THE TOUCH SENSITIVITY (TOUCH BUTTON) The TOUCH button is used to select a different touch sensitivity of the keyboard from the standard touch of an acoustic piano. You can change the sensitivity to one of five different settings: LIGHT1/2, HEAVY1/2 and OFF. Light1 Heavy2 LIGHT: For those still developing finger strength. A louder volume is produced even when playing with a soft touch. LIGHT2 is lighter than LIGHT1. HEAVY: Perfect for those with strong fingers.
TRANSPOSING THE PIANO (TRANSPOSE BUTTON) Use the TRANSPOSE button to raise or lower the piano’s key in half steps. This is especially useful when you have learned a song in one key and have to play it in another key. The transpose feature allows you to play the song in the original key, but hear it in another key. ❏ OPERATION Value: -5 -5, for example, represents 5 half steps lower than the standard. To switch from the standard key to the desired key, press the TRANSPOSE button.
The LED indicator of the button will flash to show which function is selected. To exit the function, press any of the SOUND SELECT buttons or the TOUCH or the TRANSPOSE button. Once the power is turned off, the settings will be reset to the factory preset value. 1. TUNING Tuning allows you to adjust the piano’s pitch. You may need to adjust the tuning when you play with other instruments. ❏ OPERATION Pitch: 440.
KEY SIGNATURE OF TEMPERAMENT Limitless modulation of the key became available only after the invention of Equal temperament. When we use a temperament other than Equal temperament, we must carefully choose the key signature to play in. Key in D Key in A# To select the key signature of the temperament, simply press one of the 88 piano keys. The note name of the key you pressed will be shown in the display and it will be chosen as the key of the temperament.
Pythagorean Meantone Werckmeister Kirnberger Equal(Flat) Equal MEANTONE TEMPERAMENT This temperament, which uses a mean between a major and minor whole tone to eliminate dissonance for thirds, was devised to eliminate the lack of consonances experienced with certain fifths for the Mersenne pure temperament. It produces chords that are more beautiful than those with the equal temperament.
3. MIDI TRANSMIT AND RECEIVE CHANNEL This determines on which MIDI channel the CN piano will exchange MIDI information with an external MIDI instrument or a personal computer. ❏ OPERATION Channel 15 Press the ELECTRIC PIANO button while holding down the TOUCH and the TRANSPOSE buttons, and the piano will show the channel number in the LED display. The default channel is 1. Change the channel within the range of 1-16 using the VALUE buttons.
5. LOCAL CONTROL ON/OFF This determines whether the CN piano’s sound will be Played from the piano’s keyboard (“ON”) or only from an external MIDI instrument (“OFF”). Even with local control “off” the piano’s keyboard will still transmit to an external MIDI instrument or personal computer. ❏ OPERATION Local Control ON Local Control OFF Press the CHURCH ORGAN button while holding down the TOUCH and the TRANSPOSE buttons, and the piano will show “on” or “off” in the LED display. The initial value is on.
❏ OPERATION Mute OFF Press the VIBRAPHONE button while holding down the TOUCH and the TRANSPOSE, and the piano will show “on” or “off” in the LED display. The initial value is “on” for channel 1 and “off” for the other channels. To turn off the channel, use the VALUE keys to toggle on and off. When you want to turn on and off the other channels, use the 16 leftmost white keys to select a desired channel. Then use the VALUE keys to turn them on and off.
Number 1 The LED display shows the lower part is shifted one octave up. 10. LOWER PEDAL ON/OFF This determines if the sustain pedal will be active for lower sound when in SPLIT mode. The default setting is Off which means the sustain pedal is not active the lower sound. ❏ OPERATION Sustain pedal OFF Press the BASS button while holding down the TOUCH and the TRANSPOSE, and the piano will show “on” or “off” in the LED display. The initial value is “off”.
11. POWER SWITCH TURNING THE POWER ON Press this button to turn on the power. Pressing it again will turn off the power. Pressing this button while holding down the REC and PLAY/STOP buttons will erase all the songs currently stored in memory. 12. VOLUME SLIDER CONTROLLING OVERALL VOLUME This slider controls the master volume level of the piano’s sound. Move this slider to the right to increase the volume and move to the left to decrease the volume.
13. PEDALS SUSTAIN PEDAL SOSTENUTO PEDAL SOFT PEDAL SUSTAIN PEDAL Depressing this pedal sustains the sound even after removing your hands from the keyboard. SOSTENUTO PEDAL Depressing this pedal after pressing the keyboard and before releasing the keys, sustains the sound of only the keys just played. SOFT PEDAL Depressing this pedal softens the sound and also reduces its volume. When the Rotary Speaker effect is turned on, this pedal works as a switch to change effect speed.
14. JACKS LINE OUT JACKS These jacks provide stereo output of the piano’s sound to amplifiers, tape recorders or similar equipment. The audio signal coming through the LINE IN jacks is also routed to these jacks. The piano’s sound is mixed with the LINE IN signals. The CN piano’s VOLUME slider can control the output level of its own sound while it does not control the LINE IN signal.
15.
MIDI Exclusive Data Format 1st byte 2nd byte 3rd byte 4th byte 5th byte 6th byte 7th byte 8th byte 9th byte 10th byte 1 2 3 4 5 6 7 8 9 10 1 2 3 4 5 6 7 8 9 10 F0 . . . . . . . . . . 40 . . . . . . . . . . 00 - 0F . . . . . . 10,30 . . . . . . . 04 . . . . . . . . . . 02 . . . . . . . . . . data 1 data 2 . . . . . . . data 3 F7 . . . . . . . . . .
DATE: DECEMBER 2002 VERSION 1.
FRONT PANEL VOLUME SLIDER (P. 60) LED DISPLAY DEMO BUTTON (P. 39) CONCERT MAGIC BUTTON(P. 36) Sound Select Buttons (p.
VALUE BUTTONS (P. 41) DUAL/SPLIT BALANCE SLIDER (P. 43) METRONOME BUTTONS (P. 45) FUNCTION BUTTONS (P.51) EFFECT BUTTONS (P. 42) SPLIT BUTTON (P. 44) RECORDER BUTTONS (P. 47) Demo Songs Classic Grand Modern Piano Electric Piano Drawbars Church Organ Harpsichord Mallets Strings Choir/Pad Bass Concert Grand Mellow Grand Modern Piano Rock Piano Classic E.Piano Modern E.P. 1 Jazz Organ Drawbar Organ 1 Church Organ Diapason Harpsichord Harpsichord Oct.
CONCERT MAGIC SONG LIST BANK A Title Note# Mode CHILDREN’S SONGS Bingo Frère Jacques Good Morning To You Hickory Dickory Dock I’m A Little Teapot Itsy, Bitsy Spider London Bridges Mary Had A Little Lamb Pop Goes The Weasel Row, Row, Row Your Boat The Farmer In The Dell This Old Man Twinkle, Twinkle, Little Star G#1 F#1 F1 D#1 A#0 A1 C#1 C1 E1 D1 G1 B0 A0 EB MP MP EB MP MP MP MP MP MP MP MP MP C2 A#1 B1 D2 C#2 E2 D#2 F2 F#2 MP MP MP MP MP MP MP MP MP A2 G#2 B2 G2 A#2 MP MP MP MP MP C#4 A#4 F4 G3 F#4
Reference Section REFERENCE SECTION 69
CN390 Owner’s Manual OW965-L0212 Printed in Japan