
user manual


3-96 FUEL SYSTEM (DFI)
Fuel Tank
•
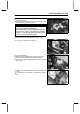
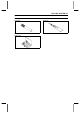
Insert the pump outlet hose joint [A] straight onto the de-
livery pipe [B] until the hose joint clicks [C].
Front [D]
•
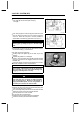
Push and pull [A] the hose joint [B] back and forth more
than two times and make sure it is locked and doesn’t
come off. When the hose joint is correctly installed, it
should slide on the delivery pipe about 5 mm (0.2 in.).
WARNING
Make sure the hose joint is installed correctly on the
delivery pipe by sliding the joint, or the fuel could
leak.
If it does not slide, reinstall the hose joint.
•
Connect the fuel pump and the fuel level sensor connec-
tors and the battery (–) lead terminal.
Fuel Tank and Cap Inspection
•
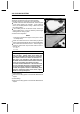
Visually inspect the gasket [A] on the tank cap f or any
damage.
Replace the gasket if it is damaged.
•
Check to see if the water drain pipe [B] and fuel breather
pipe [C] in the tank are not clogged. Check the tank cap
breather also.
If they are clogged, remove the tank and drain it, and then
blow the breather free with compressed air.
CAUTION
Do not apply compressed air to the air vent holes
[D] in the tank cap. This could cause damage and
clogging of the labyrinth in the cap.
Fuel Tank Cleaning
WARNING
Clean the tank in a well-ventilated area, and take
care that there are no sparks or flame anywhere
near the working area. Because of the danger or
highly flammable liquids, do not use gasoline or
low-flash point solvents to clean the tank.
•
Remove the fuel tank (see Fuel Tank Removal).
•
Remove the fuel pum p inlet hose and the fuel pump (see
Fuel Pump section in this chapter).
•
Pour some high flash-point solvent into the fuel tank and
shake the tank to remove dirt and fuel deposits.
•
Draw the solvent out of the fuel tank.
•
Dry the tank with compressed air.
•
Install the fuel pump (see Fuel P ump Installation).
•
Install the fuel tank (see Fuel Tank Installation).