
user manual


2-28 PERIODIC MAINTENANCE
Periodic Maintenance Procedure s
Clutch
Clutch Adjust Inspection
•
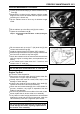
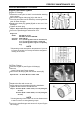
Pull the clutch lever just enough to take up the free play
[A].
•
Measure the gap between the lever and the lever holder.
If the gap is too wide, the clutch may not release fully. If
the gap is too narrow, the clutch may not engage fully. In
either case, adjust it.
Clutch Lever Free Play
Standard: 2 ∼ 3mm(0.08∼ 0.12 in.)
WARNING
To avoid a serious burn, never touch the engine or
exhaust pipe during clutch adjustment.
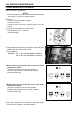
•
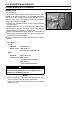
Turn the adjuster [A] so that 5 ∼ 6 mm (0.20 ∼ 0.24 in.) [B]
of threads are visible.
•
Slide the dust cover [A] at the clutch cable lower end out
of place.
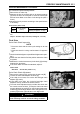
•
Loosen both adjusting nuts [B] at the clutch cover as far
as they will go.
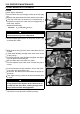
•
Pull the clutch outer cable [C] tight and tighten the adjust-
ing nuts against the bracket [D].
•
Slip the rubber dust cover back onto place.
•
Turn the adjuster at the clutch lever until the free play is
correct.
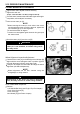
•
Push the release lever [A] toward the front of the motor-
cycle until it becomes hard t o turn.
○
At this time, the release lever should have the proper an-
gle shown.
If the angle is wrong, check the clutch and release parts
for wear.
WARNING
Be sure that the outer cable end at t he clutch lever
is fully seated in the adjuster at the clutch lever, or
it could slip into place later, creating enough cable
play to prevent clutch disengagement.
•
After the adjustment, start the engine and check that the
clutch does not slip and that it releases properly.