
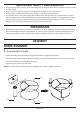
Instructions / Assembly


Page 4 of 4
CLEANING
• Do not use any cleaners with chemicals, solvents, or harsh abrasives. Use only a dry, soft cloth to dust or
wipe carefully.
• To clean the fixture, pull the plug from the wall outlet. Use a dry or slightly dampened, clean cloth to wipe
the exterior surface of the fixture.
TROUBLESHOOTING
• The light does not come on at all:
a) Ensure the power supply is turned on.
b) Ensure the cord is plugged into an outlet.
c) Ensure the circuit breaker is set in the “ON” position.
• Fuse blows or circuit trips when light is turned on.
a) Check for crossed wires, ensure wiring is correct.
5
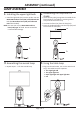
Using the USB port
• On the base there is a built in Dual USB port for
you to connect a charging cable (not included)
(powers phones, tablets & more).
• The built-in Dual USB port rating: 5Vdc, 2.0A.
ASSEMBLY (continued)
USB port
LAMP ASSEMBLY
H6
6
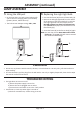
Replacing the night light bulb
• Unscrew the frame (B) from the fixture body (A).
• Remove the old night light bulb from the socket
of the bottom of the fixture body (A). Install the
new night light bulb into the socket. Use one
Max 9W medium base (E26) self-ballasted LED
bulb (2W LED bulb (H6) is pre-assembled on the
fixture body (A)).
• Screw the frame (B) to the fixture body (A) again.
NOTE: You can also use one MAX 40W medium base
(E26) type "T" or type "A" bulb. Do not exceed
the recommended wattage.
A
B