
User Guide


11
VII. OPERATION.
WARNING! Read Safety Warning on page 3 before attempting to operate the
control or severe injury or death can result.
After the control has been set up properly (the jumpers set to the desired positions, and the
wiring has been completed) the start-up procedure can begin. If AC power has been properly
brought to the control the "ON" LED and the "STOP" LED indicators will be lighted. Before
initially starting, be sure the main potentiometer is in the minimum position. To start the
control move the Start/Stop toggle to the "Start" position and release. The "Stop" LED should
extinguish and the motor should rotate as the potentiometer knob is rotated clockwise.
Note: If the motor rotates in the wrong direction, it will be necessary to disconnect the main
AC power and reverse the armature wires. To stop the motor, move the Start/Stop toggle to
the Stop position. If power is lost the control will not restart, unless the Start/Stop toggle is
moved to the Start position.
VIII. TRIMPOT ADJUSTMENTS.
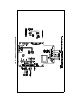
The control contains trimpots which have been factory adjusted for most applications. Figure
1 (p. 5) illustrates the location of the trimpots and their approximate adjustment positions.
Some applications may require readjustment of the trimpots in order to tailor the control to
exact requirements. (See Table 2, p. 4, for range and factory setting of all trimpots.) Readjust
trimpots as follows:
WARNING. Do not adjust trimpots with main power on if possible. If
adjustments are made with power on, insulated adjustment tools must be
used and safety glasses must be worn. High voltage exists in this
control. Electrocution and/or fire can result if caution is not exercised.
Safety warning must be read and understood before proceeding.
A. Minimum Speed (MIN) – The MIN trimpot is used to set the minimum voltage of the drive.
This sets the minimum speed of the motor. Adjust the MIN trimpot as follows:
1. Rotate Main Potentiometer to minimum speed position (full counterclockwise).
2. Increase setting of MIN trimpot so that motor runs at desired minimum speed.
B. Maximum Speed (MAX) – The MAX trimpot is used to set the maximum voltage of the
drive. This sets the maximum speed of the motor. Use the Max trimpot to change the
factory setting. Adjust the MAX trimpot as follows:
1. Rotate Main Potentiometer to maximum speed position (full clockwise).
2. Adjust MAX trimpot setting to desired setting of motor speed.
C. Acceleration (ACCEL) – The ACCEL trimpot sets the amount of time it takes the control
to reach full output. The accel circuit operates when rapidly rotating the main speed
potentiometer to full clockwise position, or when starting the control when the main speed
potentiometer is rotated clockwise. The trimpot is factory set to one (1) second. If more
rapid acceleration is desired, rotate the trimpot counterclockwise. Note: Rapid ACCEL
setting may cause the current limit circuit to activate which will extend the acceleration
time. For a longer acceleration time, rotate ACCEL trimpot clockwise. 50% rotation
represents approximately seven (7) seconds and full rotation is approximately fifteen (15)
seconds.
D. Deceleration (DECEL) – The DECEL trimpot sets the amount of time it takes the control
to go from full speed to minimum speed when rotating the main potentiometer CCW. The
trimpot is factory set to one (1) second, and can be readjusted to full counterclockwise
position for more rapid DECEL. Note: On high inertial loads, a rapid DECEL setting may
cause the motor to coast to a stop slower than the DECEL setting. To increase
deceleration time, rotate DECEL trimpot clockwise. 50% rotation represents
approximately seven (7) seconds and full rotation is approximately fifteen (15) seconds.
Note: The Decel circuit works when rotating the main speed pot in the CCW direction or
when opening the P3 lead of the main pot or when placing the Start/Stop Switch toggle
to the Stop position. It does not operate when power is removed.