SAFE & EASY ® FILTER OW N E R S M A N UA L This Owner’s Guide provides specific operating instructions for your model. Use the Safe & Easy Filter only as instructed in this Service Guide. Versión en español Si desea obtener una copia en español de este Manual de el Usuario, sirvase escribir a la dirección que se incluye a continuación. 1-800-KEATING 037402 www.keatingofchicago.
READ AND SAVE THIS MANUAL FOR FUTURE REFERENCE Record the Model No. and Serial No. (located on the back of the motor housing) of this Safe & Easy Filter in the space provided below. Serial No. ____________________________________________________________ Model No. ____________________________________________________________ Keep these numbers for future reference IMPORTANT: Keep a copy of your bill of sale. The date on the bill establishes the warranty period should service be required.
® SAFE & EASY FILTER OPERATING INSTRUCTIONS A. PREPARING THE FILTER-DRAWER CAUTION WATER IN ANY FORM & HOT OIL DON'T MIX! NOTE: Operator should be outfitted with proper protective attire: safety goggles, oil and heat resistant gloves, apron and footwear Filter assembly inside of cabinet: 1. Pull the handle marked “Pull to Release Filter” (top of filter panel). 2. Remove the entire assembly from the cabinet by rolling it forward. 3. Pull the handle marked “Pull to Release Tub” (bottom of panel) 4.
9. Sprinkle Keating Acidox Powder evenly over the paper. 10. Replace crumb basket and push drawer fully into cabinet. Ensure the connection on top of the housing mates with the connection inside the cabinet. Pull the front of the filter system lightly to verify proper connection NOTE: Cabinet door should be closed during filtration. NOTE: For best results, new filter paper and Acidox Powder must be used for each fryer. B. PREPARING OIL FOR FILTRATION NOTE: Oil in fryer must be between 250° - 350°F. 1.
Failure to do so may cause the drain lines to clog up. NOTE: If the pump shuts down, turn it off and let the motor cool. Push the motor reset button located on the filter panel. Check filtering procedure or clean tub and paper if needed. 6. Let swirling action rinse down fryer. 7. Fully drain fryer. NOTE: Pump should be run for at least 30 seconds after crumbs are removed from fryer. This will help prevent blockage in the drain lines. FIGURE 6. 8.
4. Push the small black knob on the filter panel to the left (“Oil to Hose”). 5. Place the nozzle of the hose in an approved discard container. 6. Drain the oil. 7. Plug the filter into the receptacle. 8. Turn the motor switch ON (the green light will illuminate). CAUTION A KEATING FRYER OR FILTER SHOULD BE DRAINED ONLY UNDER THE SUPERVISION OF PROPERLY TRAINED PERSONNEL. WHEN DISCARDING OIL, A COVERED RECEPTACLE APPROVED FOR USE WITH HOT OIL SHOULD BE USED.
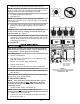
SAFE & EASY FILTER PARTS LIST ® 9 Front View Motor & Pump Assembly 055173 OR 4 6 5A 5 Front View Motor & Pump Assembly 052982 21 14 15 3 20 16 18 17 2 19 1 Description Part No. 1. Quick Connect Coupler 052573 Compression Fitting Straight Female 011087 2. Caster Swivel 2" 054919 3 /8-16 Acorn Nut 011763 3 12 /8 Split Lockwasher 009085 3. Quick Connect Nipple Male 052572 4. Motor & Pump 052982 4A. Motor & Pump 055173 5. Three Way Valve 030792 11 5A. Valve Handle 053233 6.
PROBLEM Motor runs but will not pump oil. Self-Help Guide PROBABLE CAUSE SOLUTION (Follow Sequentially) Place components in tub per the following: Tub not set up properly. Tub not connected to the motor housing properly Filter not connected inside of cabinet 1. Sump screen on the very bottom 2. Filter paper over sump screen (Lie it flat on the bottom, creasing the sides). 3. Hold down ring (ensure paper is not folded, lock hold down ring into place ensuring a tight seal). 4.
PROBLEM Self-Help Guide (Continued) PROBABLE CAUSE SOLUTION (Follow Sequentially) Motor runs but will not pump oil. Oil has not penetrated the filter paper 1. Let oil sit in the filter pan for approximately 2 minutes and try again Motor not making any noise Not plugged in 1. Plug filter into the receptacle inside of cabinet Turn ON/OFF switch to ‘ON’. Motor has overheated Oil not pumping through the hose Valve not switched to “Oil to Hose” 2. 1.
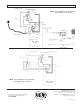
WIRING DIAGRAM NOTE: Use this diagram with motor/pump part # 052982 (See parts list) NOTE: Use this diagram with motor/pump part # 055173 (See parts list) KEATING OF CHICAGO, INC. 8901 West 50th Street, McCook, Illinois 60525-6001 Tel. 708-246-3000 • Fax 708-246-3100 If you have any questions regarding filtering procedures or need assistance, call: 1-800-KEATING. Toll Free 1-800-KEATING (In U.S. and Canada) www.keatingofchicago.
100% 80% 60% 40% 20% 10% AND CONDITIONS KEATING OF CHICAGO, INC., 1-800-KEATING KEATING WWW.KEATINGOFCHICAGO.COM REFILE/warranty 8/07 All repair services under this Limited Warranty must be authorized by Keating or performed at Keating. Authorization may be obtained by calling 1-800-KEATING within the Continental United States, Alaska, Hawaii, Puerto Rico and Canada during normal business hours (7:00 a.m. through 6:00 p.m. Central Time, Monday through Friday).
SERVICE INFORMATION If you have a service related question call 1-800-KEATING. Please state the nature of the call; it will ensure speaking with the appropriate person. Have your serial and model number available when ordering parts. KEATING OF CHICAGO, INC. 8901 West 50th Street, McCook, Illinois 60525-6001 Phone: (708) 246-3000 FAX: (708) 246-3100 Toll Free 1-800-KEATING (In U.S. and Canada) www.keatingofchicago.com *As continuous product improvement occurs, specifications may be changed without notice.