On-A-Roll Lifter® Instruction Manual for Compact Models Read Before Use! Important instructional, safety and precautionary information! It is the user’s responsibility to exercise good judgment, common sense, safety measures and reasonable limits regarding the use of the On-A-Roll Lifter® so as not to incur risk to the user or damage to the materials being carried. In order to obtain maximum benefit from your machine, please read these instructions carefully before using the On-A-Roll Lifter®.
Contents 1. Warnings & Safety Rules 2. Daily Inspection 3. Installation Guide 4. Operation 5. Maintance 6. Technical Data 7. Warranties 1.1 Warnings 1.2 Caution 1.3 Safety Rules 2.1 What to check before operation 3.1 Packing list 3.2 Placing the Lifter Carriage on the Caster Frame 3.3 Installing the Carriage Support Frame 3.4 Connecting the chain 4.1 How to use the brakes 4.2 Loading the roll onto the tray 4.3 Lifting the tray 4.4 Lowering the tray 4.5 Maneuvering with heavy rolls 5.
Warnings & Safety Rules 1.1 Warnings 1. 2. 3. 4. 5. 6. 7. 8. 9. 10. Do not put your hands or feet under the load tray. All unconcerned personnel should be more than 60 cm away from the unit while the rolls are in transit, or being lifted. Do not move the unit while a load is being raised. Do not move the unit without securing the rolls with the straps. Do not move the unit with tray raised more than a couple inches to avoid tip overs and vision obstruction.
Warnings & Safety Rules 1.3 Safety Rules Failure to obey the instructions and safety rules in this document may result in serious injury. 1. Do not operate unless you: a) Understand and practice the principles of safe machine operation specified in this manual: - Avoid hazardous situations - Always perform a pre-operation inspection - Always perform the function tests (see step 2.
Warnings & Safety Rules 1.3 Safety Rules 4. Bodily Injury Hazards: - Keep hands and fingers away from chain, wheels and other potential pinch points - Recommend operators wear safety shoes and gloves - Do not put your feet under the load tray 5. Improper Use Hazard: - Never leave a machine unattended with the load. Unauthorized personnel may attempt to operate the machine without proper instruction, creating an unsafe situation. 6.
Daily Inspection 2.1 What to check before operation It is the operator’s responsibility to make sure that the On-A-Roll Lifter® is inspected daily to ensure safe operation: Check the On-A-Roll Lifter® before operation: 1. 2. 3. 4. 5. Inspect the vertical guide rails, load tray, carriage and hydraulic components for damage, including bending, cracking and loose or missing hardware. Do not use the On-A-Roll Lifter® if any faults are discovered during your visual inspection.
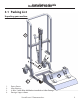
Installation Guide Installation Guide 3.1 Packing List Unpacking your machine: 4 3 2 1 1. 2. 3. 4.
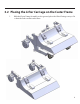
3.2 Placing the Lifter Carriage on the Caster Frame 1. With the Caster Frame Assembly on the ground, place the Lifter Carriage on top of it so that the forks rest flat on the base.
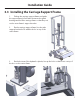
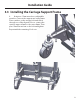
Installation Guide 3.3 Installing the Carriage Support Frame 1. Pick up the carriage support frame and guide the support frame’s front tubes between the guide bearingsand the lifter carriage frame so that they rest on the caster frame’s support bracket. 2. On the carriage support frame, line the tube support bracket holes with the holes on top of the caster frame. 3. On the bottom of the hydraulic cylinder, line up the hole so that it rests on top of the boss on the caster frame.
Installation Guide 3.3 Installing the Carriage Support Frame 4. Using two 17mm wrenches or adjustable wrenches, connect the support and caster frame. Place a washer on the carriage bolt and slide it through one of the aligned holes to connect the carriage support frame to the caster frame. Then place a washer and nut on the bolt and tighten. Repeat with the remaining 3 bolt sets.
Installation Guide 3.4 Connecting the chain 1. Remove the 2 nuts on each side of the chain with a 17mm wrench. 2. Starting with the back side, slide the threaded end of the chain through the two holes in the back of the lifter frame and insert the 2 nuts onto the threaded end. Tighten with the wrench. 3. Insert the cotter pin into the end of the threaded bolt and bend prongs outward to secure. 1 4. Next, attaching the front side.
Operation 4.1 How to use the brakes The Lifter is equipped with 2 brakes. 1. 2. To engage the brake, press both the brake pedals with your foot. To release the brake, lift up the brake pedals with your foot. Locks shown on the Caster Wheels in the unlock position. 4.2 Loading the roll onto the tray 1. 2. 3. 4. 5. 6. 7. Ensure the load tray is at its lowest position. Make sure the brakes are applied. Lay out the securing straps across the load tray, and extended onto the floor.
Operation 4.3 Lifting the tray Warning: Do not overload the load tray. The load must be evenly distributed on the Load Tray surface so that it does not tilt forward or sideways. The parking brakes should be engaged whenever the On-A-Roll Lifter® is being loaded or unloaded. 1. 2. To raise the load tray, pump the lift pedal with your foot. Press the lifting pedal several times until the load tray reaches the desired position. The load tray can be raised up to 0.85m (33in) for precise unloading. 4.4 4.
Maintance 5.1 Lubrication Points 1. Lubricate with grease each point described below each month: a) Axel and bearing wheels b) Chain guide roller on cylinder c) Connecting chain assembly d) Injection fittings located on the Lift Pump handle assembly c a b d Remove screw to access the chain guide. 2. Change hydraulic oil every 12 months.
Technical Data 6.1 Technical specifications Specifications Roll Weight Capacity Max. Roll Width Max. Roll Diameter Oil LIFTER ITEM # 61579 200 lbs (90 Kg) 72” (1.8 m) 12” (30.5cm) Use L-HM46 Hydraulic oil (equivalent to ISO VG46) 1079mm 42.48in 752.49mm 29.63in 462.48mm 18.21in 117.49mm 4.63in 574mm 22.60in 702.41mm 27.65in 795.98mm 31.
Warranties 7 Warranties 1. 2- year warranty on all wheels, hydraulics and media tray All Foster products are inspected before shipment and believed to be free from defects in workmanship. Foster cannot be responsible for tools that show excessive wear or damage resulting from misuse, accidents or abuse. These warranties do not cover any product that has been altered, modified or damaged, neglected, accidently dropped or improperly used.