
Installation & Maintenance Manual Owner's manual


– 24 –
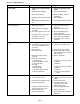
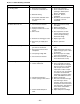
Chart 6 - Trouble Shooting continued
SYMPTOMS
J. Floating flame.
K. Burner won't turn off.
L. Rapid burner cycling.
M. Not enough heat.
POSSIBLE CAUSES
1. Blocked heat exchanger.
2. Insufficient combustion air.
3. Blocked venting.
4. Air leak into combined cham-
ber, draft hood, or flue
collector.
1. Poor thermostat location.
2. Defective thermostat.
3. Improper thermostat or trans-
former.
4. Short circuit.
5. Defective or sticking gas valve.
6. Excessive gas supply pres-
sure.
1. Loose electrical connections at
gas valve or thermostat.
2. Excessive thermostat heat
anticipation.
3. Unit cycling on high limit.
4. Poor thermostat location.
1. Incorrect gas input.
2. Heater undersized.
3. Thermostat malfuction.
4. Heater cycling on limit control.
5. Check outside dampers if
used.
CORRECTIVE ACTION
1. Clean heat exchanger.
2. Clean combustion air inlet
openings in bottom panel.
Refer to installation.
3. Clean flue. Refer to
installation.
4. Determine cause and repair
accordingly. Refer to
installation.
1. Relocate thermostat away
from drafts.
2. Replace thermostat.
3. Check wiring diagrams.
4. Check operation at valve.
Look for short and correct
(such as staples piercing
thermostat wiring).
5. Replace gas valve.
6. Refer to operation.
1. Tighten all electrical connec-
tions.
2. Adjust thermostat heat antici-
pation for longer cycles. Refer
to operation.
3. Check for proper air supply
across heat exchanger.
4. Relocate thermostat. (Do not
mount thermostat on unit).
1. Refer to operation.
2. This is especially true when
the heated space is enlarged.
Have the heat loss calculated
and compare to the heater
output (79% or 80% of input-
see chart 2). Your gas supplier
or installer can furnish this
information. If heater is under-
sized, add additional heaters.
3. Replace thermostat.
4. Check air movement through
heat exchanger. Check
voltage to power venter motor,
clean power venter wheel and
heat exchanger, and oil power
venter motor. Check filters,
replace if necessary.
5. Adjust dampers accordingly.