
Instructions / Assembly


12
Refer to the thermostat manufacturer’s instruction sheet
for detailed mounting and installation information.
• Installthegrommet,whichispackedwiththeunit,in
the hole for low-voltage wires. Properly connect the
low-voltage wiring between the thermostat, outdoor
unit, and control board. NOTE: When the low voltage
wires are positioned in this grommet, the grommet will
prevent chafing and/or shorting of the low voltage leads.
Control Board
The control board in the air handler controls the timing
sequence of the elements. The board is equipped with
a 3 second blower on delay and a 15 second blower off
delay in heating and a 40 second blower off delay in
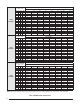
cooling. See Figure 13 (page 23) or Figure 14 (page
23) and Table 12 (page 29), (page 30) & page
31 for control board modes and actions.
Twinning
B6BM air handlers are not supplied with a built in twinning
capability. To connect two air handlers to a common
single stage AC condensing unit or heat pump, a twinning
kit is available for field installation. Please follow the
instructions supplied with the kit.
NOTE: Variable speed air handlers cannot be twinned.
Heater Kits
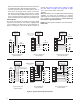
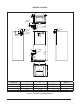
Figure 9. Typical Thermostat Connections
G
R
C
W/EO
Y
Thermostat
G
R
W
Thermostat
Y
C
Y
G
R
W
Thermostat
Y
C
Air
Handler
Air
Conditioner
Y
Typical Air Conditioner with
Standard Air Handler
GRC
E
O
Y
Thermostat
Typical Heat Pump with
Standard Air Handler
Typical Air Conditioner with
2-Stage Air Handler
Typical Heat Pump with
2-Stage Air Handler
G
R
W2
C
O
Y1
Thermostat
O
Y1
R
C
G
R
W/E
Thermostat
Y1
C
Y1
W2
Typical 2-Stage Air Conditioner
with 2-Stage Air Handler
Typical 2-Stage Heat Pump with
2-Stage Air Handler
Y2
Y2
Y2
Y2 OUT
W/E
R
Air
Conditioner
Air
Handler
Air
Conditioner
Air
Handler
Heat Pump
Air
Handler
Heat Pump
O
R
C
Y
Air
Handler
Heat Pump
NOTE: Jumper between
W2 & E is required when
no OD T- Stat is used.
W1
Y
G
R
C
NOTE: Jumper W1 & W2
together if not using W2
on thermostat
Y1
W2
W1
O
Y/Y2
G
R
C
Y1
W2
W1
O
Y/Y2
G
R
C
W2
Air
Handler
W1
Y
G
R
C
R
C
Y
W2
O
Y1
W2
W1
O
Y/Y2
G
R
C
Y1
W2
W1
O
Y/Y2
G
R
C
W2
W2
W2
NOTE: Jumper W1 & W2
together if not using W2
on thermostat