
User manual


2
3. INSTALLATION
3.1. Unpacking
Packing used to protect internal parts of the
washing machine during transport must be
removed before the washing machine is put
into service for the first time.
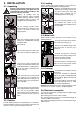
Remove all packing from the
washing machine. Tilt the washing
machine sideways and then remove
the packing under the motor, and
straighten the washing machine.
Tilt the washing machine back-
wards, rotate it by a quarter of a turn
on one of its corner to remove the
transport base.
Open the washing machine lid and
remove the immobilization packing
and plastic films.
Close the lid.
Use a 10 mm spanner to remove the
two screws and spacers at the back.
You can now see the openings that
must be closed with the caches in the
pack attached to the washing machi-
ne; do not forget to fold down the
central capsule.
Make sure that you have removed all
these parts from your washing ma-
chine and keep them so that you can
use them again if you need them for
future transport.
If you want to keep your washing ma-
chine aligned with the adjacent furni-
ture, you can cut the pipe support
strip at the back of your washing ma-
chine. Leave the two side closers in
place.
3.2. Position
Put the washing machine on a flat hard floor in a well venti-
lated room. Make sure that your washing machine does not
touch the wall or any other furniture in the room.
3.3. Leveling
Precise leveling will prevent vibrations, noise and move-
ments of the washing machine during operation.
Make the washing machine level by
adjusting the leveling screw that is
too short. Unscrew the stand and
locking collar assembly (lift the
washing machine if necessary).
When the washing machine is sta-
ble, maintain the stand on the
ground and turn the locking collar as
far as posible.
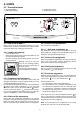
3.4. Water inlet
Please install the water inlet hose onto the back of your
washing machine:
- Insert the seal in the hole at the bot-
tom of the back panel (fig. 1).
- Screw on the bottom fitting of the
water inlet hose as shown in fig. 2
and fig. 3.
- Connect the feed hose connector
onto the water inlet tap, taking care to
position the gasket correctly.
- Turn on the water inlet tap.
The water inlet hose cannot be exten-
ded. If it is too short, please contact
the After Sales Department.
3.5. Drainage
- Assemble the hose holder onto the
drain hose.
- Place the assembly in a drainage
pipe (or in a sink) at a height between
70 and 100 cm. Make sure that it will
not fall out.
You must provide an air intake at the
end of the drainage hose, to avoid
any water being siphoned.
Important: the drainage hose must not be extended, on any
account. If it is too short, contact a qualified engineer.
3.6. Electrical connection
You can only connect this washing machine to 230 V single
phase power supply.
Check rating of the fuse line: 10 A at 230V.
The washing machine must not be connected through an
extension cable or a power bar.
Check that the earthing connection is conform with the regu-
lations in force.