Inverter Split System Room Air Conditioner User Manual KSV26CRE, KSV26HRE, KSV35CRE, KSV35HRE, KSV53HRE, KSV62HRE, KSV70CRE, KSV70HRE, KSV80HRE Refrigerant R32
Congratulations Contents Congratulations and thank you for choosing our Inverter split system room air conditioner. We are sure you will find your new air conditioner a pleasure to use. Before you use the air conditioner, we recommend that you read through the entire user manual, which provides the description of the air conditioner and its functions.
Safety instructions • Contact an authorised installer for installation of this unit. • Contact an authorised service technician for repair or maintenance of this unit. • The socket outlet required to supply power must be connected and commissioned by a licensed contractor.
Safety instructions caution Prior to Operation 1 Contact an installation specialist for installation. 2 Plug in the power plug properly. 3 Do not use a damaged or non-standard power cord. 4 Do not share the same outlet with other appliances. Do not clean the air conditioner with water. Water may enter the unit and degrade the insulation. It may cause an electric shock. 5 Do not use an extension cord. Ventilate the room well when used together with a stove, etc. An oxygen shortage may occur.
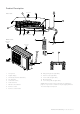
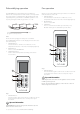
Product Description Air inlet 2 Indoor unit 1 12 3 4 5 Air outlet Outdoor unit Air inlet (side) 6 7 8 11 10 Air inlet (rear) 9 Air outlet 13 14 1. Front panel 10. Refrigerant pipe (if applicable) 2. Digital display 11. Drain hose (if applicable) 3. Air filter (behind the dust filter) 12 Power cable (if applicable) 4. Pre-dust filter 13 Mounting plate 5. Horizontal louvres 14 Connecting cable (if applicable) 6. Vertical louvres 7. Manual control button 8.
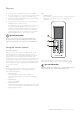
Indoor display unit • When the remote control sends out a signal, the symbol will blink for about 1 second on the display of the remote control. caution 1 1 2 3 4 5 6 7 I feel indicator Lights when the 'I feel' function is activated. 2 Turbo indicator Lights when the 'TURBO' function is activated. 3 Eco (economy) indicator Lights when the 'ECO' function is activated.
Remote control 6 X-Fan Function Press the function. X-FAN button to activate the X-FAN After the unit is turned off, the indoor fan will continue to operate for 10 minutes to remove all moisture from the indoor unit and prevent bacteria and mildew from growing. 7 TIMER ON Button Press this button to set the start time. TIMER OFF Button 8 2 Press this button to set the start time. 5 1 3 4 6 7 13 12 9 10 ON/OFF Button Push this button to start or stop operation.
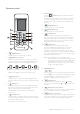
Remote control display indicator 1 9 2 10 3 4 11 5 12 6 Timer On/Off Display Displays when the Timer On/Off function is activated. 9 Fan Speed Display Displays the selected fan speed in the following sequence: LOW 7 8 8 13 MEDIUM and AUTO. In Auto speed, only the is displayed. HIGH symbol 10 SWING Display 14 Displays when the Swing function is selected. 11 X-Fan Display 1 Transmission Indicator Displays when the remote control transmits signals to the indoor unit.
First use 1 Ensure the unit is plugged in and power is available. Stop 2 Be sure the batteries are inserted correctly in the remote control (the lights on the remote control will be on). 1 3 Set the time with the Control buttons and confirm by pressing the Clock button. 4 Point the remote control at the indoor unit and press ON/OFF button to turn the unit on. ON/OFF Button Press this button again to turn the air conditioner off. The horizontal louvre returns to the closed position upon shut down.
Dehumidifying operation Fan operation The DEHUMIDIFY mode works based on the difference between the set temperature and the actual room temperature. The temperature is regulated while dehumidifying through repeatedly turning on/off of the COOLING operation on or off, or by turning the FAN only operation on or off. When you select the FAN operating mode the air conditioner will recirculate the indoor air. 1 ON/OFF Button Press this button to turn the air conditioner on.
Cooling and heating operation Setting the clock Start Ensure the unit is plugged in and power is available. The OPERATION indicator on the display panel of the indoor unit starts flashing. 1 ON/OFF Button Press this button to turn the air conditioner on. The temperature indicator on the indoor display unit lights up. 2 Mode Button Press to select to COOL or HEAT (where applicable). 3 Control Buttons Set the desired temperature (normally, set between 21ºC to 28ºC).
Timer settings Timer-On Operation Timer-Off Operation (Timer Stop Operation) 1 Press the TIMER-ON button. This function is recommended when you want the unit to be turned off automatically (e.g. bedtime). The air conditioner will automatically stop operating at the set time. will flash on the display of the remote control the very first time the Timer-ON operation is used. With all subsequent uses, the last set time will flash.
Economy (Eco) operation 6 Confirm the set time by pointing the remote control at the indoor unit and pressing the Timer-On button again. symbol will stay on the remote control display and the function is activated. Timer-Off Timer-On (On-Stop-Start operation) Press Eco button in COOL or HEAT (if applicable) mode, the air conditioner will automatically increase (in COOL mode) or decrease (in HEAT mode) 1ºC per hour for 2 hours.
How to use the indoor unit Additional options 1 Smart restart function The air conditioner automatically resumes the previous settings after a power failure. 2 Removable panel The front panel of indoor unit can be easily removed for cleaning and maintenance. 3 Self diagnosis and auto protection This air conditioner can detect malfunctions, showing the diagnosis on the display of the indoor unit with an error code. The air conditioner will change operation automatically for self-protection.
Emergency operation Operating Temperature When the remote control is lost or fails to operate, please use the manual switch on the indoor unit. The air conditioner will operate in AUTO mode and the temperature setting or fan speed cannot be changed.
Maintenance Cleaning the filters The following maintenance operations must be performed regularly. A clogged air filter reduces the cooling efficiency of this unit. Please clean the filter every month or more often if necessary.
4 The healthy air freshening filters (if applicable) like Active carbon filter / BIO filter / Vitamin C filter / Silver ion filter are fixed on the dust filter. General maintenance Remove the healthy air filters from the support frame of the dust filter. • Operate in FAN only mode for 3~4 hours to allow the unit to completely dry out. Clean the healthy air filters at least every three (3) months and replace every 6 months. • Switch off the unit and pull out the power plug.
Operating tips The following events may occur during normal operation. Noises coming from the air conditioner 1 • You may hear a low hissing sound when the compressor is running or has just stopped running. This is the sound of the refrigerant flowing or coming to a stop. • You also may hear a low “squeak” sound when the compressor is running or just stopped running. This is caused by heat expansion and cold contraction of the plastic parts in the unit when the temperature is changing.
Troubleshooting The air conditioner is not user serviceable. Incorrect repair may cause electric shock or fire. • Fuse blows frequently or circuit breaker often trips. • Water or other liquid is splashed into the unit. Please contact an authorised service centre for professional repair. • Water is leaking from the unit. • There is a harsh sound during operation. • Strong odours are emitted during operation. • Power cord and power plug are overheating. • Other abnormal situations.
Troubleshooting Please check the following prior to contacting your Electrolux Service Centre. Problem Cause The unit does not operate The unit does not operate if it is turned on immediately after it is turned off. This is to protect the unit compressor. Please wait for about 3 minutes before turning the unit on again. Odours are emitted Some odours may be emitted from the indoor unit. This is the result of room smells (such as furniture, tobacco, etc) which have been taken into the unit.
Notes Kelvinator Air Conditioning Notes 21
Notes 22 Notes Kelvinator Air Conditioning
Warranty FOR SALES IN AUSTRALIA AND NEW ZEALAND APPLIANCE: kELvINATOR SPLIT SYSTEM AIR CONDITIONER This document sets out the terms and conditions of the product warranties for Electrolux Appliances. It is an important document. Please keep it with your proof of purchase documents in a safe place for future reference should you require service for your Appliance. 1.
If you’d like further information about Kelvinator appliances, please visit your retailer, phone or email our Customer Care team or visit our website. telephone: 1300 363 640 fax: 1800 350 067 email: customercare@electrolux.com.au web: www.kelvinator.com.au Kelvinator. We are part of the Electrolux family. Share more of our thinking at www.electrolux.com.