Window Wall (Manual) Room Air Conditioner User Manual KWH16CMF Refrigerant R32
Congratulations Contents Congratulations and thank you for choosing our Manual Window Wall room air conditioner. We are sure you will find your new air conditioner a pleasure to use. Before you use the air conditioner, we recommend that you read through the entire user manual, which provides the description of the air conditioner and its functions.
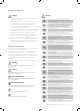
Safety precautions caution • Contact an authorised service technician for repair or maintenance of this unit. • Contact an authorised installer for installation of this unit. • This air conditioner is not intended for use by young children or infirm persons without supervision. • Young children should be supervised to ensure that they do not play with the air conditioner. • This air conditioner should be installed in accordance with AS/NZS 3000:2000 and your electricity suppliers rules.
Safety precautions caution Prior to Operation Preparing for operation 1 Contact an installation specialist for installation. 2 Plug in the power plug properly. 3 Do not use a damaged or non-standard power cord. 4 Do not share the same outlet with other appliances. Do not clean the air conditioner with water. Water may enter the unit and degrade the insulation. It may cause an electric shock. 5 Do not use an extension cord. Ventilate the room well when used together with a stove, etc.
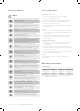
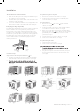
Unit parts ide 1 cation Air conditioning features Front panel The operation panel of your unit will look like the following: 2 Ai 3 Frame 4 Cabinet 5 Air inlet grille (outdoor side) 6 Air outlet grille 7 Operation knob 8 Power supply cord and plug lter NOTE: The outline of the operation panel is based on typical model, the function is the same with your air conditioner while some difference may exist in appearance.
Air conditioning features Note: When turning the SELECTOR knob from "LOW" to "HIGH", change as slowly as possible. Do not change the operation mode between "LOW", “MED”and "HIGH" too often. Adjusting the ai Horizontal ai ow direction ow adjustment For the units with AIR SWING feature (automatic): When the AIR SWING switch is turned to ON position, the vertical louvres automatically oscillate right and left sweeping the cold air around to obtain comfortable cooling.
Care and cleaning Vent control The vent control is located above the control knobs. For maximum cooling efficiency, CLOSE the vent. This will allow internal air circulation. OPEN the vent to discharge stale air. caution Clean your air conditioner occasionally to keep it looking new. Be sure to unplug the unit before cleaning to prevent shock or fire hazards. Air filter cleaning The air filter should be checked at least once a month to see if cleaning is necessary.
Spec cations Unit dimensions: Model (kW) < 1.
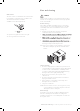
Installation The treatment of condensed water Step 2 Removing the front panel 1 1 Remove the screws from the frame. (see Fig.3) 2 Grasp the left corner in the frame's underside, then loosen the frame. (see Fig.4) Take out the drain pan and screws (provided within your air conditioner accessories bag) 2 Install the drain pan at the bottom of the unit and secure it with the screws provided.
Troubleshooting tips Before calling for service, review this list. It may save you time and money. This list includes common occurrences that are not the result of defective workman-ship or materials in this appliance. Problem Solution Wall plug disconnected. Push plug firmly into wall outlet. House fuse blown or circuit breaker tripped. Replace fuse with time delay type or reset circuit breaker.
Kelvinator Air Conditioning warranty 11
If you’d like further information about Kelvinator appliances, please visit your retailer, phone or email our Customer Care team or visit our website. telephone: 13 13 49 email: customercare@electrolux.com.au web: kelvinator.com.au Kelvinator. We are part of the Electrolux family. Share more of our thinking at www.electrolux.com.au P/No.