Window Wall (Electronic) Room Air Conditioner User Manual KWH20CRE, KWH20HRE, KWH26CRE KWH26HRE, KWH39CRE, KWH39HRE KWH53CRE, KWH53HRE, KWH62CRE KWH62HRE Refrigerant R32
Congratulations Contents Congratulations and thank you for choosing our Electric Window Wall room air conditioner. We are sure you will find your new air conditioner a pleasure to use. Before you use the air conditioner, we recommend that you read through the entire user manual, which provides the description of the air conditioner and its functions. Safety precautions......................................................................
Safety precautions caution • Contact an authorised service technician for repair or maintenance of this unit. • Contact a licensed installer for installation of this unit. • The air conditioner is not intended for use by young children or infirmed persons without supervision. • Young children should be supervised to ensure that they do not play with the air conditioner. • This air conditioner must be installed in accordance with AS/NZS 3000:2000 and your electricity suppliers rules.
Safety precautions caution Prior to Operation Preparing for operation 1 Contact an authorised installation specialist for installation. 2 Plug in the power plug properly. 3 Do not use a damaged or non-standard power cord. 4 Do not share the same outlet with other appliances. Do not clean the air conditioner with water. Water may enter the unit and degrade the insulation. It may cause an electric shock. 5 Do not use an extension cord. Ventilate the room well when used together with a stove, etc.
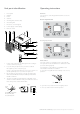
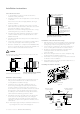
Unit parts identification Operating instructions 1 Front panel Controls 2 Air filter 3 Frame The electronic control keypad will look like one of the following: 4 Cabinet Reverse Cycle Models 5 Air inlet grille (outdoor side) 6 Air outlet grille 7 Electronic control keypad 8 Power supply cord and plug 9 Remote control S W IN P OWE R C OOL DR Y F AN 1 2 4 3 MOD F AN LOW AUT O F IL T E R T IME R Cooling only models 5 S W IN 6 P OWE R C OOL 7 DR Y F AN MOD F AN LOW A
Operating instructions Operating instructions Timer: Power: Press the "TIMER" keypad to activate the "auto start/auto stop" timer function. Press the POWER keypad to turn the unit on/off. (The TIMER keypad controls the auto start/stop feature of the unit.) Auto start/stop programs can be set from 1/2-12 hours. Each press of the "TIMER" keypad will increase the selected time in 1/2 hour increments. Mode: Dry: Press the "MODE" keypad to select the appropriate operating mode.
Operating instructions Sleep: Press and hold the "SWING" keypad for 2 seconds or use the remote control to activate the "SLEEP" feature . Press and hold the "SWING" keypad or use the remote control again for 2 seconds to deactivate the "SLEEP" feature. In the Cooling mode, the cooling temperature set point will increase 1OC per hour after the "SLEEP" mode is selected. Two hours later, the set point will continue at this temperature and the fan motor will remain on LOW speed.
Operating instructions Remote Control Operating Instructions: The hand held remote control unit operates within a range of 7 metres (23ft) from the receiver located inside the unit. Any obstruction between the receiver and the hand held remote may cause signal interference, limiting the ability to program the main unit. Each time a remote control button is pressed, a beep will sound indicating a command (signal) is transmitted and received on the unit.
Maintenance Air Filter The treatment of condensed water The air filter behind the inlet grille should be checked and cleaned at least once every 2 weeks (or as necessary) to maintain optimal performance of the air conditioner. 1 Take out the drain pan and screws (provided within your air conditioner accessories bag) 2 Install the drain pan at the bottom of the unit and secure it with the screws provided.
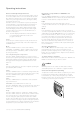
Installation instructions Note: unit may be support solid frame from be by a hanger from a overhead support. Note: unit may be supported by a solid frame from below or by a hanger from a solid overhead support. Select the best location Flash or seal around extern Wall frame or architrave Flash or or seal seal around around external flash external Wallframe frame of or architrave architrave wall 1 To avoid vibration and noise, make sure the unit is installed securely and firmly.
Installation instructions Installation Steps 4 Step 1. Remove the front panel and the air filter Reinstall the chassis fixing bracket removed earlier (See Fig.5). 1 Hold the slot under the front panel, then lift it up and outwards, and remove the front panel (See Fig.1). 2 Pinch the handle under the air filter, bend the filter gently and remove it from the slots (See Fig.2). Fig. 7 Install the frame. Fig. 1 Fig. 2 1 Install the frame making sure not to jam the power supply cable (See Fig.8).
Troubleshooting Troubleshooting Tips Save time and money! Review the chart below first and you may not need to call for service. Normal operation • You may hear a pinging noise caused by water being picked up and thrown against the condenser on rainy days or when the humidity is high. This design feature helps remove moisture and improve efficiency. • You may hear the thermostat click when the compressor cycles on and off. • Water will collect in the base pan during high humidity or on rainy days.
Notes Kelvinator Air Conditioning Specifications 13
Notes 14 notes Kelvinator Air Conditioning
Warranty FOR SALES IN AUSTRALIA APPLIANCE: KELVINATOR WINDOW WALL AIR CONDITIONER This document sets out the terms and conditions of the product warranties for Electrolux Appliances. It is an important document. Please keep it with your proof of purchase documents in a safe place for future reference should you require service for your Appliance. 1.
If you’d like further information about Kelvinator appliances, please visit your retailer, phone or email our Customer Care team or visit our website. telephone: 1300 363 640 fax: 1800 350 067 email: customercare@electrolux.com.au web: www.kelvinator.com.au Kelvinator. We are part of the Electrolux family. Share more of our thinking at www.electrolux.com.au P/No.