VLM for VMware ESX, ESXi and vSphere Installation Guide Virtual LoadMaster for VMware ESX, ESXi using vSphere Installation Guide VERSION: 1.18 UPDATED: AUGUST 2014 Copyright © 2002 - 2014 KEMP Technologies, Inc. All Rights Reserved.
VLM for VMware ESX, ESXi and vSphere Installation Guide Copyright Notices Copyright © 2002-2014 KEMP Technologies, Inc.. All rights reserved.. KEMP Technologies and the KEMP Technologies logo are registered trademarks of KEMP Technologies, Inc.. KEMP Technologies, Inc. reserves all ownership rights for the LoadMaster product line including software and documentation. The use of the LoadMaster Exchange appliance is subject to the license agreement.
VLM for VMware ESX, ESXi and vSphere Installation Guide Redistribution and use in source and binary forms are permitted provided that the above copyright notice and this paragraph are duplicated in all such forms and that any documentation, advertising materials, and other materials related to such distribution and use acknowledge that the software was developed by the University of California, Berkeley.
VLM for VMware ESX, ESXi and vSphere Installation Guide Table of Contents 1 Introduction .................................................................................................................................... 5 2 Best Practices .................................................................................................................................. 6 3 Installing Virtual LoadMaster (VLM) using vSphere ........................................................................
VLM for VMware ESX, ESXi and vSphere Installation Guide 1 Introduction The KEMP Virtual LoadMaster is a version of the KEMP LoadMaster that runs as a virtual machine within a hypervisor and can provide all the features and functions of a hardware-based LoadMaster. This document describes the installation of the Virtual LoadMaster (VLM) within a VMware ESX or ESXi hypervisor environment. Figure 1-1: VMware Ready The Virtual LoadMaster is VMware ready. The VLM is has been tested with VMware ESX 4.0, 4.
VLM for VMware ESX, ESXi and vSphere Installation Guide 2 Best Practices Some best practices to be aware of before deploying a LoadMaster on VMware are below: Configure a load balancing port group for the relevant VLAN to avoid port flooding Use the E1000 network adapter type when deploying the VLM Figure 2-1: Security Tab The Security Policy Forged Transmit on the Portgroup should be set to Accept.
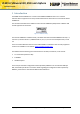
VLM for VMware ESX, ESXi and vSphere Installation Guide 3 Installing Virtual LoadMaster (VLM) using vSphere The following instructions describe how to install a Virtual LoadMaster on a VMware ESXi environment using the VMware vSphere client. Download the OVF File The VLM is packaged with an .ovf file for ease of deployment. This file can be freely downloaded from KEMP Technologies for a 30 day evaluation period. To download the VLM please follow the following instructions. 1. Log on to http://www.
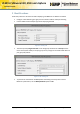
VLM for VMware ESX, ESXi and vSphere Installation Guide Figure 3-1: Source 5. Click the Next button. 6. Within the OVF Template Details screen, ensure that all the details regarding the VLM are correct. Figure 3-2: OVF Template Details 7. Click the Next button. 8. Within the End User License Agreement screen, read the KEMP Technologies SOFTWARE LICENSE AGREEMENT. Copyright © 2002 - 2014 KEMP Technologies, Inc. All Rights Reserved.
VLM for VMware ESX, ESXi and vSphere Installation Guide Figure 3-3: End-User License Agreement 9. If you wish to continue with the installation you must accept the end-user license agreement by clicking the Accept button. 10. When the Accept button has been clicked the Next button will become available. 11. Click the Next button. 12. In the Name and Location field, enter a name for the VLM into the Name field. The name can be up to 80 characters long. It should be unique within the virtual machine folder.
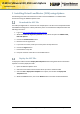
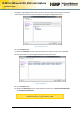
VLM for VMware ESX, ESXi and vSphere Installation Guide This page is only displayed if the cluster contains a resource pool and if you hadn’t selected a resource pool within the inventory tree before initiating the deployment wizard. Figure 3-5: Resource Pool 16. Click the Next button 17. Within the Datastore screen, select the datastore in which you wish to store the VLM. You may only select from preconfigured datastores within this screen. Figure 3-6: Datastore 18. Click the Next button. 19.
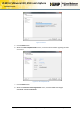
VLM for VMware ESX, ESXi and vSphere Installation Guide Figure 3-7: Disk Format 20. Click the Next button. 21. Within the Network Mapping screen, select which networks in the inventory should be used for the VLM. Select the network mapping for Network and Farm by right-clicking the Destination Network column and choosing the relevant preconfigured network from the drop-down list. Figure 3-8: Network Mapping 22. Click the Next button. 23.
VLM for VMware ESX, ESXi and vSphere Installation Guide Figure 3-9: Ready to Complete 24. Click the Finish button. Once the Finish button is clicked, the VLM is deployed. Check the Network Adapter Settings Before starting the VLM we must first verify that the network adapters are configured correctly. 1. Select the deployed VLM within the inventory tree. 2. Select the Inventory > Virtual Machine > Edit Settings menu option. 3. Ensure that the network adaptors are configured correctly as follows a.
VLM for VMware ESX, ESXi and vSphere Installation Guide Figure 3-10: Edit Settings If the network adapters are not configured correctly or if they have not been setup you can add a new network adapter by clicking the Add button. Power On the LoadMaster To power on the Virtual LoadMaster, follow the steps below: 1. In the left panel of the client, select the LoadMaster Virtual Machine. Copyright © 2002 - 2014 KEMP Technologies, Inc. All Rights Reserved.
VLM for VMware ESX, ESXi and vSphere Installation Guide Figure 3-11: Power On 2. Click the Power on the virtual machine link. 3. Select the Console tab and wait for the Virtual Machine to finish booting. Figure 3-12: IP address 4. When the Virtual Machine finishes booting, a screen similar to the one above appears which will show the IP address. Take note of this as you will need it to access the LoadMaster Web User Interface (WUI). Copyright © 2002 - 2014 KEMP Technologies, Inc. All Rights Reserved.
VLM for VMware ESX, ESXi and vSphere Installation Guide To change the IP address via the console view, follow the steps in Section 4.1. Licensing and Configuration You must now configure the LoadMaster to operate within your network configuration. 1. In your internet browser enter the IP address previously noted, ensure you place ’https://’ before the IP address. 2. You may get a warning regarding website security certificates. Please click on the continue/ignore option. 3.
VLM for VMware ESX, ESXi and vSphere Installation Guide Please use the following login credentials: lb100 login: bal Password: 1fourall 7. The Change Password screen appears 8. Enter a new password for the bal user in the Password input field and retype it in the Retype Password input field. 9. The login screen appears again, enter the bal user name and the new password as defined in the previous step. 10. In the screen informing you that the password has changed, press the Continue button 11.
VLM for VMware ESX, ESXi and vSphere Installation Guide Figure 3-14: Appliance Vitals 14. Click the System Configuration menu option. 15. Click the eth0 menu option within the Interfaces section. 16. In the Network Interface 0 screen, enter the IP address of the eth0 interface, the network facing interface of the LoadMaster, in the Interface Address input field. 17. Click the Set Address button 18. Click the eth1 menu option within the Interfaces section 19.
VLM for VMware ESX, ESXi and vSphere Installation Guide 25. In the DNS configuration screen, enter the IP address(es) of the DNS Server(s) which will be used to resolve names locally on the LoadMaster into the DNS NameServer input field. 26. Click on the Add button. 27. Enter the domain name that is to be prepended to requests to the DNS nameserver into the DNS NameServer input field. 28. Click on the Add button. 29. Click on the Route Management > Default Gateway menu option. 30.
VLM for VMware ESX, ESXi and vSphere Installation Guide 4 Troubleshooting 4.1 Cannot access the Web User Interface If a connection to the WUI cannot be established, network settings can be configured via the console view. 1. Login into the VLM via the console using the settings: lb100 login: bal Password: 1fourall Figure 4-1: Enter IP address 2.
VLM for VMware ESX, ESXi and vSphere Installation Guide Figure 4-3: Nameserver IP addresses 4. Enter a space-separated list of nameserver IP addresses. 5. A message will appear asking to continue licensing via the WUI. Try to access the IP address via a web browser. Ensure to enter https:// before the IP address. 6. Contact the local KEMP Customer Services Representative for further support if needed.
VLM for VMware ESX, ESXi and vSphere Installation Guide References Unless otherwise specified, the below documents can be found at http://www.kemptechnologies.com/documentation. VMware Tools Add-On Package, Feature Description Licensing, Feature Description Copyright © 2002 - 2014 KEMP Technologies, Inc. All Rights Reserved.
VLM for VMware ESX, ESXi and vSphere Installation Guide Document History Date Change Reason for Change Ver Resp Jun 2012 Initial draft of the document Initial draft of the document 1.0 DD Oct 2012 Added not re VMware Tools Note required 1.1 DD Nov 2012 Updates made EULA screen update 1.2 DD Nov 2012 Updates Made Introduction of VLM-DE product 1.3 DD Jan 2013 Minor Updates made As per 6.0-42 updates 1.4 DD May 2013 Updates made As per 7.0-4 updates 1.