
Manual

Copyright 2004 Kendall Howard LLC All Rights Reserved
2 Post to 4 Post Conversion Add On Kit
And Wall Mount Extensions
Installation Instructions
Step 1
Remove all contents from the box
and make sure all of the following
parts are accounted for.
Box Contents
2 Center Arms
2 Left Arms
2 Right Arms
4 1/4 X 20 Bolts
4 1/4 X 20 Nuts
8 Washers
1 Instruction Sheet
Tools Required
2 ½” wrench or sockets
(You will also need mounting hardware
specific to your rack or wall mount
application)
Step 2
Assemble each of the 2 arm assemblies as shown. Be sure the center
arm is centered on the left and right arms so the weight of the rack will
be evenly distributed. In the example at the right, there are 3 holes on
the left and 3 holes on the right of the center arm. A general rule of
thumb: The longer you make the arm assembly, the less strength your
rack will have overall. Extending the arm to its last possible position may
result in your rack becoming unstable. This is also greatly dependent on
the type of 2-post racks you are using. For example, a steel railed rack
will be much more stable than an aluminum railed rack.
Step 3 (For wall mount applications skip to the
next step)
Mount one arm at a time to each rack using the correct
screws for your rack type, placing them at the upper
corners. If this kit is being used in addition to the 4 piece
kit, mount the conversion arms in the center of the rack
or the mid position.
For most installations, 3 screws per arm will be
sufficient. The more screws that you use to mount the
arms to your 2-post racks, the stronger the overall rack
will be. Each arm allows for 8 screws per side.
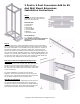
Wall Mount Installation
For wall mount application, install the arms as shown to
the right and attach the opposite end to the wall. We
recommend using a piece of plywood or similar material
to attach the arms too. Then attach the plywood to the
wall using anchor bolts directly into the wall studs.