KENDALL HOWARD Corner Unit Assembly and Maintenance Manual Workbenches LAN Stations And Accessories
Your New Performance Workstation Congratulations on your new Kendall Howard Performance LAN Station Workbench. This manual will step you through the assembly process. If you have trouble, please feel free to call our customer service department from 8:30 AM to 5:30 PM CST. Step 1. Inventory Please be sure that you unpack the crate completely and take a complete inventory of what you have received. This will save you much time if parts are missing and you have to stop in the middle of the build process.
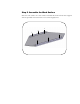
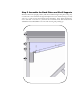
Step 2. Assemble the Work Surface Place the work surface on a clean surface and install the front and rear table supports with the provided cross head screws. Leave screws slightly loose.
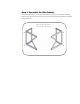
Step 3. Assemble the Side Frames Attach the left frame to the left sub frame with (2) 3/8X1.5 cap head bolts and fully tighten bolts.
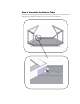
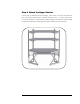
Step 4. Assemble the Bottom Table With the table top laying down with the bolt holes and sub frame up, attach the left and right leg assemblies using the (4) 3/8 X 1.5” and 4 channel nuts.
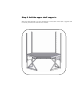
Step 5. Assemble the Back Plates and Shelf Supports With the table in the upright position, add the left and then right back plates using only out side bolts. Once both left and right back plates have been attached using 4 (2 each) 3/8 X 2 ½” bolts you may then add the center back plate. Next, add 8 channel nuts, one to each bolt. Leave about ¼” between the nut and the frame. DO NOT FULLY TIGHTEN AT THIS TIME. Leave nuts with the long side pointing up.
Step 6. Add the upper shelf supports Place the shelf channels over the channel nuts on the back of the table. Tighten each nut slowly until the nut turns into the channel.
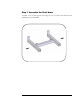
Step 7. Assemble the Shelf Arms Assemble 4 sets of shelf support arms using the 3/8 X 1.5 bolts. DO NOT FULLY TIGHTEN AT THIS TIME.
Step 8. Assemble the upper shelves With the upper shelves upside down, add the shelf support arms using the cross head screws provided.
Step 9. Attach the Upper Shelves For this step you will need at least one helper. Add a 3/8 X 1.5” bolt to each shelf arm hole. Next, add a channel nut to each bolt leaving at least ¼” of space between the nut and the shelf arm. Carefully lift the shelf placing the nut inside the channel. With the provided T-Handle wrench, tighten the bolts until the nut turns into place.
Step 10. Add the Plastic End Caps Insert the plastic end ¾” round caps into the left and right side frames as well as the upper shelf supports.
Maintaining Your New Workbench Your new Kendall Howard Performance Workbench is constructed with some of the highest quality materials available today. To keep your Workbench looking new, we recommend cleaning it regularly damp cloth using a mild soap and water solution. • Do not use abrasive cleaners. • Keep work surface away from petroleum products • Keep away from open flames. Shelving is constructed from a wood product and is not fire proof.
Limited Warranty General: Under certain circumstances we offer with our products the following One Year Warranty Against Defects in Material and Workmanship. Please read your Warranty carefully. This Warranty sets forth our responsibilities in the unlikely event of defect and tells you how to obtain performance under this Warranty.
Warranty Performance of Component Manufacturers: It is Kendall Howard’s practice, consistent with its desire to remedy Warranty defects in the most prompt and effective manner possible, to cooperate with and utilize the services of component manufacturers and their authorized representatives in the performance of work to correct defects in the Kendall Howard components.