E L ! T E Three-Speed Automatic Washers Lavadoras autom&ticas con tres velocidades Laveuses automatiques trois vitesses 8530461B Sears Roebuck and Co., Hoffman Estates, IL 60179 U.S.A. Sears Canada, Inc., Toronto, Ontario, Canada M5B 2B8 www.sears.com www.sears.
TABLE OF CONTENTS PROTECTION AGREEMENTS ....................................................... in the U.S.A ................................................................................... in Canada ..................................................................................... WARRANTY ..................................................................................... 2 2 3 3 WASHER SAFETY ...........................................................................
Limited 2-Year Warranty Control Board Maintenance Agreements Your purchase has added value because you can depend on Sears HomeCentraf _for service. With over 2,400 Service Technicians and access to over 900,000 parts and accessories, we have the tools, parts, knowledge and skills to back our pledge: We Service What We Sell. Your Kenmore ®appliance is designed, manufactured and tested to provide years of dependable operation. Yet any major appliance may require service from time to time.
WASHER SAFETY Your safety and the safety of others are very important. We have provided many important safety messages in this manual and on your appliance. Always read and obey all safety messages. This symbol alerts you to potential hazards that can kill or hurt you and others. l_ Allhissafety follow the safety alert symbol and either the word "DANGER" or is themessages safety alertwillsymbol. "WARNING.
Alternate INSTALLATION REQUIREMENTS Assemble the necessary tools and supplies before beginning the washer installation. The parts supplied are in the washer basket. Tools needed for connecting the drain hose and water inlet hoses: • Pliers that open to 19/16in. (3.95 cm) • Parts Parts listed are available from your local Sears store or Sears Service Center. For further information, please call 1-800-4-MYHOME ® (1-800-469-4663}.
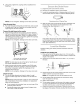
Recessed area or closet installation The dimensions shown are for the recommended spacing allowed, except the closet door ventilation openings. The dimensions shown for the closet door ventilation openings are the minimum required. The top of the standpipe must be at least 39 in. (99 cm) high and no higher than 96 in. (244 cm) from the bottom of the washer. olo 1. Front view 2. Side view 3. Closet door with vents • Additional spacing should be considered for ease of installation and servicing.
• To minimize possible shock hazard, the cord must be plugged into a mating, 3 prong, ground-type outlet, grounded in accordance with local codes and ordinances. If a mating outlet is not available, it is the personal responsibility and obligation of the customer to have the properly grounded outlet installed by a qualified electrician. • If codes permit and a separate ground wire is used, it is recommended that a qualified electrician determine that the ground path is adequate.
Youwillusetheremainder oftheshipping straplaterto secure thedrainhose. .......... ....... For standpipe or laundry tub drain systems: 1. Open yellow, single-wire clamp with pliers and slide over hooked end of drain hose to secure the rubber and corrugated sections together. 4ose Proper connection of the drain hose will protect your floors from damage due to water leakage. To prevent the drain hose from coming off or leaking, it must be installed per the following instructions.
4. Using pliers, tighten the couplings with an additional twothirds turn. NOTE: Do not overtighten. Drape the power cord over the console. 2. Remove any cardboard used to move washer. 3. Locate the remaining portion of shipping strap (not the end with the cotter pins) from step 3 of "Remove Shipping Strap." Remaining portion of Shipping Strap Damage to the valves can result. 4. Clear the water lines 5. 1.
8. Ifthewasher isnotlevel,movethewasher outslightly, tip back,propupthefrontofthewasher withthewoodblock andadjustthefeetupordownasnecessary. Repeat steps 5through 8 untilwasher islevel. BENEFITS Your new washer has many special features that contribute to proper cleaning and fabric care. Here are descriptions of the features and their benefits: 9. Afterthewasher isinthefinallocation andlevel,usea%ein. (14mm)open-end wrench toturnthenutsonthefeettightly against thewasher cabinet.
WASHER USE F_ WA]ER LEVEL ULTRACLEAN • 2. To reduce wrinkling of permanent press clothes and some synthetic knits, use the Large Load setting to provide more space (see step 5). (OPTIONAL STEP) Pour measured liquid chlorine bleach into the liquid chlorine bleach dispenser. Bleach will be dispensed automatically during the wash part of the cycle.
• You may change to a higher level setting after the washer has started filling by turning the knob to a different setting. This section describes the wash/spin speeds you can select with the Speeds control. Each speed setting is designed for different types of fabric and soil levels. 6. Set the Water Temperature selector to the correct setting for the type of fabric and soils being washed. Use the warmest water safe for fabric. Follow garment label instructions.
2ND RINSE ULTRA CLEAN 5UM_ o PERMANENT PRESS II ' SHORT When the Cycle Control knob is set to a number and pulled out, the washer fills (to the selected load size) before agitation and timing start. The washer begins agitating immediately after filling; agitation occurs with the washer lid up or down. During agitation, the agitator creates a continuous rollover action that provides a thorough cleaning of the wash load.
LAUNDRY TIPS Preparing clothes for washing Follow these recommendations to help you prolong the life of your garments. • Close zippers, snaps, and hooks to avoid snagging other items. Remove pins, buckles, and other hard objects to avoid scratching the washer interior. Remove non-washable trim and ornaments. • Empty pockets and turn them inside-out. • Turn down cuffs; brush away lint and dirL • Turn synthetic knits inside-out • Tie strings and sashes so they will not tangle.
Install and store your washer where it will not freeze. Because some water may stay in the hoses, freezing can damage your washer. If storing or moving your washer during freezing weather, winterize it. Non-use or vacation TROUBLESHOOTING First try the solutions suggested here and possibly avoid the cost of a service call... care: Washer won't fill, rinse or wash Operate your washer only when you are at home.
Washer won't drain or spin Washer Is the drain hose clogged, or the end of the drain hose more than 96 in. (244 cm) above the floor? See "Installation Instructions" for proper installation of drain hose. Check the following: Are the fill hoses tight? Are the fill hose washers properly seated? Is the drain hose clamp properly installed? (See "Installation Instructions.") Is the lid open? The lid must be closed during operation.
• Was paper or tissue left in pockets? • Didyou use enough detergent? Follow manufacturer's directions. Use enough detergent to hold the lint in the water. • Is your water colder than 70°F (21°0)? Wash water colder than 70°F (21°C) may not completely dissolve the detergent. • Are you using a gentle wash cycle? Consider using liquid detergent for slow speed cycles such as Handwash, Casual or Delicate.
Your Home For repair-in your home-of all major brand appliances, lawn and garden equipment, or heating and cooling systems, no matter who made it, no matter who sold it! For the replacement parts, accessories and owner's manuals that you need to do-it-yourself. For Sears professional installationof home appliances and items like garage door openers and water heaters. 1-800-4-MY-HOME ® (1-8o0-4sg.4ss3) Call anytime, day or night (U.S.A. and Canada) www.sears.com www.sears.