
Manual
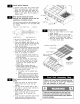


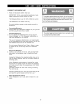

H Install Ignitor Batteries
[] Unscrew ignitor Caps from Control Panel.
[] Place one supplied AA battery into each
ignitor Slot with positive pole facing you.
[] Position the Cap and Spring over the AA
battery in each ignitor Slot and tighten to
Control Panel.
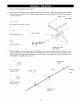
Main Burners Electrode Check
Perform this Electrode Check with the
assistance of another person.
This test will ensure that the Spark Electrode Tips
are properly positioned so your grill lights easily
and properly.
Spark Gap Gas Collector Box Inside Nut
AA Battery
Ignitor Cap
Ignitor Slot _¢
Spark Receiver Spark Electrode Tip
[] Be sure all Control Knobs are set to
"OFF" and open the Grill Lid.
[] Have your assistant stand behind to the
right of the grill and look toward the front
of the grill bowl. Never put your face
inside the Grill Bowl.
[] Turn any Control Knob of Main Burners to IGN
and push in and have assistant watch for a
blue spark within each Gas Collector Box.
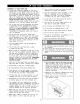
[] If no spark is seen, the Spark Gap
needs to be adjusted as follows:
• Using an adjustable wrench, loosen the
Inside Nut until the Gas Collector Box can
be turned upward.
• If the gap between the Spark Elec-
trode Tip and Receiver is more than
3/16" use long nose pliers to gently
squeeze the Gas Collector Box to
narrow gap.
• Return the Gas Collector Box to its
original position, secure the Inside Nut
and try the Electrode Check again. If no
"clicking" sound is heard:
• AA Battery may be installed back-
wards.
• Electric wires may be loose. Remove
the AA Battery and inspect the ignitor
Junction Box found behind the Control
Panel and reconnect any loose wires.
Side Burner and Back Burner Electrode
Check
[] Open side burner lid. Remove plastic
shipping band from burner and pot
support.
[] Turn side burner Control Knob to IGN
and push in. Look for spark between tip
of electrode and burner.
[] Open Grill Lid. Turn back burner Control
Knob to IGN and push in. Look for
spark between tip of electrode and
burner.
[] if you don't see a spark from side or back
burner electrode, adjust gap between
electrode and burner surface to 3/16 in.
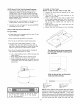
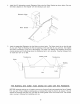
Install Cooking Components
[] Place the Savor Plates ® on lower ledge
above Burners.
[] Place Cooking Grids on bowl ledge.
[] Place the Secondary Cooking Rack into
the slots on Grill Bowl Side Panels.
[] Place the infrared Burner Cooking Grid
on infrared Burner Body.
Secondary Cooking Rack
Cooking Grids
Savor
Slots for Secondar
Cooking
Infrared Burner
Cooking Grid
When you have finished assembling your
grill be sure that all screws are tightened
for safe operation of your grill.
Failure to read and follow the Use and Care
Instructions could result in a fire or explosion
that could cause serious bodily injury, death or
property damage.
11