OPERATOR'S MANUAL L I ® Liquid Propane Gas (LPG) Grill Natural Gas (NG) Grill Model 141.17686 Model 141.16686 Model 141.17692 • Safety • Assembly • Use and Care • Cooking Guide • Frequently Asked Questions Call us first if you have any problem with this product. We can help you with questions about assembly and grill operation or if there are damaged or missing parts when you unpack this unit from the shipping box. Please call before returning to the store.
Primary Safety Warnings ........................... 1-3 Warranty Terms and Conditions .................. 2 Pre-Assembly Instructions .............................. 3 Part Diagrams and Lists .......................... 4-9 Assembly Instructions .............................. 10-14 LP Gas Tank Installation ...................... 15-17 Natural Gas Connection .............................. 18 Use & Care Instructions: • Lighting Instructions ................................. 19 • Troubleshooting .................
Failure to comply with these instructions result in a hazardous situation which, avoided, may result in injury, Spiders and small nest in the grill warehousing obstruction Burner T_ can cau_ unsafe insects can may if not For safe operation ensure the Gas Valve Assembly Orifice is inside the Burner Tube before using your grill. See figure.
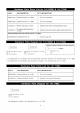
PART # DESCRIPTION P06001019A Hardware Packfor141.16686 1 For use in assembly P06001020A Hardware Packfor141.17686 1 For use in assembly $122G04121 Phillips Head Screw 1/4"x3/4" Counters nk F at Head .... 11/4 X,..1//4 $142G04121 4 Attaches Side Shelf 4 Attaches CartSide Secures Gas Tank to Left Outside Bowl Panel Screw Handle to RightOutside Bowl Panel Already installed in the Tank Pull-Out Tray for 141.
1i 17 16<> 25 18 19 24 26 39 27 A14 28 15 16 32 31 37 5_ 61 6563 48 \ 49 48 47 62 51 -52
5 7 6 11 9\ 17 3029 B6 B5 13 25 B4 20 23 18 19 24 26 12 21 22 AI 27 28 (?5 15 16 32 31 C1 C7 B7 70 / 69 C2
PIN 16686 17686 P/N 17692 i 1 Lid P0011903AA P0011903AA i 8 P01518001B P01518001B DESCRIPTION Cooking Rack/Secondary QTY ii1668617686i 1 1 iii QTY 17692 1
DESCRIPTION P/N P/N 16686 17686 17692 QTY 16686 17686 36 Cart Bracket, Front P03302007C 1 37 Cart Rear Panel (LPG only) P07701040A 1 .... 40 Cart ...........................................................................................................................................................
P/N DESCRIPTION 16686 17686 P/N QTY 17692 QTY 16686 17686 17692 A4 Infrared Burner Body P02301012B P02301012B 1 1 A9 Infrared Burner Thermocouple P05305002A P05305002A 1 1 P06906007C At3 Infrared Burner Wind Shield (LPG only) 1 B2 Back Burner Extension Tube P03717033A P03717033A 1 1 B4 Back Burner Gas Collector Box P02621001K P02621001K 1 1 B6 Back Burner Electrode P02614004C P02614004C 1 1 B7iilconiioi Knob _i BackBuinei iil¸ P034i9663H ¸¸¸i¸ii P034i9663H ¸¸¸i¸! i¸ i
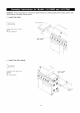
CAUTION " While it is possible for one person to assemble this grill, obtain assistance from another person when handling some of the larger, heavier pieces. [] Install Side Shelf LEFT Phillips Head Screw Qty. 4 Ref. # $122G04121 [] SiDE SHELF 1/4"x3/4" LEFT OUTSIDE BOWL PANEL Install Cart Side Handle Countersink Flat Head Screw 1/4"x3t4" Qty.
CAUTION : While it is possible for one person to assemble handling some of the larger, heavier pieces. [] Installing Trim this grill, obtain assistance from another person when Panels 1. Remove the screws from B, C and D position of your grill. 2. Enlisting the aid of an assistant, attach Left Trim Panel to left side of grill. Align the 4 holes on Left Trim Panel with the 4 threaded holes on left side of grill. Tighten securely using screws of $122G04121. 3.
PLEASE READ THESE INSTRUCTIONS BEFORE CONSTRUCTING YOUR GRILL ENCLOSURE During unpacking, assembly and construction stages always wear work gloves and eye protection. CAUTION: When choosing a location for your gas grill, keep in mind that it should not be located under any overhead combustible construction. The side, bottom and back of the grill should not be closer than 36 inches to combustible construction.
Ignitor Install [] [] [] Batteries Unscrew Ignitor Caps from Control Panel. Place one supplied AA battery into each ignitor Slot with positive pole facing you. Position the Cap and Spring over the AA battery in each Ignitor Slot and tighten to Control Panel. AA Battery ignitor Slot ring Main Burners Perform this assistance Electrode Electrode of another Check Check AA Battery with Ignitor Cap the person.
H Fuel Gauge Instruction for Model 141.16686 Figure a DISPLAY BOX FOR LPG GRILLS ONLY FUEL Battery Installation/Replacement: GAUGE DISPLAY COVER 1. Remove the Grease Tray from the grill. 2. Reach behind the Control Panel and unscrew WIRE the Battery Cover behind the Display Box. 9V BATTERY 3. Pull out the Battery with electric wire from the Battery Compartment. 4. Replace the used Battery with the new one. BATTERYCONNBCTOR 5.
CORRECT [] [] LP GAS TANK USE [] Use of alcohol assemble and [] high is the maximum size LP Gas tank to use. You must use an "OPD" gas tank which offers a listed Overfill Prevention Device. This safety feature prevents tank from being overfilled which can cause Keep fire extinguisher readily accessible. event of a oil/grease fire, do not attempt guish with water. Use type B extinguisher smother with dirt, sand or baking soda.
NOTE • about LP Gas Tank Exchange Programs Many retailers that sell grills offer you the option of replacing your empty LP Gas tank through an exchange service. Use only those reputable exchange companies that inspect, precision fill, test and certify their tanks. Exchange your tank only for an OPD safety feature-equipped section of this tank as described manual. • Always upright • Leak test new and exchanged connecting one to your grill.
Check all connections for LP Disconnecting A Liquid Propane Tank From Your Grill Gas Never test for leaks with a flame. Prior to first use, at the beginning of each season, or every time your LP Gas tank is changed, you must check for gas leaks. Follow these three steps: [] [] [] Make a soap solution by mixing detergent and one part water. [] Turn the grill Control Knobs to the full OFF position, then turn the gas ON at source.
Natural Gas Model only: Connecting Natural Gas To Your [] Check Grill Never Connect the Swivel nut of the 12' Natural Gas Hose to the vertical fitting of NG Regulator as shown in Fig. 1. Connect the other hose end (male plug) to the gas supply line from house. Also, read and follow all natural gas safety instructions below. Figure 1 _ all connections test for leaks for NG Leaks with a flame. Prior to first at the beginning of each season, you must gas leaks.
Lighting Grill Back Burner Lighting Instructions Instructions 1. Follow steps instructions. 1. Before each use, check all hoses for cracks, nicks, cuts, burns or abrasions. If a hose is damaged in any way, do not use your grill before replacing the hose with an authorized part from the Parts List. Also make sure all gas supply connections are securely tightened. 2. Familiarize yourself with the safety and Use and Care instructions in this manual. Do not smoke while 3. 4. 5. 2.
Troubleshooting If the grill fails To purge air the regulator to light : 1. Turn gas off at source and turn Control Knobs to OFF. Wait at least 5 minutes for gas to clear, then retry. 2. 3. if your grill still fails and connections. to light, gas supply Repeat lighting procedure.
10. Replace [] [] Annual [] Grids Savor Plates The the Inside of the Cleaning TM Grill of The Grill Turn all Burner 2. Turn the LP gas tank valve to the full OFF For Natural Gas shut off valve. 3. Disconnect the regulator from the gas tank. Inspect the hose with regulator assembly for cracking, cuts or any other damage, and replace as neccessary. Refer to the Parts List in this Operator's Manual. 5. Cover 6.
Toreduce thechance ofFLASHBACK FIREyoumust cleantheBurner Tubesasfollowsatleastoncea month insummer andfallor whenever spiders areactiveinyour area,andif yourgrillhasnotbeenusedforanextended periodoftime. 1. TurnallBurner Valves tothefullOFFposition. 2. TurntheLPGastankvalve tothefullOFFposition. ForNatural GasshutoffNGvalve. 3. Detach theLPGasregulator assembly fromyour gasgrill.ForNatural Gasdetach NGregulator from yourgrill. 4. Remove theCooking Grids,SavorPlates and Regardless 1. Trays from your 2.
Burn-Off [] Indirect Before should foreign cooking on your gas grill for the first time, you "burn off" the grill to eliminate any odor or matter, ignite the main burners, lower the Lid, [] andoperate grill on HIGH setting for 3 to 5 minutes. The Lid must be open if the infra-red burner is lit. CAUTION: Operating your grill on the HIGH setting for longer than five minutes may damage certain parts of your grill.
Grilling Steak and Ribs Turn the grill Burners on HIGH, close the Lid and preheat your grill 3 to 5 minutes. Open Lid and place the meat on the Cooking Grid directly above the lit Burners. Cook the meat on both sides until seared. Reduce the heat to MEDIUM according and cook meat until done. to meat thickness.
Important notes about using the Infra-red Burner Once lit, leave the Infra-red Burner on High and sear both sides of meat using the guidelines below. Whether you are a seasoned chef or a newcomer to gas grilling, infra-red cooking is quite different than grilling over a traditional burner.
An Important Note About Heat Settings Food The suggested heat settings shown are approximate. There are many factors such as outside temperature, wind conditions and grill location that affect your grill performance. We offer these cooking times as a convenience, but suggest you watch the temperature gauge and adjust the heat accordingly. Preparing preparation Trim meat of excess fat. Truss meat and poultry with cooking string to retain shape if desired.
Slow Cooking with a Rotisserie Preparing A Rotisserie Kit is made to fit your grill model. Rotisserie cooking produces foods that are moist, flavorful and attractive. The optional rotisserie system is most commonly used for cooking meat or poultry and is designed to cook food slowly. You can place a cooking pan beneath the food to collect juices for basting and gravy. To flavor the contents of the cooking pan you may add herbs, onions, or other spices of your choice.
A Rotisserie Kit is made to fit your grill model. Rotisserie cooking produces foods that are moist and flavorful because the slowly rotated food self-bastes to seal in meat's natural juices. The Rotisserie Kit can be used to slow cook foods using the indirect cooking method or an infrared back burner, a feature available on select models. Anything you enjoy cooking indoors can be prepared outdoors optional accessories as well.
Question: Sometimes I hear a humming sound coming from my regulator. What causes this? And - My grill has a low flame and sometimes will not light, Why? Question: Can I convert my.qrillfrom onefuet typeto another in other words fr0m-LFGto NGor vice Yersa? An_: No, your gas grill is manufactured to exact specifications and is certified for LPG (Liquid Propane Gas) or NG (Natural Gas) use only.
Question: What causes grill parts to rust and what affect does it have on my grill? Question: The Regulator and Hose supplied with my gas grill does not fit the older LP Gas tank I've used for years. Why not? Answer: Answer: Rusting is a natural oxidation process and may appear on cast-iron and steel parts. Rust will not affect the short term performance of your grill. The U.S. Government regulates gas appliances and LP Gas tanks.
Your Home For repair-in your home-of aH major brand app!ian_s lawn and garden equipment or heating and cooing systems no matter who made it, no matter who sold lfl For me owners rep acement pads a_essodes and manuab that you need to dooit°yeurse/f For Sears p_ofessional ins_a_atioe ef home applian_s and items _ike garage doer openers and water heate_ Cali anyt m® day o s_ght (US,A, _sea_ corn Our asd Canada} www_sears ca Home For repair of car_oin items like vacuums, lawn equipment and ebctronics