E L I T E ® Side by Side Refrigerator Use & Care Guide Lado a Lado Refrigerador Guia para su uso y cuidado Compartiments C6te _ C6te R_frig_rateur Guide d'utiiisation et d'entretien m Sears, Roebuck and Co., Hoffman Estates, iL 60179 U.S.A. Sears Canada, inc., Toronto, Ontario, Canada M5B 2B8 www.sears.
Welcome & Co n gratulations Congratulations on your purchase of a new refrigerator! We here at Sears are very proud of our product and we are completely committed to providing you with the best service possible. Your satisfaction is our #1 priority. We know you'll enjoy your new refrigerator and ThankYou for choosing our product. We hope you consider us for future purchases. PLEASE READ AND SAVE THESE INSTRUCTIONS This Owner's Guide provides specific operating instructions for your model.
KENMORE These Guidelines Safety Mechanism Properly. ELECTRICAL • Must Be FollowedToEnsuteThat s InThis RefrigeratorWill Operate INFORMATION The refrigerator must be plugged into its own dedicated 115 Volt, 60 Hz., AC only electric outlet. The power cord of the appliance is equipped with a three-prong grounding plug for your protection against electrical shock hazards. It must be plugged directly intoa properly grounded three-prong receptacle.
In the U.S.A. In Canada Master Protection Agreements Maintenance Congratulations on making a smart purchase. Your new Kenmore Elite ®product is designed and manufactured for years of dependable operation. But like all products, it may require preventive maintenance or repair from time to time. That's when having a Master Protection Agreement can save you money and aggravation. Your purchase has added value because you can depend on Sears HomeCentral ®for service.
This Owner's Guide provides specific operating instructions for your model. Use the refrigerator only as instructed in this Use & Care Manual. Before starting the refrigerator, follow these important first steps. LOCATION • Choose a place that is near a grounded electrical outlet. Do Not use an extension cord or an adapter plug. If possible, place the refrigerator out of direct sunlight and away from the range, dishwasher or other heat sources.
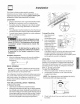
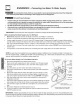
lftstEtilatiort - Connecting Ice Maker To Water Supply To avoid electric shock, which can cause death or severe personal injury, disconnect the refrigerator from electrical power before connecting a water supply line to the refrigerator. To Avoid Property Damage: - Copper tubing is recommended for the water supply line.Water supply tubing made of W' plastic is not recommended since it greatly increases the potential for water leaks.
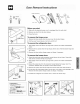
Door Removal instructions Tools Necessary 3/8" ._ Hxod Wrench o_ Phi EDS neoc _,! Before you start: 1 Make sure the electrica power cord is unolugged from the wall outlet. 2 Remove any food from the door shelves. 3 Close the doors. CoveF To remove the hinge cover: 1 Remove the three screws from the cover over the top door hinges. 2 Pull the cover forward about a half inch and lift it off. To remove the refrigerator door: 1 Trace lightly around the door's top hinge with a pencil.
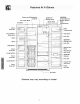
Freezer and Refrigerator Controls ice Cream SpiliProof TM g Shelf -Water Filter (Location varies by model) Fixed Door Bin CAUTION: Do Not Remove net Behind Dairy Corn partrnent Corn partrnent Rack ice SpilISafe TM g Shelf Half item Rack Door Bin Meat Keeper Cover Large Fixed Door Bin Retainer Large and Cover Fixed Door Bin Toe Grille Features may vary according to model
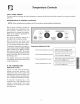
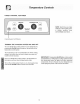
TemperatureCon trois COOL DOWN PERIOD To ensure safe food storage, allow the refrigerator to operate with the doors closed for at least 6 hours before loading it with food. REFRIGERATOR & FREEZER CONTROLS NOTE: when changing Control settings, wait 24 hours befoie making additional adjustments, After 24 hours, adjust the controls as needed. Make your adjustments small and gradual; allowing time for temperatures to change and stabilize. Refer to the adjacent guidelines for temperature settings.
OTHER CONTROL FEATURES NOTE: EaCh time you make settings on the control panel, a single audib!e tone acknowledges your inpuL Cooling System On/Off Button TURNING THE COOLING SYSTEM ON AND OFF You can disable the cooling system in your refrigerator by pressing the On/Off button located on the left side of the temperature control panel. To ensure that you do not accidentally turn off the cooling system, the button does not work unless you press and holdit for three seconds.
iCE CREAMSHELF (SOME MODELS) Thisshelfattaches tothetopoftheicedispenser container. It allowsstorageof bothroundandrectangular cartonsof yourfavoriteicecream. TIP=UPSHELF(SOME MODELS) A Tip-Up shelf in the freezer section allows tall items to be easily stored. To avoid personal injury or pr0perty Ice Cream Shelf damage, handle tempered glass she!yes careful!y. Shelves may break suddenly if nicked, scratched, or exposed to Sudden temperatutechange.
TALL BOTTLE RETAINER DELl DRAWER (SOME MODELS) The Tall Bottle Retainer keeps tall containers in the bin from falling forward when opening or closing the refrigerator door. To install, hold the retainer at the top, and slide it over the outside wall of the bin, as shown in the diagram. The Tall Bottle Retainer works best with a Bin Snugger. (SOME MODELS) Some models are equipped with a deli drawer for storage of luncheon meats, spreads, cheeses, and other deli items.
Automatic J J Using J Ice and Water Dispenser The Dispenser Your automatic ice & water dispenser includes a control panel push-paddles for turning on the tce and water supplies. a drinking glass bay, and two Using the dispenser control panel is necessary for the ice dispenser but not the water dispenser. The control panel also includes opttons for lighting, filter monitoring, and increasing the rates of ice making and freezing.
iCE AND WATER DISPENSER FEATURES The iceand water dispenser conveniently dispenses chilled water, and ice cubes or crushed ice, depending on the model. To operate the ice dispenser, select the ice option desired using the touchpad. Press a glass against the dispensing paddle as far up as possible to catch all ice. To stop dispensing ice, pull glass away from dispensing paddle. Do not remove the glass until the ice has completely dispensed.
Automatic Ice and Water Dispenser • If a large quantity of ice is needed at one time, it is best to remove cubes directly from the ice container. The following sounds are normal when the ice maker is operating: Motor running • Ice loosening from tray Ice dropping into ice container • Running water Water valve opening or closing • Turn Off the ice maker when cleaning the freezer and during vacations.
Automatic ice and WaterOispenser Kenmore Ice and Water Rear Filter (some models) NOTE: if you purchased a refrigerator with a Kenmore ice and Water rear filter, please read the following use and care information. This ice and water filter system filters water to your ice maker and water dispenser, it is located in the upper right back corner of the fresh food compartment. System Startup: Water supply does not need to be turned off, however, do not use ice and water dispenser while installing filter.
FOOD STORAGE IDEAS Fresh Food Storage • The fresh food compartment should be kept between 34 ° F and 40 ° F with an optimum temperature of 37 ° R • Avoid overcrowding the refrigerator shelves. This reduces the circulation of air around the food and results in uneven cooling. Fruits and Vegetables • Storage in the crisper drawers traps moisture to help preserve the fruit and vegetable quality for longer time periods.
Normal UNDERSTANDING THE SOUNDSYOU Operating MAY HEAR Sounds & Sights A. Evaporator Your new high-efficiency refrigerator may make unfamiliar sounds. Most often, these are all normal sounds that soon become familiar to you. They indicate your refrigerator is operating as designed. Hard surfaces, such as vinyl or wood floors, walls, and kitchen cabinets may make sounds more noticeable. The following list describes some of the most common sounds you may hear, and what is causing them.
Keepyourrefrigerator andfreezercleantopreventodorbuild-up. Wipeupanyspillsimmediately andcleanbothsections atleasttwicea year.Neveruseanytypeofscouringpads,brushes, abrasivecleanersor strongalkalinesolutions on anysurface.Donot washanyremovable partsina dishwasher. Always unplug the electrical power cord from the wall outlet before cleaning. • • 0 = • When moving the refrigerator, pul! straight out, Do not shift the refrigerator from side to side as this may damage the f!oor.
woo,g,oves .henre,,a ,"g ,,gh. bulbs to avoid getting cut, REPLACING LIGHT BULBS 1. Unplug refrigerator. 2. Wear gloves as protection against possible broken glass and heat. Remove light cover, if necessary. 3. 4. 5. 6. Unscrew and replace old bulb with an appliance bulb of the same type and wattage. Replace light cover, if necessary. Remember to plug the refrigerator back in. Refrigerator Light Replacement UghtSoc.etI, Located Behind Rear 0f Meat Pan :over Light Bu_.
Before You Call PROBLEM RUNNING Compressor _ CAUSE [ CORRECTION OF REFRIGERATOR does not run. • Cooling system is turned Off. • • Refrigerator is in defrost cycle. • Turn cooling system On. See Temperature Controls section. This is normal for a fully automatic defrost refrigerator. The defrost cycle occurs periodically, lasting about 30 minutes. Plug at wall outlet is disconnected. House fuse blown or tripped circuit breaker. • Ensure plug is tightly pushed into outlet.
PROBLEM TEMPERATURES 1 ARE CAUSE [ CORRECTION TOO WARM Freezer/Refrigerator temperature is too warm. • • Doors are opened too frequently or too long. Door is slightly open. • • Warm air enters the refrigerator whenever the door is opened. Open the door less often. See PROBLEM section OPENING/CLOSING OF DOORS/DRAWERS. Freezer temperature is too warm. Refrigerator temperature is satisfactory. • Freezer control is set too warm. • Set freezer control to a colder setting.
Be fore You Call (continued) PROBLEM A UTOMA TIC ICE MAKER Ice maker is not making enough ice. 1 CAUSE CORRECTION (CONTINUED) • Ice maker is producing less ice than you expect. Ice maker should produce approximately of ice every 24 hours. • Freezer is not cold enough. • Household water line valve is not completely open. Check to see if water dispenser is dispensing slower than normal. See PROBLEM section TEMPERATURES WARM. Turn on household water line valve.
Before P.OB'E. 1 WA TEn • Household • not open. Freezer door is not closed. • Water has an odd taste and/or odor. Water pressure extremely low. ODORS IN REFRIGERA / Light bulb is not on. to • Replace • Draw and discard 10- 12 glasses of water to freshen the supply and completely rinse out the tank. Connect unit to cold water line that supplies water to the kitchen faucet. • filter cartridge. For best results, connections. • Water has a high mineral content.