Installation Instructor READ BEFORE INSTALLING UNIT For Through-the-Wall Air Conditioners To avoid risk of personal injury, property damage, or product damage due to the weight of this device and sharp edges that may be exposed: Air conditioners covered in this manual pose an excessive weight hazard, Two or mots people are needed to move and install the unit. To prevent injury or strain, use proper lifting and carrying techniques when moving unit.
Installation Instructions How to Install 1. Identify the wall-sleeve brand for your installation, from the chart below.
Installation Instructions 4. Prepare the wall sleeve for installation of the new unit per the following Brand instructions. #1 Emerson 15" Deep #2 Feeders 16%" Deep #3 Feeders or Fried rich 16%" Deep #4 General Electric/Hotpoint 1674" Deep #5 Sears or Carrier Series) 18%" Deep #6 Whirlpool 17%" Deep #7 Whirlpool 23" Deep #8 16" + 177" Deep Carrier Series) #9 22" Deep 5. Identity your wall sleeve type and follow the instructions for that type in the following pages.
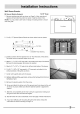
Installation Instructions Wall Sleeve Brands: #1 Emerson 15" Deep 1. Remove existing rear grille as shown on Page 3 of this manual and Rear Louvers replace with provided louvered rear panel. install as shown here. 4.5" ati NOTE: You may need to drill holes in flange of existing sleeve to match 80 iL A sisal © BU new rear grille A Top View 2. x 3/8" x 25" long seal in the center at the top of the sleeve. Remove the backing paper and press into position. 3.
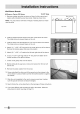
Installation Instructions Wall Sleeve Brands: #2 Feeders 193/14" Deep 1. Remove existing rear grille as shown on Page 3 of this manual and Rear Louvers replace with provided louvered rear panel. Install as shown here. NOTE: You ray need to drill holes in flange of existing sleeve to mach ner Di new rear rifle 4 Top View 2. Attach (2) 472" centering/support blocks one on each side wall. Place in center of side wall with the tapered end facing the opening. Cu There | — . protection Paper Backing 4.
Installation Instructions Wall Sleeve Brands: #3 Feeders or Fried rich Deep 1. Remove existing rear grille as shown on Page 3 of this manual and Rear Louvers replace with provided louvered rear panel. install as shown here. reed re il NEE NOTE: You may need to drill holes in flange of existing sleeve to match 80 NET A Leann © BO® new rear grille i Top View 2. Almach (2) 472" centering/support blocks one on each side wall. Place in center of side wall with the tapered end facing the opening. 3.
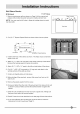
Installation Instructions Wall Sleeve Brands: #4 General Electric/Hotpoint Deep 1. Remove existing rear grille as shown on Page 3 of this manual and Rear [overs replace with provided louvered rear panel. Install as shown here. NOTE: You may need to drill holes in flange of existing sleeve to match 80° x , Seignior © 80° new rear grille 4 Top View 2. Cut (2) 17" Tapered Spacer Blocks as shown below into two pieces. 1 Cut Here protection Paper Backing 3.
Installation Instructions Wall Sleeve Brands: #5 Sears or Carrier 518 Series Deep 1. Remove existing rear grille as shown on Page 3 of this manual and Rear Louvers replace with provided louvered rear panel. Install as shown here. NOTE: You may need to drift holes in flange of existing sleeve to match 8a — CAMPANELLA 80° new rear grille 4 Top View 2. install (2) tapered spacer blocks to the floor of the sleeve as shown. This helps induce a rearward slope on the unit. 3.
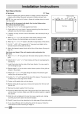
Installation Instructions Wall Sleeve Brands: #6 Whirlpool Deep 1. Remove existing rear grille as shown on Page 3 of this manual and replace with provided louvered rear panel. install as shown here. NOTE: You may need to drill holes in flange of existing sleeve to match new rear grille AN 4.5" Rear [overs " 500 500% Led) assist az tr Top View s 2. Cut (2) 17" Tapered Spacer Blocks as shown below into two pieces. 3. Install to the floor of the sleeve as shown. This helps induce a rearward slope on the unit.
Installation Instructions Wall Sleeve Brands: #7 Whirlpool 23 Deep 1. Remove existing rear grille as shown on Page 3 of this manual and Boar Louvers replace with provided louvered rear panel. install as shown here. 4.5" op NOTE: You may need to drill holes in flange of existing sleeve to match new rear grille x Because of the increased unit depth, first try dry fitting using the method described below: 2. 3. Use these next steps if the unit requires extra extension into the room.
Installation Instructions Wall Sleeve Brands: #8 White Westinghouse/Frigidaire/ 16+ Deep Carrier 52F Series 1. Remove existing rear grille as shown on Page 3 of this manual and Rear Louvers replace with provided louvered rear panel. Install as shown here. NOTE: You may need to drill holes in flange of existing sleeve to mach new rear grille 4 Top View 2. Attach (1) 1" x 3/8" x 28" long seal in the center at the top of the sleeve. Remove the backing paper and press into position. 3.
Installation Instructions Wall Sleeve Brands: #9 White Westinghouse or Frigidaire 22" Deep 1. Remove existing rear grille as shown on Page 3 of this manual and Rear Louvers . Ts replace with provided louvered rear panel. install as shown here. \ 45 so see » < ¥ NOTE: You may need to drill holes in flange of existing sleeve to match aoe new rear rifle A Because of the increased unit depth, first try dry fitting using the method described below: Top View 2. Place seals against each side. 3.
installation Ins Direct Unit Mounting The previous directions are the preferable way to mount the new rear grill. The unit's performances is slightly better and the possibility of droughts is reduced. As a last resort, direct mounting of the grille to the unit can be considered. Note: The grille must be installed prior to inserting the unit into the sleeve. 1. Attach the 2 seal pieces as shown in Fig. 1. 2. Position the grille aver the rear of the unit making sure that: a.
Installation Instructions FINISHING INSTALLATION: 1. Install the long stiffer seal between the wall-sleeve and the unit. A flab bladed screwdriver or putty knife is recommended. 2. Assemble the trim frame by inserting top and bottom pieces into side pieces and snapping into place. 3. Pull cord through trim frame then slide over unit until flush with wall. NOTE: For larger sleeves, an accessory trim kit is nonavailability. Call 1-844-553-6667 to order and purchase kit.
LEA ESTO ANTES DE MONTAR LA UNIDAD Para Aire Acondicionado de Pared PRECAUCIÓN Para evitar of riesgo de lesiones, de dacios materiales y de dacios al equipo debido a su peso v a los bordes afufados que puedan quedar expuestos: * Los aparatos de aire acondicionado detallados en este manual suponen un peligro por su excesivo peso. Es necesaria la conferencie de dos 0 mas personas para mover e instalar ef equipo.
Indicaciones para Instalar 1.
_ Instrucciones taje 4. Prepare la junta de pared para la instalación de la nueva unidad según las siguientes instrucciones por marca. #1 Mesonero 15" Profundidad #2 Federes 19%" Profundidad #3 Federes o Chirrichote 16%" Profundidad #4 General Contraelectromotriz 1674" Profundidad #5 Seras o Carrerista 518) 18%" Profundidad #6 Whirlpool 17%" Profundidad #7 Whirlpool 23" Profundidad #8 16" + 177" Profundidad Carrerista 52F) #9 22" Profundidad 5.
Marcas de Junta de pared: #1 Mesonero 15" Profundidad 1. Quite la parrilla trasera existente como se indica en la Pag. 3 de este manual y reemplace con el panel trasero con abertura provisto. Instale como se indica aquí. NOTA: Necesitaré perforar agujeros en la estafa de junta existente para adaptar a la nueva parrilla trasera N . Adhiera (1) un sello de 1" x 3/8" centro en la parte superior de la junta, Quite ef papel de soporte y presione para dejar en posición. .
Marcas de Junta de pared: #2 Federes de profundidad 1. Quite la parrilla trasera como se indica en la Pag. 3 de este manual y reemplace con el panel trasero con abertura provisto. Instale como se indica aquí. NOTA: Necesitara perforar agujeros en la estafisagria de junta existente para adaptar a la nueva parrilla trasera 2. Adhiera (2) bloques de centrado/soporte uno en cada pared lateral. Coloque en el centro de la pared lateral con el extremo cónico hacia la abertura. 3.
Instrucciones de montaje Marcas de Junta de pared: #3 Federes o Chirrichote Profundidad 1. Quite la parrilla trasera como se indica en la Pag. 3 de este manual y Mear Versículo reemplace con el panel rasero con abertura proviso. Instale como indica aquí. B00 FE 50 50 Lon Se NOTA: Necesitara perforar agujeros en la pestaña de junta existente para adaptar a la nueva parrilla frasear 4 Top Viere 2. Adhiera (2) bloques de centrado/soporte uno de cada pared lateral.
Instrucciones de montaje Marcas de Junta de pared: #4 General Contraelectromotriz Profundidad 1. Quite la parrilla trasera como se indica en la Pag. 3 de este manual Reilaras Traseras y reemplace con el panel trasero con abertura provisto. Instale como se indica aquí. NOTA: Necesitara perforar agujeros en la pestaña de la junta existente 4 para adaptar a la nueva parrilla trasera Vista Superior 2. Corte (2) bogues espaciadores cónicos de 17" como se indica a continuación, en dos piezas.
Instrucciones de montaje Marcas de Junta de pared: #5 Seras o Carricera Serie 515 Profundidad 1. Quite la parrilla trasera como se indica en la Pag 3 de este manual y reemplace con el panel trasero con abertura provisto. Instale como se indica aquí. NOTA: Necesitara perforar agujeros en la pestaña de la junta existente para adaptar a la nueva parrilla trasera 2. Instale (2) bloques espaciadores cónicos al piso de la junta como se indica. Esto ayuda a inducir una pendiente posterior en la unidad. 3.
Instrucciones de montaje Marcas de Junta de pared: #6 Whirlpool 17-18" Profundidad 1. Quite la parrilla trasera como se indica en la Pag 3 de este manual y reemplace con el panel trasera con abertura provisto. Instale como se indica aquí. NOTA: Necesitara perforar agujeros en la pestaña de jla unta existente para adaptar a la nueva parrilla trasera ro . Corte (2) bloques espaciadores cónicos de 177 en 2 piezas, como se indica a continuación.
Marcas de Junta de pared: #7 Whirlpool 23" Profundidad 1. Quite la parrilla trasera como se indica en la Pag 3 de este manual Rejillas Traseras y reemplace con el panel trasero con abertura provisto. Instale como se indica aquí. 80° Lae Se NOTA: Necesitara perforar agujeros en la pestaña de la junta existente 4 para adaptar a la nueva parrilla trasera Debido a la mayor profundidad de la unidad, primero intente el ajuste en seco usando el método descifro en adelante: Vista Superior 2.
SR 0: Marcas de Junta de pared: #8 Hite Westinghouse/Frigidaire/ 16"+ Profundidad Carricera Serie 52F 1. Quite la parrilla trasera como se indica en la Pag. 3 de este manual | Rejillas Traseras y reemplace con el panel trasero con abertura provisto. Instale arn son 707 a NOTA: Necesitar perforar agujeros en la pes tafia de la junta existente i para adaptar a la nueva parrilla frasear ; como se indica aquí Vista Superior 2. Adhiera (1) sello de 1" x 3/8" centro en la parte superior de la junta.
taje | Marcas de Junta de pared: #9 Hite Sugestionase o Frigidez 22" Profundidad 1. Quite la parrilla trasera como se indica en la Pag. 3 de este manual Rejillas Traseras y reemplace con el panel trasero con abertura provisto. Instale como se indica aquí.
Montado Directo de ia Unidad Las directivas anteriores indican la manera en que es preferible montar la parrilla trasera. El rendimiento de la unidad es levemente mayor y se reduce asi la posibilidad de corrientes. El montado directo de la parola a la unidad deberé considerarse como Ultimo recurso. Nota: La parrilla debe instalarse antes de insertar la unidad en la junta. 1. Adhiera las 2 piezas de sellado 14") como se indica en la Fig. 1. 2.
tracciones TERMINAR LA INSTALACIÓN: 1. Instale el sello de rellena entre la junta de pared y la unidad. Se recomienda usar un destornillador de punta plana o una espátula para masilla 2. Ensamble el marco moldeado insertando las piezas de arriba y de abajo en las piezas laterales y luego hágalas encajar en su sitio. 3. Tire la cuerda a través del marco moldeado, luego deslice sobre a unidad hasta que quede alineada con la pared.