For best results, a low-sudsing, HE High Efficiency Detergent made for high efficiency washers must be used. Use & Care Guide Model: 796.4100* Kenmore Elite Front-Loading ® Automatic Washer * = color number MFL68005553 Sears Brands Management Corporation Hoffman Estates, IL 60179 U.S.A. www.kenmore.com Sears Canada Inc. Toronto, Ontario, Canada M5B 2C3 www.sears.ca ® 1-MFL68005553-영.indd 1 2018. 8. 29.
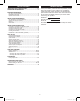
TABLE OF CONTENTS PRODUCT RECORD IMPORTANT SAFETY INSTRUCTIONS.....................................3-5 GROUNDING REQUIREMENTS................................................... 5 In the space below, record the date of purchase, model, and serial number of your product. You will find the model and serial number printed on an identification plate located inside the washer door. Have these items of information available whenever you contact Sears concerning your product. Model No.
SAFETY MESSAGES There are many important safety messages in this manual and on your appliance. Always read and obey all safety messages. This is the safety alert symbol. This symbol alerts you to potential hazards that can result in property damage and/or serious bodily harm or death. All safety messages will follow the safety alert symbol and the word WARNING. This word means: WARNING Indicates a hazardous situation which, if not avoided, could result in death or serious injury.
IMPORTANT SAFETY INSTRUCTIONS WARNING To reduce the risk of fire, electric shock, or injury to persons when using this appliance, follow basic precautions, including the following. • Unplug the washer before cleaning to avoid the risk of electric shock. • Never use harsh chemicals, abrasive cleaners, or solvents to clean the washer. They will damage the finish. • Do not put oily or greasy rags or clothing on top of the washer. These substances give off vapors that could ignite the materials.
IMPORTANT SAFETY INSTRUCTIONS WARNING: RISK TO CHILDREN • Do not allow children to play on or in the washer. Close supervision of children is necessary when the washer is used near children. As children grow, teach them the proper, safe use of all appliances. Failure to comply with these warnings could result in serious personal injury. • Destroy the carton, plastic bag, and other packing materials after the washer is unpacked. Children might use them for play.
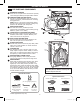
FEATURES AND BENEFITS KEY PARTS AND COMPONENTS A B A DETERGENT DISPENSER There are four compartments. One each for prewash, main wash, liquid bleach, and liquid fabric softener. B CONTROL PANEL WITH LED DISPLAY The easy-to-read LED display shows cycle options, settings, cycle status, and estimated time remaining during operation. NOTE: Sensors in the washer automatically detect the size of the wash load to optimize washing time, based on the selected cycle and options.
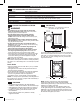
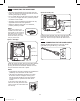
INSTALLATION REQUIREMENTS KEY DIMENSIONS AND SPECIFICATIONS Description Electrical Requirements Max. Water Pressure Dimensions Net Weight Max. Spin Speed Front-Loading Washer 120 VAC, 60 Hz 20 - 120 psi (138 - 827 kPa) 27”(W) X 30 ¼”(D) X 39”(H), 55” (D with door open) 70 cm(W) X 77 cm(D) X 99 cm(H), 139.6 cm (D with door open) 220 lbs (100 kg) 1,300 RPM CHOOSE THE PROPER LOCATION CLEARANCES Allow at least 24 3/4 in. (62.6 cm) in front of the washer to open the door. WARNING • This washer is heavy.
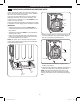
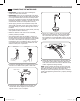
INSTALLATION INSTRUCTIONS UNPACKING AND REMOVING SHIPPING BOLTS When removing the washer from the carton base, be sure to remove the foam drum support in the middle of the carton base. See drawing below. If you must lay the washer down to remove the base packaging materials, always protect the side of the washer and lay it carefully on its side. DO NOT lay the washer on its front or back. To prevent internal damage during transport, the washer is equipped with four shipping bolts and plastic retainers.
INSTALLATION INSTRUCTIONS CONNECTING THE WATER LINES • IMPORTANT: Use new hoses when installing the washer. Do NOT reuse old hoses. • IMPORTANT: ONLY use new, high-quality inlet hoses when installing this laundry product. Aftermarket hoses are not guaranteed to fit or function correctly. Other hoses may not tighten correctly and could cause leaks. Subsequent damage to product or property will not be covered under the terms of the product warranty.
INSTALLATION INSTRUCTIONS CONNECTING THE DRAIN HOSE Option 2: Laundry Tub • The drain hose should always be properly secured. Failure to properly secure the drain hose can result in flooding and property damage. • Do not install the end of the drain hose lower than 29 in. (73.7 cm) or higher than 96 in. (243.8 cm) above the bottom of the washer. • The drain must be installed in accordance with any applicable local codes and regulations.
INSTALLATION INSTRUCTIONS LEVELING THE WASHER The drum of your new washer spins at very high speeds. To minimize vibration, noise, and unwanted movement, the floor must be a level, solid surface. NOTE: Adjust the leveling feet only as far as necessary to level the washer. Extending the leveling feet more than necessary can cause the washer to vibrate. NOTE: Before installing the washer, make sure that the floor is clean, dry and free of dust, dirt, water and oils so the washer feet cannot slide easily.
HOW TO USE WARNING: To reduce the risk of fire, electric shock, or injury to persons, read and follow this entire Use & Care Guide, including the Important Safety Instructions, before operating this washer. CONTROL PANEL FEATURES F A B G C A POWER (ON/OFF) BUTTON Press to turn the washer ON or OFF. NOTE: Pressing the POWER button during a cycle will cancel that cycle and any load settings will be lost. The door will unlock after a brief pause, unless the water level or temperature is too high.
HOW TO USE OPERATING THE WASHER 1 SORT LAUNDRY AND LOAD WASHER Sort laundry by fabric type, soil level, color and load size, as needed. Open the door and load selected items into the washer. 2 TURN ON THE WASHER Press the POWER button to turn ON the washer. The lights around the cycle selector knob will illuminate and a chime will sound. 3 SELECT A CYCLE Turn the cycle selector knob in either direction to select the desired cycle.
HOW TO USE CYCLE GUIDE The cycle guide below shows the default settings, available options and recommended fabric types for each cycle. Allowable modifier adjustments are shown below the default setting for each cycle. Cycle Fabric or Load Type Cotton, linen, towels, Normal/ shirts, sheets, Casual jeans, mixed loads. Load Wash Sensing Option Yes Yes Wash Temp. Spin Speed Soil Level Warm High Normal Heavily soiled cotton fabrics. Whitest Whites Heavily to normally soiled white cottons.
ry HOW TO USE CYCLE GUIDE (continued) The cycle guide below shows the default settings, available options and recommended fabric types for each cycle. Allowable modifier adjustments are shown below the default setting for each cycle. Cycle Fabric or Load Type Heavily soiled items Sanitize* such as work clothes, diapers, etc. Permanent Workout press, Wear synthetic items. Dress shirts, blouses, Delicates nylons, sheer or lacy garments. Small Load Normally soiled and small loads.
HOW TO USE SORTING WASH LOADS Fabric Care Labels Loading the Washer Many articles of clothing include a fabric care label. Using the chart below, adjust the cycle and option selections to care for your clothing according to the manufacturer’s recommendations. • Check all pockets to make sure that they are empty. Items such as clips, matches, pens, coins, and keys can damage both your washer and your clothes.
HOW TO USE ABOUT THE DISPENSER DRAWER The automatic dispenser consists of four compartments which hold: Liquid Chlorine Bleach Compartment • Liquid chlorine bleach. • Liquid fabric softener. • Liquid or powdered detergent for prewash. • Liquid or powdered detergent and color-safe bleach for main wash.
HOW TO USE DETERGENT AND DISPENSER USE A Word About Detergents Filling the Dispenser High-Efficiency (HE) detergents produce fewer suds, dissolve more efficiently to improve washing and rinsing performance, and help to keep the interior of your washer clean. Using detergent that is not HE may cause oversudsing and unsatisfactory performance which could result in error codes, cycle failure, and machine damage.
HOW TO USE TIME AND STATUS DISPLAY The time and status display shows the estimated time remaining, cycle progress, and door lock status. B C A A ESTIMATED TIME REMAINING When the START/PAUSE button is pressed, the washer will automatically detect the load size for cycles that use load sensing. The control will then optimize the wash and rinse times, based on the selected cycle, modifiers and options.
HOW TO USE CYCLE MODIFIER BUTTONS Each cycle has default settings that are selected automatically. You may also customize these settings using the cycle modifier buttons. Press the button for the desired modifier until the indicator light for the desired value is lit. The washer automatically adjusts the water level for the type and size of wash load for best results and maximum efficiency. Due to the high-efficiency nature of this product, water levels may be much lower than expected.
HOW TO USE STEAM CYCLES AND OPTIONS ACCELA WASH Your washing machine features several additional cycle options that customize cycles to meet your individual needs. The Accela Wash option uses a twin waterspray and detergent injection which reduces cycle time while maintaining wash performance when added to a cycle. 1 Turn ON the washer and turn the cycle selector knob to select the desired cycle. 2 Use the cycle modifier buttons to adjust the settings for that cycle.
HOW TO USE STEAM CYCLES AND OPTIONS ADD GARMENTS Use this function to add garments or remove foreign objects like coins or keys after the cycle has started. 1 Press ADD GARMENTS. The cycle pauses and the door unlocks. 2 Open the door, add garments or remove foreign objects, and close the door. 3 Press START/PAUSE to restart the cycle. The cycle continues automatically. NOTE: • After checking the water level/temperature conditions for safety, the door unlocks once the wash movement has stopped.
HOW TO USE SPECIAL FUNCTIONS CLEAN WASHER DRUM LIGHT Detergent residue can build up in the wash drum over time and can lead to a mildewy or musty smell. The CLEAN WASHER cycle is specially designed to remove this buildup using bleach or another cleaner designed specifically for cleaning front load washers. Run the CLEAN WASHER cycle once a month, or more often under heavy use conditions or if odor is present. See complete instructions in the CARE AND CLEANING section.
HOW TO USE DRY Dry Only Cycle Drying options are easily selected with the DRY LEVEL button. For the most even drying, make sure all articles in the load are similar in material and thickness. Do not overload the washer by placing too many articles into the drum. Items must be able to tumble freely. If you open the door and remove the load before the washer has finished the Dry cycle, remember to press the START/ PAUSE button. 1. Press POWER button. Do not turn the cycle selector knob. 2.
CARE AND CLEANING WARNING: To reduce the risk of fire, electric shock, or injury to persons, read this entire Use & Care Guide, including the Important Safety Instructions, before operating this washer. • Unplug the washer before cleaning to avoid the risk of electric shock. Failure to follow this warning can cause serious injury, fire, electric shock, or death. • Never use harsh chemicals, abrasive cleaners, or solvents to clean the washer. They will damage the finish.
CARE AND CLEANING REGULAR CLEANING (continued) Storing the Washer 5 Press the POWER button, then press the SPIN SPEED button without selecting a cycle. Press the START/ PAUSE button to activate the drain pump. This will expel some of the antifreeze, leaving enough to protect the washer from damage. 6 Unplug the power cord, dry the drum interior with a soft cloth, and close the door. 7 Refer to the instructions below to clean and dry the dispenser drawer. 8 Store the washer in an upright position.
CARE AND CLEANING WARNING: Certain internal parts are intentionally not grounded and may present a risk of electric shock only during servicing. Service personnel - Do not contact the following parts while the appliance is energized: pump, valve, motor, control board. MAINTENANCE Cleaning the Water Inlet Filters IMPORTANT: ONLY use new, high-quality inlet hoses when installing this laundry product. Aftermarket hoses are not guaranteed to fit or function correctly.
CARE AND CLEANING MAINTENANCE (continued) Cleaning the Drain Pump Filter The washer is equipped with a filter that helps prevent excess lint and foreign objects like buttons, keys, and coins from causing damage to the pump. If the washer fails to drain properly, unplug the washer and allow the water to cool, if necessary, before proceeding. Plug 1 3 Remove the plug from the drain hose, and allow the water to drain completely.
DIAGNOSTICS Should you experience any problems with your washing machine, it has the capability of transmitting data via your telephone to the Diagnostics Team. This gives you the capability of speaking directly to our specially trained technicians. The technician records the data transmitted from your machine and uses it to analyze the issue, providing a fast and effective diagnosis. If you experience problems with your washer, in the U.S.A. call 1-844-553-6667, and in Canada call 1-800469-4663.
TROUBLESHOOTING GUIDE NORMAL SOUNDS YOU MAY HEAR The following sounds may be heard while the washer is operating. They are normal. Clicking: Door locking mechanism clicks when the door locks and unlocks. Spraying or hissing: Water spraying or circulating during the cycle. Humming or gurgling: Drain pump is pumping water from the washer at times during a cycle. Splashing: Clothes tumbling in the drum during the wash and rinse cycles.
TROUBLESHOOTING GUIDE BEFORE CALLING FOR SERVICE (continued) Problem Washer will not turn ON Door will not unlock when cycle is stopped or paused Wash cycle time is longer than usual Musty or mildewy odor in washer Wrinkling Strange odors coming from washer Possible Cause Power cord is not properly plugged in. Solutions Make sure that the plug is plugged securely into a grounded, 3-prong, 120-VAC, 60-Hz outlet. House fuse is blown, circuit breaker has Reset circuit breaker or replace fuse.
TROUBLESHOOTING GUIDE BEFORE CALLING FOR SERVICE (continued) Your washing machine is equipped with an automatic error-monitoring system to detect and diagnose problems at an early stage. Problem Possible Cause Water in the washer Drain hose is kinked, pinched, or clogged. drains slowly or not at all, or the display The drain pump filter is clogged. shows: Drain discharge is more than 96 inches (244 cm) above bottom of washer. Water supply faucets are not open fully.
WARRANTY KENMORE ELITE LIMITED WARRANTY WITH PROOF OF SALE the following warranty coverage applies when this appliance is correctly installed, operated and maintained according to all supplied instructions. One Year on Appliance FOR ONE YEAR from the date of sale this appliance is warranted against defects in material or workmanship. A defective appliance will receive free repair. If the appliance cannot be repaired it will be replaced free of charge.
Kenmore ® Customer Care Hotline To schedule in-home repair service or order replacement parts Para pedir servicio de reparación a domicilio, y ordenar piezas 1-844-553-6667 www.kenmore.com ® 2-MFL68005553-스.indd 68 2018. 8. 29.