Use & Care Guide Models: 796.6155*, 796.7155* Kenmore Elite Dryer * = color number P/N MFL67652511 Sears Brands Management Corporation HoffmanEstates,IL60179U.S.A. www.kenmore.
TABLE OF CONTENTS PRODUCT RECORD In the space below, record the date of purchase, model, and serial number of your product. You will find the model and serial number printed on an identification plate located inside the dryer door. Have these items of information available whenever you contact Sears concerning your product. Model No. Date of Purchase Serial No. Save these instructions and your sales receipt for future reference. IMPORTANT SAFETY INSTRUCTIONS ....................
IMPORTANT SAFETY INSTRUCTIONS READ ALL INSTRUCTIONS BEFORE USE Your safety and the safety of others is very important. We have provided many important safety messages in this manual and on your appliance. Always read and obey all safety messages. This is the safety alert symbol. This symbol alerts you to potential hazards that can kill or hurt you and others. All safety messages will follow the safety alert symbol and either the word DANGER or WARNING.
IMPORTANT SAFETY INSTRUCTIONS BASIC SAFETY PRECAUTIONS WARNING: To reduce the risk of fire, electric shock, or injury to persons when using this appliance, follow basic precautions, including the following: • Do not allow children to play on or in the dryer. Close supervision of children is necessary when the dryer is used near children. • Do not use fabric softeners or products to eliminate static unless recommended by the manufacturer of the fabric softener or product.
IMPORTANT SAFETY INSTRUCTIONS SAFETY INSTRUCTIONS FOR INSTALLATION WARNING: To reduce the risk of fire, electric shock, or injury to persons when using this appliance, follow basic precautions, including the following: • Properly ground dryer to conform with all governing codes and ordinances. Follow details in the installation instructions. Electrical shock can result if the dryer is not properly grounded. • Remove all packing items and dispose of all shipping materials properly.
IMPORTANT SAFETY INSTRUCTIONS SAFETY INSTRUCTIONS FOR STEAM FUNCTIONS WARNING: To reduce the risk of fire, electric shock, or injury to persons when using this appliance, follow basic precautions, including the following: • Do not open the dryer door during steam cycles. Failure to follow these instructions can result in a burn hazard.
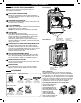
FEATURES AND BENEFITS KEY PARTS AND COMPONENTS Front of Dryer A D B There are several important components that are referenced in this manual. C A EASY-TO-USE CONTROL PANEL Rotate the cycle selector knob to select the desired dry cycle. Add cycle options or adjust settings with the touch of a button. B TIME AND STATUS DISPLAY The easy-to-read LED display shows cycle status and estimated time remaining.
INSTALLATION INSTRUCTIONS KEY DIMENSIONS AND SPECIFICATIONS Description Dryer Electrical Requirements Gas Requirements* NG: Gas Requirements* LP: Dimensions Net Weight Drying Capacity *Gas Models Only Dryer (Gas and Electric) Refer to the rating label 4–10.5 inches WC 8–13 inches WC 27 in. (W) X 28.9 in. (D) X 45 in. (H), 50 ¼ in. (D with door open) 68.6 cm (W) X 73.4 cm (D) X 114.1 cm (H), 127.5 cm (D with door open) Electric : 127.9 lb. (58 kg) Gas : 130.5 lb. (59.2 kg) IEC 7.3 cu. ft.
INSTALLATION INSTRUCTIONS GAS DRYERS GAS REQUIREMENTS (GAS MODELS ONLY) WARNING: To reduce the risk of fire, electric shock, or injury to persons when using this appliance, follow basic precautions, including the following: • Gas supply requirements: As shipped from the factory, this dryer is configured for use with natural gas (NG). It can be converted for use with propane (LP) gas. Gas pressure must not exceed 8 inches water column for (NG), or 13 inches water column for (LP).
INSTALLATION INSTRUCTIONS GAS DRYERS (continued) WARNING: To reduce the risk of fire, electric shock, or injury to persons when using this appliance, follow basic precautions, including the following: • If necessary, the correct nozzle (for the LP nozzle kit, order part number 383EEL3002D) should be installed by a qualified technician and the change should be noted on the dryer. Failure to do so can result in fire, explosion, or death.
INSTALLATION INSTRUCTIONS ELECTRIC DRYERS ELECTRICAL REQUIREMENTS Electrical Requirements for Electric Models Only WARNING: To help prevent fire, electrical shock, serious injury, or death, the wiring and grounding must conform to the latest edition of the National Electrical Code, ANSI/NFPA 70 and all applicable local regulations. Contact a qualified electrician to check the home’s wiring and fuses to ensure that the home has adequate electrical power to operate the dryer.
INSTALLATION INSTRUCTIONS ELECTRIC DRYERS (continued) CONNECTING ELECTRIC DRYERS WARNING: Connect the power cord to the terminal block. Each colored wire should be connected to the same color screw. Wire color indicated on manual is connected to the same color screw in block. Failure to follow these instructions may result in a short or overload.
INSTALLATION INSTRUCTIONS VENTING THE DRYER IMPORTANT! CHECK THE EXHAUST SYSTEM FOR PROBLEMS The most common cause of dryer problems is poor exhaust venting. Before installing the new dryer, check the items listed below to make sure to get the best possible performance. This can save time and money by reducing cycle times and increasing energy efficiency. • DIRTY OR DAMAGED EXHAUST DUCTS. Lint builds up in exhaust ducts over time. This decreases the airflow and makes the dryer work harder.
INSTALLATION INSTRUCTIONS INSTALLATION INSTRUCTIONS VENTING THE DRYER (continued) Routing and Connecting Ductwork Follow the guidelines below to maximize dryer performance and reduce lint buildup and condensation in the ductwork. NOTE: Transition duct and fittings are NOT included and must be purchased separately. • Use 4 inch (102mm) diameter rigid or semi-rigid metal duct. • The exhaust duct run should be as short as possible. • Use as few elbow joints as possible.
INSTALLATION INSTRUCTIONS CONNECTING THE INLET HOSE NOTE: • Before connecting the water line to the dryer, flush several gallons of water into a drain or bucket. This will help prevent foreign particles such as sand and scale from clogging the dryer inlet valve. • Do not overtighten. Damage to the coupling can result. The dryer must be connected to the cold water tap using the new water supply hose. Do not use old hoses. NOTE: • Water supply pressure must be between 20 psi and 120 psi (138–827 kPa).
INSTALLATION INSTRUCTIONS INSTALLATION INSTRUCTIONS LEVELING THE DRYER WARNING: • Wear gloves during installation. • Failure to follow these instructions can result in injury. To ensure that the dryer provides optimal drying performance, it must be level. To minimize vibration, noise, and unwanted movement, the floor must be a level, solid surface. NOTE: Adjust the leveling feet only as far as necessary to level the dryer. Extending the leveling feet more than necessary can cause the dryer to vibrate.
INSTALLATION INSTRUCTIONS REVERSING THE TWO-WAY DOOR WARNING: Before You Begin NOTE: The door reversal procedure for the two-way door is far more complex than for a conventional dryer door. Read through these instructions in their entirety before beginning the process, in order to gauge whether to have the procedure done by a professional installer or service person. Be sure to support the weight of the door before removing the hinge screws.
INSTALLATION INSTRUCTIONS INSTALLATION INSTRUCTIONS REVERSING THE TWO-WAY DOOR (continued) hinge cover upper hinge latch mechanism latch hole cover On the Door: 4 Lift off the door cover. With the door laid inside facing up on a protected surface, remove the 12 screws on the inside of the door. Carefully lift off the door cover with the help of a small flat-blade screwdriver inserted in the upper corner (circled below). hinge bracket hinge CAUTION: d.
INSTALLATION INSTRUCTIONS 6 Reverse the components inside the door. You will now be removing and reversing various components inside the door. See below for a detailed diagram and identification of the inner structure and parts of the door. (The diagram shows the "before view" of the door, with the default setup for a right side hinge swing. After following these instructions, your door should be a mirror image of the illustration.
INSTALLATION INSTRUCTIONS INSTALLATION INSTRUCTIONS REVERSING THE TWO-WAY DOOR (continued) 7 Lift out the grey interlock button in the side of the door. Make sure to remove the spring with the interlock button and to keep the two together. Set the interlock button aside. Do not confuse it with the interlock buttons from the top of the outer door. 10 Remove the upper hinge pivot.
INSTALLATION INSTRUCTIONS 12 Reinstall the top lock rod. Rotate the top lock rod (removed in step 9) 180 degrees end for end from its original position and reinstall it. The spring should now be to the right of center, with the spring on the side of the rod facing the top of the door. a. Insert the right end of the lock rod into the right hinge assembly. Make sure the rod is aligned with the guides in the door panel. c.
INSTALLATION INSTRUCTIONS INSTALLATION INSTRUCTIONS REVERSING THE TWO-WAY DOOR (continued) WARNING: 15 Reinstall the side interlock button. Reinstall the side interlock button removed in step 7. Center the spring in the compartment and insert the interlock button on top of it. Be sure to support the weight of the door before installing the hinge screws. 18 Reinstall the door. While supporting the door, install the four hinge screws removed in step 2.
INSTALLATION INSTRUCTIONS FINAL INSTALLATION CHECK Testing Dryer Heating Once you have completed the installation of the dryer and it is in its final location, confirm proper operation with the following steps and tests. 1 Close the dryer door. 1 Is gas turned on? (Gas models only) 2 Press the POWER button to turn the dryer on. 2 Is dryer plugged in? Dryer should always be plugged into the proper outlet. 3 Turn the cycle selector knob to Normal drying cycle.
INSTALLATION INSTRUCTIONS INSTALLATION INSTRUCTIONS INSTALLATION TEST (DUCT CHECK) Once you have completed the installation of the dryer, use this test to make sure the condition of the exhaust system is adequate for proper operation of the dryer. This test should be performed to alert you to any serious problems in the exhaust system of your home. 4 Check the display for results. During the test cycle, monitor the CHECK VENT LED on the control panel.
INSTALLATION INSTRUCTIONS RESTRICTED OR BLOCKED AIRFLOW Avoid long runs or runs with multiple elbows or bends. Check the duct condition. If the CHECK VENT LED is blinking, check the exhaust system for restrictions and damage. Repair or replace the exhaust system as needed. NOTE: When the dryer is first installed, this test should be performed to alert you to any existing problems with the exhaust ducts in your home.
HOW TO USE WARNING: To reduce the risk of fire, electric shock, or injury to persons, read this entire manual, including the Important Safety Instructions, before operating this dryer. CONTROL PANEL FEATURES F D A E B A POWER (ON/OFF) BUTTON Press to turn the dryer ON. Press again to turn the dryer OFF. Pressing the POWER button during a cycle will cancel that cycle and any settings will be lost.
HOW TO USE TIME AND STATUS DISPLAY The Time and Status Display shows the cycle time, cycle progress, and vent status. When the dryer is turned on, the display will illuminate. A B C C CYCLE STATUS INDICATORS This portion of the display shows which stage of the drying cycle is currently under way (DRYING or COOLING). A TIME DISPLAY When a cycle is selected, the display will indicate the default time for that cycle including selected options or adjustments.
HOW TO USE INSTALLATION INSTRUCTIONS OPERATING THE DRYER 1 LOAD THE DRYER Load the dryer with the wet laundry from the washer. If the load is extra large, you may need to divide it into smaller loads for proper performance and fabric care. 2 CLEAN THE LINT FILTER If the lint filter has not already been cleaned, lift out the filter and remove the lint from the last load. This will help ensure the fastest and most efficient drying performance.
HOW TO USE WARNING: To reduce the risk of fire, electric shock, or injury to persons, read this entire manual, including the Important Safety Instructions, before operating this dryer. SORTING LOADS LOADING THE DRYER WARNING: Fabric Care Labels To reduce the risk of fire, electric shock, or injury to persons when using this appliance, follow basic precautions, including the following: Most articles of clothing feature fabric care labels that include instructions for proper care.
HOW TO USE INSTALLATION INSTRUCTIONS CYCLE GUIDE The cycle guide below shows the available options and recommended fabric types for AUTO DRY cycles. *NOTE: The default time and actual time will vary depending on the size of the load and moisture content. Auto Dry Cycles AUTO DRY cycles utilize a sensor that detects moisture levels in the clothes and adjusts the drying time as needed to ensure superior results.
HOW TO USE The cycle guide below shows the available options and recommended fabric types for TIMED DRY cycles. Timed Dry Cycles Use Timed Dry cycles to select a specific amount of drying time and the drying temperature. When a TIMED DRY cycle is selected, the display shows the actual time remaining in the cycle. Change the actual time for the cycle by pressing MORE TIME or LESS TIME. Press and hold the MORE TIME or LESS TIME buttons to rapidly change the time.
HOW TO USE INSTALLATION INSTRUCTIONS USING THE TWO-WAY DOOR Hamper Door The dryer is equipped with a two-way door which opens in two directions, from the side as a swing door and from the top as a hamper door. Use the two-way door as a hamper door when loading. The hamper door opens about 40 degrees, acting as a chute, to help guide items into the drum and help prevent items from falling onto the floor.
HOW TO USE CYCLE MODIFIER BUTTONS Each cycle has default settings that are selected automatically. You may also customize these settings using the cycle modifier buttons. AUTO DRY cycles are designed to properly care for specific fabrics and loads. As a result, not all settings are available for each cycle selection. NOTE: To protect garments, not every dry level, temperature, or option is available with every cycle.
HOW TO USE INSTALLATION INSTRUCTIONS CYCLE OPTIONS AND SPECIAL FEATURES The dryer features several additional cycle options and special features to meet your individual needs. MORE TIME CONTROL LOCK Use the MORE TIME/LESS TIME buttons to increase or decrease the selected drying time in 1-minute increments. Press and hold the MORE TIME or LESS TIME buttons to rapidly change the time. Use this option to disable the controls. All controls will be disabled except for the POWER button.
HOW TO USE STEAM FEATURES WARNING: • Do not open the dryer door during Steam Cycles. Steam can cause severe burns. • Do not touch the steam nozzle in the drum during or after the steam cycle. IMPORTANT NOTES ABOUT STEAM FUNCTIONS: • Steam may not be clearly visible during the steam functions. This is normal. • Do not use Steam Refresh with items such as wool, wool blankets, leather jackets, silk, wet clothes, lingerie, foam products, or electric blankets.
HOW TO USE INSTALLATION INSTRUCTIONS STEAM CYCLE GUIDE Cycle Steam Default Time Temp.
USER MAINTENANCE INSTRUCTIONS WARNING: To reduce the risk of fire, electric shock, or injury to persons, read this entire manual, including the Important Safety Instructions, before operating this dryer. • Unplug the dryer or turn the power off before cleaning to avoid the risk of electric shock. Failure to follow this warning can cause serious injury, fire, electrical shock, or death. • Never use harsh chemicals, abrasive cleaners, or solvents to clean the dryer. They will damage the finish.
USER MAINTENANCE INSTRUCTIONS MAINTAINING THE EXHAUST SYSTEM The most common cause of dryer problems is poor exhaust venting. Poor exhaust venting may result from the following conditions: • DIRTY OR DAMAGED EXHAUST DUCTS • WRONG VENT MATERIAL • RESTRICTED OR DAMAGED VENT HOOD • EXCESSIVELY LONG VENT • THE USE OF PLASTIC OR FOIL VENTING CHECK VENT Operation Maintaining the Exhaust System The CHECK VENT system uses components already in the dryer.
DIAGNOSTICS Should you experience any problems with your dryer, it has the capability of transmitting data via your telephone to the Diagnostics Team. This gives you the capability of speaking directly to our specially trained technicians. The technician records the data transmitted from your machine and uses it to analyze the issue, providing a fast and effective diagnosis. If you experience problems with your dryer, call 1-844-553-6667.
TROUBLESHOOTING GUIDE FAQs Q: When I press a button, why does my dryer beep and then nothing happens? A: The Control Lock feature is turned on. To turn off Control Lock, turn the dryer on, then press and hold the button that has *Control Lock on or under it for 5 seconds. Q: Why does my dryer take so long to dry clothes? A: Proper airflow is critical to the efficient operation of clothes dryers.
TROUBLESHOOTING GUIDE BEFORE CALLING FOR SERVICE (continued) Problem Possible Cause Dryer will not turn on Power cord is not properly plugged in. House fuse is blown, circuit breaker has tripped, or power outage has occurred. CONTROL LOCK function is engaged. Buttons are disabled or CL shows in display Error code: tE1 through tE7 Temperature sensor failure.
TROUBLESHOOTING GUIDE INSTALLATION INSTRUCTIONS BEFORE CALLING FOR SERVICE (continued) Problem Possible Cause Drying time is not consistent Heat settings, load size, or dampness of clothing is not consistent. Clothes take too long to dry Exhaust ducts are blocked, dirty, or duct run is too long. Load is not properly sorted. Large load of heavy fabrics. Dryer controls are not set properly. Lint filter needs to be cleaned.
TROUBLESHOOTING GUIDE Problem Possible Cause Solutions Clothes are wrinkled Clothes dried too long (over dried). Clothes are shrinking Clothes left in dryer too long after cycle ends. Garment care instructions are To avoid shrinking your clothes, always consult and follow fabric not being followed. care instructions. Some fabrics will naturally shrink when washed. Other fabrics can be washed but will shrink when dried in a dryer. Use a low or no heat setting.
WARRANTY Kenmore Elite Limited Warranty WITH PROOF OF SALE the following warranty coverage applies when this appliance is correctly installed, operated and maintained according to all supplied instructions. One Year on Appliance FOR ONE YEAR from the date of sale this appliance is warranted against defects in material or workmanship. A defective appliance will receive free repair. If the appliance cannot be repaired it will be replaced free of charge.
NOTES 45
Kenmore ® Customer Care Hotline To schedule in-home repair service or order replacement parts Para pedir servicio de reparación a domicilio, y ordenar piezas 1-844-553-6667 www.kenmore.