Installation Instructions Instrucciones de instalaci6n Instructions d'installation English / Espafiol / Fran_ais i
TABLE OF CONTENTS DISHWASHER SAFETY .................................................................. INSTALLATION REQUIREMENTS 2 ................................................. Tools and Parts ........................................................................................ Location Requirements Drain Water Requirements Supply Electrical ........................................................................... ...........................................................................
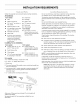
INSTALLATION REQUIREMENTS Gather the required tools and parts before starting installation. Do not run drain All installations can interfere with or contact Small level The location where the dishwasher clearance floor. Tools needed: • lines, water between motor Pliers • Flashlight • Phillips screwdriver • Shallow • s,_d' and 1/4" nut drivers • s/8" open-end • Bath towel freezing.
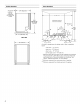
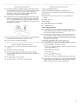
Cutout dimensions Product dimensions 3/4" (1.9 crn)_ insulation may be compressed (not used on all models) 241/2'' (62.2 cm) *-------------_ 24" (61 cm)** All surfaces 33%" (86 cm) rain. with wheels removed free from must be intrusions 12" 33% SIDE VIEW 23%" (60.6 cm) (7 cm) (8.3 cm) Cut holes in shaded (8.3 cm) (7 cm) area of cabinet walls or floor as specified below: water line - drain line - 11/2'' (3.8 em) 1/2" (1.3 cm) direct wire - 3/4" (1.
Use the new drain not long enough, hose supplied with your dishwasher. use a new drain If this is hose with a maximum length of 12 ft (3.7 m) that meets all current AHAM/IAPMO test standards, is resistant to heat and detergent, and fits the 1" (2.5 cm) drain connector of the dishwasher. Contact You must have: • connected to an air gap. Air gap IL electrician. Assure that the electrical installation is adequate and in conformance with all national and local codes and ordinances.
INSTALLATION INSTRUCTIONS Install the drain hose IMPORTANT: Always replacement dishwasher. 1. use a new drain Drill a 11/2'' (3.8 cm) diameter the side of the opening hose when installing hole in cabinet closest a new wall or floor on to the sink. Electrical Shock Hazard Disconnect electrical power at the fuse box or circuit breaker box before installing dishwasher. Failure to do so can result in death or electrical shock. 2. Connect drain the following 1. Disconnect 2.
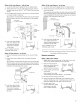
Option 2, No waste 1. Cut end of drain 2. Attach drain the drain disposer - with hose if needed air gap: Option (do not cut ribbed hose to air gap with section). large spring-type clamp. If 1. Cut end of drain 2. Attach hose was cut, use a 11/2'' to 2" (3.8 to 5 cm) screw-type hose connector air gap This connection (50.8 _ with spring or screwtype (50.8 to waste tee.
Option 2, Power NOTE: A mating, in a cabinet supply cord method: 3 prong, ground-type next to the dishwasher wall receptacle Install the drain is required opening. IMPORTANT: 1. Drill a 11/2'' (3.8 cm) hole in the cabinet 1. rear or side. Preferred Wood cabinet: Sand cabinet: use a new drain hose. wall or floor on the side of the \ the hole until smooth. Metal Always Drill a 11/2'' (3.8 cm) diameter hole in cabinet and optional locations are shown. 2. hose Cover 2.
Option 2, No waste 1. Cut end of drain 2. Attach drain the drain disposer - with hose if needed air gap: Option (do not cut ribbed hose to air gap with large spring-type section). clamp. If 1. Cut end of drain 2. Attach hose connector air gap This connection (50.8 _ with spring or screwtype clamps _ the floor - no air gap: hose if needed (do not cut ribbed the drain where section). clamp _.
3. Remove panels andsetpanels asideona covered surface. 4. Check thatgrounding clipisattached tothelowerpanel. . Terminal I.................................................................................... q_ box cover Z>Cabledamp connector Dishwasher 8° Measure from floor Lower point). Slide nut and ferrule (you need Check opening. clip of cabinet opening underside of countertop to where dishwasher will be installed panel 5.
Option Install the door handle (some Kenmore Elite models) 1. attachment from the package slots on the left- and right-hand shown. NOTES: • To ease installation, using two or more people, dishwasher on its back. • To avoid scratching the front panel, place a soft cloth against the panel while installing the door handle. • Setscrews 1. Remove the door key from 2.
Level the dishwasher Check door spring tension 1. With another tipping, person holding the dishwasher 1. to keep it from or falls open under its own weight, the door tension will need to To adjust front of dishwasher Helpful be adjusted. 2. Align may need to adjust open and close the door a few times. If the door closes unhook the spring from when adjusting doors. You to be even with your cabinets.
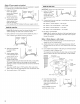
Check "Electrical Requirements" section. 5. Securely tighten ground connector. You need to: • Ground wire have the correct electrical grounding method, Washer supply and recommended Ground connector If you are: • direct • using a power wiring, use Option supply cord, 1 1, Direct method use Option 2 Ground wire Option wire 6. 1. Route direct wire so that it does not touch dishwasher lower part of dishwasher motors or Tighten conduit clamp connector or connector screws.
2. Check for leaks. H Electrical Shock Hazard Electricaly Place paper ground dishwasher. towel under 90 ° elbow fitting. Turn on water supply and check for leaks. If leak occurs, repeat previous step. Connect ground wire to green ground connector in terminal box. Do not use an extension cord. Falure to follow these instructions death, fire, or electrical shock. can resut To help minimize vibration, route drain hose to avoid in contact flooring 4.
.................... O_LYl _ Complete installation 1. Check 2. Place the lower that grounding panel behind have insulation on the access insulation on the lower clip is attached to the lower the access panel. panel which panel. Some models must fall behind the panel. Tip Over Hazard Do not use dishwasher until completely installed, Do not push down on open door, Doing so can result in serious injury or cuts. 1.
Direct wire method: Check operation 1. Read the Use and Care Guide 2. Check that all parts that came with your dishwasher. have been installed and no steps were skipped. 3. Check 4. Start dishwasher cycle. that you have all the tools you used. After and allow it to complete the first 2 minutes, unlatch the shortest door, wash wait 5 seconds, then open door. Electrical Shock Hazard 5. tub. Check that dishwasher Electrically ground dishwasher.
INDICE SEGURIDAD DE LA LAVAVAJILLAS REQUISITOS DE INSTALACION Herramientas ............................................ .................................................. y piezas .......................................................................... 17 de ubicaci6n ........................................................................ 18 de desagOe ......................................................................... 20 Requisitos el&ctricos .........................................
REQUISITOS DE INSTALACION Retina las herramientas instalaci6n. y piezas necesarias antes de comenzar la puedan Todas las instalaciones Herramientas • Nivel • Linterna peque_o Pinzas • Destornillador Phillips • Recipiente • Llaves de tuercas o casquillos hexagonales • Llave ajustable de Cinta de medir o regla • Llave ajustable de 10" que • • Destornillador de punta plana • Cuchillo • 2 conectores Proteja contra comprar 11000.
Dimensiones del producto El aislamiento%, (1,9 cm) de._l puede compnm_rse (RO se usa | 1 Dimensiones de corte _(===.=== 241/2 '' (62,2 cm)_-=-------------) _ / eR 24" (61 cm)** todos los modelos) Todas las superficies deben estar libres de intrusiones 337/8"(86 cm) m[n.
Utilice la nueva manguera lavavajillas. Si no fuera de desag0e provista Io suficientemente con su larga, P6ngase use una manguera de desag0e nueva de una Iongitud m6xima de 12 pies (3,7 m) que cumpla con todos los est6ndares de prueba de que la instalaci6n con todos los c6digos Usted debe (50,8 sanitarias de la casa y a un mfnimo cm) sobre el piso. Se recomienda desag0e se enrolle parte inferior de aire.
INSTRUCCIONES DE INSTALACION 2. Conecte la manguera recipiente m&todos. No seguir esta instrucci6n choque el6ctrico, Desconecte el suministro 2. Cierre el suministro o al 1: con recipiente de desechos - con espaciador de • Opci6n aire 2: sin recipiente de desechos - con espaciador de • Opci6n aire _ 3: con recipiente - sin espaciador de • Opci6n aire _ 4: sin recipiente Consejo un espaciador 6til: Para reducir mantenga aqu&lla 1.
Opci6n 1. 2, Sin recipiente Corte el extremo secci6n 2. de desechos de la manguera - con espaciador si es necesario de aire: (no corte la ranurada). Sujete desagOe, grande utilice de desagOe al espaciador de aire con una de tipo resorte. la manguera una abrazadera* Si se cort6 de tipo tornillo de Utilice de hule con abrazaderas para conectar el espaciador 2. de 11/2'' a 2" Suiete debe hacerse menos a 20" (50,8 * de resorte o de de desagOe de debe la lavavajillas.
5. Pase el otro extremo El cable abertura del cable debe extenderse del armario. Opci6n 2, M_todo del cable NOTA: Se necesita un contacto a tierra de tres terminales abertura 1. a trav&s del orificio hasta la parte frontal de suministro apropiado en un armario del armario. derecha 2. de la que est& al lado de la un orificio de 11/2'' (3,8 cm) en la parte posterior o lateral armario. Los lugares ideales de desechos - con espaciador de • Opci6n aire.
Utilice 3. un conector* tornillo de hule con abrazaderas* para conectar el espaciador de resorte o de Manguera de desag0e corte aqui si es necesado de aire al tubo de desperdicios. Esta conexi6n debe menos a 20" (50,8 hacerse antes del sif6n de desacj0e cm) por encima Abrazadera y al fipo del piso en que se instalar6 la lavavajillas. Tube de desperdicios uera Sif6n de desa( Abrazadera tipo resorte 3.
4. Verifique inferior. que la pinza de puesta a tierra 7. est& sujeta al panel Quite la cubierta de la caja de terminales. - Si est6 cableando directamente: Instale un conector abrazadera en la caja de terminales. protector CSA.
Elija la opci6n para fijar Instalaci6n de la manija de la puerta (en alcjunos modelos Kenmore Elite) NOTAS: • Para facilitar parte la instalacidn, posterior coloque con la ayuda la lavavajillas sobre su Peligro de dos o mds personas. Use dos o m_s • Coloque un paso suave o una toalla instala la manija frontal. Los tornillos 2.
4. Empuje los botones NOTA: Guarde que se instale de pldstico los botones fuera del lado de la tina. para cubrir los orificios Mueva la lavavajillas despu_s de la lavavajillas. 1. Con la ayuda posici6n 2. de dos o mds personas, Tome la lavavajillas doble el soporte en la ranura al costado la leng0eta hacia dentro y hacia lavavajillas, para mantener el soporte de la lavavajillas el costado y en su lugar. 4. NOTA: No sujete la lavavajillas. Dobb Esto se har6 m6s tarde.
4. Cierre y cierre con picaporte la frente del lavavajillas verticalmente. la puerta. Coloque para verificar el nivel contra Jale suavemente par ver si es alineado los cables 3° de suministro de energia: Cable de la c&ja de terminales: blanco Si necesitado, ajusta desatornillador unidad.
Option 1. 2, Cable Pase el cable de suministro de energia de suministro de energfa los motores de la lavavajillas 5. de manera ni la parte inferior que no toque Apriete firmemente de puesta a tierra. . Cable de _. _ __) puesta a Arande a _5/_----_----_L_ _ tierra b_--_-,_ Conector l-- _m __ de la tina de la el conector lavavajillas. 2. Jale el cable terminales. de suministro de energfa del orificio de la caja de 6.
Para ayudar vibraci6n, a reducir la pase la manguera de desag0e manera que evite el contacto de agua, armario, i\ .J Verifique que la lavavajillas todav[a de lado a lado en la abertura. 3. Asegure la lavavajillas armario con dos tornillos , i debe quedar de con el motor, resortes de la puerta, tuber[a i 2. 3. ;iii!ii!ii!ii!i el I desag0e del lado de la lavavajillas. Coloque la bandeja desag0e. El agua que pudiera de 4.
4. Vuelva a insertar lostornillos a trav_s delosorificios enel paneldeacceso y lasranuras enelpanelinferior. Inserte primero eltornillodelladoderecho. Verifique el funcionamiento 1. Lea el Manual 2. Verifique de uso y cuidado que todas las partes se se haya omitido 3. Verifique 4. Ponga en marcha minutos, _z abra 5. la lavavajillas mds breve. Verifique 6. Apriete M6todo si el borde inferior del panel inferior que utiliz6.
TABLE DES MATIERES SI_CURITI_ DU LAVE-VAISSELLE ................................................... 32 INSTRUCTIONS EXIGENCES .................................................... 33 Preparation Outillage D'INSTALLATION et pi_ces ............................................................................... Emplacement d'installation .................................................................
EXIGENCES D'INSTALLATION _,,]u_ Rassembler commencer Pour toutes Outillage les configurations n6cessaire • Pince • Tournevis • Tourne-_crou douille • • C_ e e__p ece:_ tous JesoutiJs et pi_ces I'installation.
Dimensions du produit Dimensions de I'espace d'installation 3/,,,, (1,gcm)......_. Le mat_riau isolant (pas utilis_ sur tous les modules) pourrait _tre comprim6 241/2"(62,2 cm) _ 24" (61 cm) ** Toutes 33%" (86 cm) min._ avec roues enlev6es ruessurfaces ^ etre doivent , . IIbres d _.intrusion. 33%" (85,7 cm) min.
• Utiliser le tuyau d'_vacuation neuf fourni Si ce tuyau n'est pas suffisamment d'_vacuation neuf de Iongueur avec le lave-vaisselle.
INSTRUCTIONS D'INSTALLATION Installation du tuyau d'6vacuation IMPORTANT : On dolt touiours m_me pour I'installation 1. utiliser un tuyau d'_vacuation d'un lave-vaisselle Percer un trou de diam_tre placard 11/2'' (3,8 cm) dans la paroi ou darts le plancher d'installation neuf, de remplacement. du sur le c6t_ de I'espace le plus proche de I'_vier.
Option 1. 2 - pas de broyeur Si n_cessaire, couper 2. 3. I'extr_mit_ - avec brise-siphon du tuyau d'_vacuation : (ne pas Option 1. dans la section ondul_e). Connecter avec couper 6 d_chets 4 - pas de broyeur Si n_cessaire, couper le tuyau d'_vacuation sur le dispositif brise-siphon la grosse bride 6 ressort. Si le tuyau d'_vacuation 2. couper Connecter le tuyau utiliser une bride & vis _ de 11/2& 2" (3,8 & 5 cm).
5. Faire passer I'autre dans le placard. jusqu'6 I'angle extr&mit& du c6ble L'extr&mit& avant droit 6 travers du c6ble le trou perc& dolt pouvoir de I'espace Installation parvenir du tuyau IMPORTANT Option 2 - raccordement REMARQUE : Une prise de courant configuration correspondante, dans le placard, vaisselle. 1. par cordon d'alimentation murale & 3 alv&oles 1. de d'installation (3,8 cm) dans la paroi arri&re ou lat&rale du _ Autres emplacements possibles ........ placard.
Option 1. 2 - pas de broyeur Si n_cessaire, couper 2. 3. I'extr_mit_ - avec brise-siphon du tuyau d'_vacuation : (ne pas Option 1. dans la section ondul_e). Connecter avec couper 6 d_chets 4 - pas de broyeur Si n_cessaire, couper le tuyau d'_vacuation sur le dispositif brise-siphon la grosse bride 6 ressort. Si le tuyau d'_vacuation 2. Connecter le tuyau utiliser une bride & vis _ de 11/2& 2" (3,8 & 5 cm).
En utilisant 2 personnes lave-vaisselle par les c&t&s et mettre en le faisant 2. Oter reposer inf&rieur 4. le panneau du 7. et les mettre V&rifier de liaison que Fagrafe Oter le couvercle sur le dos d'acc&s direct, installer (homologation d'un conduit, installer de c&t& sur une surface aux instructions cordon 6 la terre est fix&e sur le inf&rieur. & collets Dans le un serre-c6ble UL ou CSA). - Si Fappareil dolt &tre aliment& installer maintenant le cordon Phillips.
Si la hauteur 333/4" (85,7 minimale de I'ouverture cm), on peut retirer d'insonorisation/d'isolation entre les placards une partie est de du garnissage en d_coupant le long des trous Installation de la poign6e de porte (sur les modules Kenmore PROTM) IMPORTANT performs. : Ne pas _rafler le panneau avant au cours de ce processus. 1. Retirer la poign_e lave-vaisselle. 2. Retirer et jeter conserver de porte I'emballage les instructions du panier de lavage de la poign_e.
Option acier 2 - Lave-vaisselle avec fixation lat_rale pour cuve en 5. inoxydable Raccrocher utiliser (pour plans de travail 1. Retirer 2. Briser I'extr_mit_ en marbre, granit ou autre surface le ressort de la porte au pied arriSre. On dolt les mSmes trous pour les deux tensionneurs, de chaque c6t8 de la porte. dure) les brides du sachet de pi_ces. de la bride le long des pointill_s. Ligne en 3.
Option I_tablissement 1. Aligner de I'aplomb I'avant du panneau portes des placards. d_placement Conseil de porte Cela pourrait 1. du lave-vaisselle n_cessiter 1 - Cablage Acheminer direct le cable d'alimentation de telle mani_re touche pas les moteurs du lave-vaisselle de la cuve du lave-vaisselle. avec les qu'il ne ni la partie inf_rieure un I_ger du lave-vaisselle.
5. Serrer fermement ,! le connecteur ...... , __ J_(_ de liaison 6 la terre. Conducteur de liaison 6 la Utiliser des connecteurs raccordement Rondeile / II /_L 3. cordon comme _'de de fils de taille des conducteurs d'alimentation suit : _lectrique, _? _ Liaison 6 la terre Serrer les vis de bridage du serre-c6ble ou du connecteur Vis 16) au les raccordements blanc noir _ terre Conducteur de liaison 6 la terre _ 6.
6. Race@Nemean4 1. Raccorder le raccord a cam4 d Avec une pince, ouvrir le raccord la bride de serrage de connexion, entre les buttes et placer la bride sur (voir I'illustration). Bride de tuyau coud_ de 90 ° 6 la valve. W But@es S'assurer install_e que dans iusqu'6 la rondelle le raccord. la valve de caoutchouc est correctement Enfiler le raccord de 3/4,, vers et serrer involontairement & la main le filetage. Serrer raccord soit serr_. raccord.
Si I'on utilise une fixation 5. lave-vaisselle, v_rifier de plan de travail pour immobiliser qu'il n'y a aucun contact entre le de la porte et les vis, les brides ou le plan de travail. S'il y a un contact, de on dolt abaisser nouveau I'aplomb le lave-vaisselle 5. le sommet puis _tablir de I'appareil. 6. la serviette 7. Retirer 8. R_installer le panier 6 vaisselle inf_rieur. 1. V_rifier que I'agrafe panneau 2. Placer du panneau inf_rieur est au Serrer les vis.
ContrSle du fonctionnement 1. Lire le manuel d'utilisation Si le lave-vaiselle et d'entretien fourni avec le lave- Essayer d'abord vaisselle. 2. intervention V_rifier _tape 3. V_rifier 4. Mettre que toutes les pi_ces ont _t_ install_es la presence le lave-vaisselle secondes, V_rifier vaisselle. de lavage Disjoncteur • Porte bien ferm_e et verrouill_e? • S_lection du programme les • Arriv_e cinq Sices le plus court.
6/10 . ® Registered W10297945A © 2010 Sears Brands, ® Marca LLC TM Trademark registrada/TM / Trademark Marca de MC Marque of KCD comercio de de commerce IP, LLC in the KCD / IP, LLC MD Marque United en States, Estados deposee de or Sears Brands, Unidos, o Sears Brands, Sears Brands, LLC LLC in other LLC in otros countries parses Printed in U.S.A. Impreso en EE.UU. Imprime aux E.-U.