E L ! T ULTRA WAVETMMicrowave Hood Combination Combinacibn Microondas Campana de ULTRA WAVETM Models/Modelos 665.61682 665.61689 665.61684 665.61683 ;:iiii_iiiiiiiii iiii_¸¸ 4619-652-60641/8183956 Sears, Roebuck and Co., Hoffman Estates, IL 60179 www.sears.
Table of Contents Warranty .............................................................. We Service What We Sell .................................. 2 3 Microwave 4 Oven Safety .................................... Getting to Know Your Microwave Oven ................................................ 7 How your Kenmore ULTRA WAVE TM microwave hood combination works .............. 7 Radio interference ........................................... Testing your microwave oven ..........................
We Service What We Sell Your purchase has added value because you can depend on Sears HomeCentral®, for service. With over 12,000 trained repair specialists and access to over 4.2 million parts and accessories, we have the tools, parts, knowledge and skills to ensure our pledge: We Service What We Sell. Sears Maintenance Agreements Your Kenmore appliance is designed, manufactured and tested to provide years of dependable operation. Yet any major appliance may require service from time to time.
Microwave Your safety Oven Safety and the safety of others are very important. We have provided many important safety messages in this manual and on your appliance. Always read and obey all safety messages. This is the safety alert symbol. This symbol alerts you to potential hazards that can kill or hurt you and others. All safety messages will follow the safety alert symbol and either the word "DANGER" or "WARNING.
IMPORTANT SAFETY INSTRUCTIONS • Intended to be used above ranges with maximum width of 36 inches. • Clean Ventilating Hoods Frequently - Grease should not be allowed to accumulate on hood or filter. • Oversized foods or oversized metal utensils should not be inserted in the microwave oven as they may create a fire or risk of electric shock. • Do not clean with metal scouring pads. Pieces can burn off the pad and touch electrical parts involving a risk of electric shock.
ELECTRICAL REQUIREMENTS Observe all governing codes and ordinances. A 120 Volt, 60 Hz, AC only, 15- or 20-amp fused electrical supply is required. (A time-delay fuse or circuit breaker is recommended.) It is recommended that a separate circuit serving only this appliance be provided. Electrical Shock Hazard Plug into a grounded 3 prong outlet. Do not remove ground prong. Do not use an adapter. Do not use an extension cord.
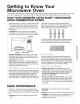
Getti to Kn Your Microwave Oven This section discusses the concepts behind microwave cooking. It also shows you the basics you need to know to operate your microwave oven. Please read this information before you use your oven. HOW YOUR KENMORE ULTRA WAVE TMMICROWAVE HOOD COMBINATION WORKS Microwave energy is not hot. It causes food to make its own heat, and it's this heat that cooks the food. Microwaves are like TV waves, radio waves, or light waves. You cannot see them, but you can see what they do.
TESTING YOUR MICROWAVE OVEN TESTING YOUR DINNERWARE Test dinnerware or cookware before using. To test a dish, put it into the oven with 1 cup (250 mL) of water beside it. Cook at 100% cook power for one minute. If the dish gets hot and water stays cool, do not use it. Some dishes (melamine, some ceramic dinnerware, etc.) OR COOKWARE absorb microwave energy, and may become too hot to handle or may slow cooking times.
MICROWAVE OVEN FEATURES 9 2 3 74 Your microwave oven is designed to make your cooking experience as enjoyable and productive as possible. To help get you up and running quickly, the following is a list of the oven's basic features: 1. Door Handle. Pull to open door. 2. Door Safety Lock System. The oven will not operate unless the door is securely closed. 3. Window with Metal Shield. Shield prevents microwaves from escaping. It is designed as a screen to allow you to view food as it cooks. 4.
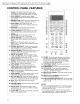
CONTROL PANEL FEATURES 1. Display. This display includes a clock and indicators to tell you the time of day, cooking time settings, and cooking functions you chose. 2. AUTO REHEAT. Touch this pad to reheat microwavable foods without entering times and cook powers. ® 3. DINNER PLATE. Touch this pad to heat a plate of food without entering a cook power or time. 4. AUTO COOK. Touch this pad to cook microwavable foods without entering times and cook powers. 5. POPCORN.
CONTROL PANEL FEATURES (CONT.) Your microwave oven comes with audible signals that can guide you when setting and using your oven: ,, E_ A programming tone will sound each time you touch a pad. You can stop the oven during a cycle by opening the door. The oven stops heating and the fan stops, but the light stays on. To restart cooking, close the door and TOUCH ,, E_ one long tone signals the end of a Kitchen Timer countdown. • I-_IE_E_I-_I Four tones signal the end of a cooking cycle.
i ii!!iii!iiiii !_iii_iiiiiii_il!!ii?::!ii!liii i iii;:i i!'iI!! iiill !i!iiiiiil il'_ii!!iiiii ill _" iiii_iiiiiiiiiiiill _liiiiii_ i i!_!iiiii_iiii! liii_iiiiii_iiiiil iiiiiii"_ii!_ii_! i!ii:iiii!_ii_iiiii!iiiiiiiiiiiill CONTR()L PANEL FEATURES (CONT.) The Child Lock locks the control panel so children cannot use the microwave oven when you do not want them to. This will work only when the oven is not performing some other function.
USING THE COOKING RACK TheCooking Rackgivesyouextraspacewhencookinginmorethanonecontainer atthesametime. If youneeda replacement rack,youcanorder onefromyourSearsServiceCenter.Please reference the servicenumbersonthe backpage ofthis manual.Makesureto haveyourmodel numberwhenordering. NOTES: " Use oven mitts to remove items from microwave oven. Insert the rack securely into the rack supports on the side walls of the oven. ,, Use rack only in the microwave oven. ,, Do not use rack with browning dish.
ii!!!i:ii_i_! i:_:_:_:_: iii!_iif!¸i_;il!ii iiiil i !!!i!iiii_ _iiiiii _iiii l!iii_ii:iiii iiii! :i'i ii!iiii !!;!; ii_:iiii!i!i!i!ii!ii_i:ii'_!_ii !iJi!ii_ i;i_i_!_ii iiiiii USING THE COOKTOP/COUNTERTOP LIGHT The pad on the bottom right of the control panel controls the cooktop/countertop light. 1. Turn on light. TOUCH O C> (once for regular light, twice for night light) 2. Turn off light when desired. TOUCH C> _G._G.
USING THE KITCHEN TIMER You can use your microwave oven as a kitchen timer. Use the Kitchen Timer for timing up to 99 minutes, 99 seconds, NOTE: The oven can operate while the Kitchen Timer is in use. To see the Kitchen Timer while the oven is cooking, touch KITCHEN TIMER. 1. Touch KITCHEN TIMER. TOUCH YOU SEE 2. Enter the time to be counted down.
USING ADD ONE MINUTE ADD ONE MINUTE lets you cook food for 1 minute at 100% cook power or add an extra minute to your cooking time cycle. You can also use it to extend cooking time cycles in multiples of 1 minute, up to 99 minutes. NOTES: - To extend cooking time cycles in multiples of 1 minute, touch ADD ONE MINUTE repeatedly during cooking. - After closing the door, you can enter ADD ONE MINUTE without having to touch START/ENTER.
Microwave Oven Use This section gives you instructions for operating each function. Please read these instructions carefully. COOKING AT HIGH COOK POWER 1. Put your food in the oven and close the door. 2. Touch COOK TIME. TOUCH YOU SEE 3. Enter the cooking time. TOUCH YOU SEE Example for 1 minute, 30 seconds: G G 4. Start the oven.
COOKING AT DIFFERENT COOK POWERS For best results, some recipes call for different cook powers. The lower the cook power, the slower the cooking. Each Number pad also stands for a different percentage of cook power. Many microwave cookbook recipes tell you by number, percent, or name which cook power to use. The following chart gives the percentage of cook power each Number pad stands for, and the cook power name usually used. It also tells you when to use each cook power.
COOKING AT DIFFERENT COOK POWERS (CONT.) i....................................................................................................................................................................................................................................................................................................................................................................................................................................................................................
iiii!i! ! iii_!i _ii:iiiiiii!i _i _iil!il i!iiiiiiiii!? Yll ii!iiiii_!iiiiiii_'!iiii_ '''iiiiiiii_iiill i_iiiii ¸;_iiii iiiiii!'_!iiii iii!iiiiii ii!i!_ iiiiil!_i i_iif?: ,', :i!:!i iiiii!iii I COOKING i IN STAGES For best results, some recipes call for one cook power for a certain length of time, and another cook power for another length of time. Your oven can be set to change from one to another automatically, for up to 3 stages. You can set your chosen cook functions in any order.
COOKING IN STAGES (CONT.) 6. Start the oven. TOUCH YOU SEE After the first stage is over, the next stage(s) will count down. (first stage, when cooking with 2 stages) At the end of the cooking time: YOU SEE (four tones will sound) You can change cooking times or cook powers for a stage any time after that stage starts by repeating Steps 2, 3 and/or 4 and 5.
iii+i! !i!+++iii++!i++++i+i+ i i!iiiiii+iii!+ii?+! :I!iiYll ii!iiiii! i?iii+ii; Iiiii!iiiiii?++!iii+i!++ii!ili+iiiii+ !+++il;+iii++++iii!iiiiii++ii!i! ii: I +++iiiiil! i i++ +iiii:ii+i+ i+i!!iii USING AUTO COOK You can cook microwavable foods just by choosing a category and quantity. AUTO COOK has preset times and cook powers for 7 categories (see chart below). 3. Touch a Number pad to enter the quantity.
USING AUTO REHEAT You can reheat microwavable foods just by choosing a category and quantity. AUTO REHEAT has preset times and cook powers for 4 categories (see chart below). 3. Touch a Number pad to enter the quantity. Example cup (250 mL) for 1 You see To use AUTO REHEAT, follow the steps below: Example for cup (250 mL) 1. Touch 4. Touch once You see YOU SEE (countdown time may vary) 2. Touch AUTO REHEAT 1 to 4 times to choose the type of food.
USING ULTRA DEFROST TM You can defrost food by choosing a category and setting a weight. ULTRA DEFROST TM can be used only for defrosting of frozen foods in the categories of Meat, Poultry or Fish. For defrosting foods or weights not listed, manually set a defrosting time using 30% power. ULTRA DEFROST TM has preset times and cook powers for 3 categories (see following chart). To use ULTRA DEFROST 3. Touch Number pad(s) to enter the weight. I follow the steps below: TM, BR_D__ DEFROST J once 2.
USING ULTRA DEFROST ii!_O_ __ TM (cont.) ©O_t@_;:_i!!_ _:_OS_ • The shape of the package affects how quickly food will defrost. Shallow packages will defrost more quickly than a deep block. • As food begins to defrost, separate the pieces. Separated pieces defrost more evenly. • Use small pieces of aluminum foil to shield parts of food such as chicken wings, leg tips, fish tails, or areas that start to get warm. Make sure the foil does not touch the sides, top, or bottom of the oven.
iiii!!T!_li _i!i liiii:iiiii!!i!j ii_iiiiiiiiil iiiiiii"_ii!_ij_! i!ili _i!ii!:iiil lliiiiiiili '_iii ii!!iii ii!_iiiiiii_i!iiiiiii!!!! !iiiii_iiiii_iill_l ULTRA DEFROST CHART FOOD i TM (CONT.) SPECIAL INSTRUCTIONS Chicken Whole Place chicken breast-side up on a microwavable roasting rack. Finish defrosting (up to 9-1/2 Ibs [4.3 kg]) by immersing in cold water. Remove giblets when chicken is partially defrosted. Cut Up Place on a microwavable roasting rack.
DEFROSTING TIPS • When using ULTRA DEFROST TM, you need to enter the net weight (the weight of the food minus the container). Enter the weight to the nearest 1/10 Ib (45 g). • Only use ULTRA DEFROST TM for raw food. ULTRA DEFROST TM gives best results when the food to be thawed is completely frozen. If the food is partially defrosted, always set a lower food weight (for a shorter defrosting time) to prevent cooking the food.
USING BREAD DEFROST You can use this feature for defrosting bread. The feature works similarly to ULTRA DEFROST TM. BREAD To use BREAD DEFROST, follow the steps below: 1. Touch the BREAD DEFROST side of pad to enter the Bread Defrost function. TRA I BR_D_ DEFROST once 1 The display will ask you to enter the weight. 2. Touch number pad(s) to enter the weight in pounds and tenths of a pound. Large Muffin 3. Touch START. The estimated defrost time is displayed. The time display begins counting down.
USING MELT The oven uses low power to melt foods (butter or margarine, chocolate, marshmallows, or processed cheese food). See the following chart. 3. Select food to be melted, (See the following chart.) 1. Place food in oven and close the door. 4. Select amount. ...........................................................................................................................................................................................................................
USING SURE SIMMER Your microwave oven lets you simmer soups, casseroles, stews, and other liquid foods. All you do is set a simmer time and your oven will bring your food to a boil and then simmer it for the time you specify. connected to power or after a power failure. If you start SURE SIMMER during the warm-up, microwave energy will not be turned on until the sensor is warm. NOTES: When cooking vegetables, increase amount of water to 1/4 to 1/2 cup (60 to 125 mL). Cover dish with a hard lid, i.e.
SENSOR COOKING Food releases humidity during cooking/heating. How much humidity food releases is affected by the quantity, temperature, and shape of the food. Your microwave oven has a sensor that detects this humidity. The amount of humidity detected tells the oven how long to cook or heat your food. You can sensor cook when preparing any of 7 types of food. Just touch the pad for the food you want to cook or heat (see the chart below). To sensor cook: 1. Touch a SENSOR COOK pad.
USING HOLD WARM Food Poisoning Hazard Do not let food sit in oven more than one hour before or after cooking. Doing so can result in food poisoning or sickness. You can keep hot, cooked food warm in your microwave oven. You can use HOLD WARM by itself, or to automatically follow a cooking cycle. NOTES: • Opening the oven door cancels HOLD WARM. Close the door and touch HOLD WARM, then touch START/ENTER if additional HOLD WARM time is desired. • Food cooked covered should be covered during HOLD WARM.
Microwave Oven Care To make sure your microwave oven looks good and works well for a long time, you should maintain it properly. For proper care, please follow these instructions carefully. For interior surfaces: Wash often with warm, sudsy water and a sponge or soft cloth. Use only mild, nonabrasive soaps or a mild detergent. Be sure to keep the areas clean where the door and oven frame touch when closed. Wipe well with clean water.
ii!!!illii!i!iiiiiii !sii :!iiiii i!i ! i i iiii!i! l iiiii!l!iiii!!i;iiiii;iiiiiiii ! INSTALLING AND CARING FOR FILTERS 3, Soak grease filters in hot water and a mild detergent. Scrub and swish to remove embedded dirt • and grease. Rinse well and DISHWASHEP shake to dry. Do not use ammonia, corrosive cleaning agents such as lye-based oven cleaners, or place in a dishwasher. The filter will turn black or could be damaged. CLEANER Electrical Shock Hazard _ _ Disconnect power before removing filters. 4.
REPLACING THE COOKTOP AND OVEN LIGHTS 2. Remove the bulb cover mounting screw and carefully remove the cover. i 3. Replace bulb(s) with candelabra-base 10-watt halogen bulb(s) (Part No. 8169418) available from your Sears Service Center. 4. Replace the bulb cover and mounting screw. 5. Replace the bulb with a candelabra-base 10-watt halogen bulb (Part No. 8169418) available from your Sears Service Center. 6. Close the bulb cover. 7. Slide the 3M filter into )lace.
C G MICROWAVE COOKING TIPS • If you increase or decrease the amount of food you prepare, the time it takes to cook that food will also change. For example, if you double a recipe, add a little more than half the original cooking time. Check for doneness and, if necessary, add more time in small increments. • The lower the temperature of the food being put into the microwave oven, the longer it takes to cook. Food at room temperature will be reheated more quickly than food at refrigerator temperature.
MICROWAVE COOKING TIPS (CONT.) • Place the container in a glass bowl and add some water so that it covers the bottom of the container, not more than ¼ in. (.64 cm) high. This ensures even heating of the container bottom. ° Reheating food in aluminum foil containers usually takes up to double the time compared to reheating in plastic, glass, china, or paper containers. The time when food is ready will vary depending upon the type of container you use. • Always remove the lid to avoid damage to the oven.
Questions and Answers QUESTIONS ANSWERS Can I operate my microwave oven without the turntable or turn the turntable over to hold a large dish? No. If you remove or turn over the turntable, you will get poor cooking results. Dishes used in your oven must fit on the turntable. Can I use a rack in my microwave oven so that I may reheat or cook on two levels at a time? You can use a rack only if the rack is supplied with your microwave oven.
Troubleshooting Most cooking problems often are caused by little things you can find and fix without tools of any kind. Check the lists below and on the next page before calling for assistance or service. If you still need help, see the Sears toll-free numbers on the back cover. MICROWAVE OVEN DOES NOT WORK PROBLEM CAUSE Nothing works. • The power supply cord is not plugged into a grounded 3 prong outlet. See the "Electrical requirements" and the "Electrical connection" sections.
iiii6 ! ii7 i!i!iiiiiiiiiii:i iiiiJiii311 !liiii!ii! !!{{iiiiiiii:Ki K_i!i!iii?ii;iiil;:i_i i_"! I!'i! il;iiiiiil ¸_,! li! TURNTABLE PROBLEM CAUSE The turntable will not turn. • The turntable is not correctly in place. It should be correct-side up and sitting firmly on the center shaft. • The support is not operating correctly. Remove the turntable and restart the oven. If the support still does not move, call an authorized service technician for repair.
f [] Garantia .................................................................... 42 Reparamos Io que vendemos ................................. 43 Seguridad del horno de microondas ..................... 44 Conozca su horno de microondas ......................... 47 Como funciona su combinacion microondas campana de Kenmore ULTRA WAVE TM ................ 47 Interferencia electromagnetica ............................. 48 Como probar su homo de microondas ................
Reparamos Io que vendemos Su compra adquiere un nuevo valor ya que usted puede confiar en Sears HomeCentral® para obtener servicio de reparacion. Con mas de 12,000 especialistas capacitados en reparaciones y acceso a mas de 4.2 millones de piezas de repuesto y accesorios, contamos con las herramientas, piezas, conocimiento y la destreza para asegurarnos de cumplir nuestra promesa de que: Reparamos Io que vendemos.
I Se rida microondas Su seguridad y la seguridad de los demos es muy importante. Hemos incluido muchos mensajes importantes de seguridad en este manual yen su electrodomestico. Lea y obedezca siempre todos los mensajes de seguridad. Este es el simbolo de advertencia de seguridad. Este simbolo le llama la atenci6n sobre peligros potenciales que pueden ocasionar la muerte o una lesi6n a usted y a los demas.
INSTRUCCIONES IMPORTANTES • Para reducir el riesgo de incendio en la cavidad del horno: - No recocine los alimentos. Vigile cuicado solamente atenci6n al homo si usa papel, plastico u otro material combustible dentro del homo para facilitar la cocci6n. DE SEGURIDAD * No use articulos de papel mientras la operacion del homo ester en el modo "TOP BROWN" (Dorado en la sarten) (en modelos con esta caracteristica).
REQUERIMIENTOS EL¢:CTRICOS Cumpla con todos los c6digos y 6rdenes vigentes. Se requiere un suministro de electricidad de 120 voltios, 60 Hz, Qnicamente CAde 15- 6 20amperios a fusible. (Se recomienda un fusible de acci6n retardada o un disyuntor.) Se recomienda que se use un circuito dedicado exclusivamente para este aparato electrodomestico. Peligro de Choque Electrico Conecte a un contacto de pared de conexi6n a tierra de 3 terminales, No quite el terminal de conexi6n a tierra. No use un adaptador.
Conozca su horno de microondas Esta secci6n habla de los conceptos de cocci6n a microondas. Tambien le muestra los elementos basicos que usted debe conocer para operar el horno de microondas. Por favor lea esta informaci6n antes de usar su horno. COMO FUNCIONA SU COMBINACION MICROONDAS COMPANA DE KENMORE ULTRA WAVE TM La energia de microondas no produce calor. Esta energia hace que los alimentos generen calory este a su vez hace que los alimentos se cocinen.
ii_! _:iiiill !iiil;:iii:i ¸¸¸' i!'iiiili:_iii'i,i?iiii: iiii_i_';! !_;lii, iiii_ i__!'_'_iiiiii:;!:_ii_il"ii'l i_iiiiiiiiii: l!'iiiii_i _"_i!_li"i_i "ii'i !iiiii_"ii:iii!i_iiii_! iii;i;i:iili'i!"_ii'ii!i:ii_!: _i iliiil i INTERFERENCIA ELECTROMAGNI_TICA El uso de su horno de microondas puede causar interferencia con su radio, TV o equipos similares. Si hay interferencia, usted puede reducirla o eliminarla: • Limpiando del horno.
i CONSEJOS iiiii;i!i i_i_i_'_S/iii;_l;;!!!!i!iiiiil;i::ili'i;!ii_ i!_iiliiii:i!;iiiii!'i!i<_i"! i!"I !iiiiiil;_ii:i"'ii;!'_!"'i !"i_iii; !'"_i_}; :i'_ii!ii!i:!ili I'_ i_i_i_l il;iiiii_i_iiii'::i ;iiii;ii!_i:! _ili"_'_i"'_i;_; i_ii_!i!!!ii PARA LA OPERACION • Las microondas pueden no Ilegar al centro de un asado. El calor se extiende al centro desde la parte de afuera cocinada, Io mismo que cuando se cocina en un homo comQn.
CARACTERISTICAS DEL HORNO DE MICROONDAS 14 13 12 15 11 II 9 2 3 74 Su horno de microondas ester dise_ado para hacer que su experiencia en la cocina sea Io mas placentera y productiva posible. Para ayudarle a estar preparado y listo rapidamente, la siguiente es una lista de las funciones basicas de su horno de microondas: 1. Asa de la puerta. Jale para abrir la puerta. 2. Sistema de seguro para la puerta. El horno no operara a menos que la puerta este cerrada o asegurada. 3.
CARACTERiSTICAS DEL HORNO DE MICROONDAS • Quite la cinta adhesiva del centro (NOmero de Lineas curvas parte 4393754). • Coloque el soporte en (NOmero de parte 4393752) en el fondo de la cavidad. • Coloque la bandeja giratoria en el centro. Cerciorese de que las curvas en relieve del centro de la parte inferior de la bandeja giratoria esten entre los tres "rayos" (CONT.) • Las rodillas (NOmero de parte 4393753) del soporte deberan entrar en el carril de la parte inferior de la bandeja giratoria.
PARTES DEL PANEL DE CONTROL 1. Pantalla. Esta pantalla induye un reloj e indicadores que le pen-nitensaber la hora, la programad6n del tiempo de cocci6n y las funciones de cocci6n que usted elige. 2. AUTO REHEAT (Recalentado automatico). Toque este bot6n para recalentar alimentos especiales para microondas sin necesidad de introducir tiempos o energias de cocci6n. ; 3. DINNER PLATE (Plato llano). Toque este bot6n para calentar un plato llano de alimentos, sin ingresar ni tiempo ni intensidad de cocci6n.
PARTES DEL PANEL DE CONTROL (CONT.) NOTAS: ° Si introdujo los valores para una funcion pero no ha tocado START/ENTER en 5 segundos, aparecera el indicador START? (INICIAR?). ° Si elige una funcion pero no toca otro boton de comando en un minuto, la pantalla regresara a la hora del dfa y tendra que empezar de nuevo.
iiii!!illiii;_!!!_ilili i_i! ''iii!i_:i _! ii_iii: :iiii_!!_ill !_ili! _!i i_!:::_!ii:_ _i!i!iiiii!iii_:_: iļi:_i i_I i;iiii_i _i:_i_i:ii iiiiii_i! i!!!ii_ ii!!i !ii_il!!_!_i PARTES DEL PANEL DE CONTROL (CONT.) Para desbloquear el panel de control: CO _¸_¸_ _i _¸¸¸_@_©S Cuando calienta platos con alimentos a un tiempo de coccion de su eleccion, usted podra calentar dos platos de 11 pulgadas (28 cm) juntos o un plato mas grande que la bandeja giratoria.
COMO UTILIZAR LA PARRILLA DE COCCION La parrilla de coccion le proporciona un espacio adicional para cocinar en mas de un recipiente a la vez. Si necesita una parrilla de repuesto, puede ordenar una a Centro de Servicio Sears. Pot favor tome referencia de los nQmeros de servicio en la contraportada de este manual. AsegQrese de tenet a la mano el nQmero de modelo cuando ordene.
ii!!ii!!ill i;iii! !!Iiiiiii!ii_iii:i:!i_ii! i__i! i:i!iI _iiii_ii !iiliii;;i_i _iiIi!'_ii!ii_ii_il iIiJ!iJ_i_i!ii!iii iii_iiTiiii_iiiii!il ¸_i_i;!i _;iiii :!_!!i!iii_:!i!! ! COMO UTILIZAR EL EXTRACTOR DE AIRE Los dos botones en la parte inferior izquierda del panel de control sirve para manejar el extractor de 5 velocidades. 1. Seleccione la velocidad del extractor. TOQUE O 0N/OFF 2. Seleccione la velocidad del extractor.
COMO PROGRAMAR EL RELOJ Cuando conecte por primera vez su homo de microondas o despues de una falla electrica, la pantalla desplegara el signo ":" de manera intermitente. Si no se programa una hora, el signo ":", destellara hasta que presione alg0n boton. NOTAS: 1. Toque (_. TOQUE USTED VE 2. Introduzca la hora del dfa. TOQUE USTED VE USTED VE Ejemplo para las 12:00: • Si selecciona una hora no valida y toca el simbolo del reloj, se escucharan 3 tonos. Introduzca la hora correcta.
ii!!!ii_il;i iiii! iii!i_ :i;_ii:i_i i!_ili!_ !i i_ _!iiii!ii_ i!i!i;ii!iii_:_i iļii_i i_li;iiii_i _i:_i_iiii iiiiiii_iii!_iii!ii_ii!!!_iil!!_! COMO UTILIZAR EL CRONOMETRO Puede utilizar su horno de microondas como un cronometro. Utilice el cronometro para cronometrar hasta 99 minutos y 99 segundos, NOTA: El horno puede funcionar mientras se utiliza el cronometro. Para ver el cronometro mientras funciona el homo, toque KITCHEN TIMER. 1. Toque KITCHEN TIMER. TOQUE USTED VE [] 2.
! !!!ii i Y! iJiliiiiiiilii!iiiiiiii¸¸¸ ii!!!!ii!ii!!i!iii C(SMO UTILIZAR ADD ONE MINUTE (UNMINUTOMAS) ADD ONE MINUTE permite cocinar los alimentos durante 1 minuto a un nivel de energfa de coccion de 100%, o bien, agregar un minuto extra al ciclo de coccion. Tambien Io puede utilizar para prolongar los ciclos de coccion en mQltiplos de 1 minuto, hasta 99 minutos. NOTAS: ,, Para prolongar los ciclos de coccion en m_ltiplos de 1 minuto, toque ADD ONE MINUTE repetidamente durante la coccion.
Cbmo utilizar su horno de microondas Esta seccion le proporciona instrucciones. las instrucciones COMO COClNAR para operar cada funcion. Por favor, lea cuidadosamente A UN NIVEL ALTO DE ENERGiA 1. Coloque la comida dentro del homo y cierre la puerta. 2. Toque COOK TIME. TOQUE USTED VE 3. Introduzca el tiempo de coccion. TOQUE USTED VE USTED VE Ejemplo para 1 minuto, 30 segundos: G G 4. Encienda el horno.
COCClON A DISTINTAS INTENSIDADES Para obtener optimos resultados, algunas recetas necesitan distintas intensidades de coccion. Cuanto mas baja es la intensidad, mas lenta es la coccion. Cada boton numerado tambien representa un porcentaje distinto de intensidad de coccion. Muchas recetas de libros de cocina para microondas le indican mediante un nQmero, porcentaje o nombre, la intensidad de coccion que debe utilizar.
ii!liiiliiiiiiiiiii iii i_;_ ii/_ i_iii !_!iliii! _lil _iI :;ii_iiiii i_iiii!l ii!!!! '!!!ii::_ _!i!i!i!i!i _iii ¸ii:iiliiiiii!!il!ii!i!!i li!!I COCClON A DISTINTAS INTENSIDADES (CONT.) 1. Coloque su comida en el horno y cierre la puerta. 2. Toque COOK TIME. TOQUE USTED VE 3. Introduzca el tiempo de coccion. TOQUE USTED VE TOQUE USTED VE USTED VE Por ejemplo, para 7 minutos, 30 segundos: 4. Establezca el nivel de intensidad de coccion.
COCClON A DISTINTAS INTENSIDADES (CONT.) l G6_O ©_b_ _ _S _S_%_©_O_@S Puede cambiar el tiempo o la intensidad de coccion en cualquier momento si repite los pasos 2, 3 y/o 4 y 5. COMO COCINAR POR PASOS Para mejores resultados, algunas recetas requieren una intensidad de coccion para un determinado lapso de tiempo y otra intensidad de coccion para otro lapso de tiempo. Puede programar su homo para cambiar de un nivel de intensidad a otro automaticamente hasta tres pasos diferentes.
COMO COCINAR POR PASOS (CONT.) 4. Establezca la intensidad de coccion para el TOQUE USTED VE TOQUE USTED VE primer paso. Ejemplo, para un nivel de intensidad de coccion del 50%: O (repita la operacibn hasta que aparezca la intensidad de coccibn deseada) 5. Repita los pasos 2, 3 y 4 para programar el tiempo y la intensidad de coccion para cada paso adicional. 6. Encienda el horno. TOQUE Despues de haber completado el primer paso, el(los) siguiente(s) se contara(n) de manera regresiva.
COMO UTILIZAR AUTO COOK Puede cocinar alimentos preparados para hornos de microondas seleccionando simplemente una cantidad y categoria. AUTO COOK tiene tiempos e intensidades de coccion preestablecidos para 7 categorias (vea la tabla siguiente). (COCCION AUTOMATICA) 3. Toque uno o mas nOmeros del panel para introducir la cantidad. Ejemplo para 1 taza (250 mL) Para utilizar AUTO COOK, siga estos pasos: USTED VE 1. TOQUE Ejemplo para 1 taza (250 mL) una vez 4. TOQUE USTED VE 2.
COMO UTILIZAR AUTO COOK (COCCION AUTOMATICA)(CONT.) 2 1 a 4 piezas 3 0.5 a 2 tazas** (125 mL a 500 mL) poch_ Arroz (sensor) 3 veces 1 a 4 piezas Huevos revueltos 6 veces 6 1 a 4 huevos Tocino 7 veces 7 1 a 6 piezas, espesor normal * Debe tocar AUTO COOK una vez antes de elegir el tipo de comida. ** Ya que este alimento se cocina por medio de sensor, no es necesario que introduzca la informaci6n de la cantidad. La cantidad que se muestra aqui es la cantidad que puede cocinar.
COMO UTILIZAR AUTO REHEAT (RECALENTADO AUTOMATICO) Puede volver a calentar alimentos preparados para hornos de microondas simplemente seleccionando una cantidad y categoria. AUTO REHEAT tiene tiempos e intensidades de coccion preestablecidos para 4 categorias (vea la tabla siguiente). 3. Toque un nQmero del panel para introducir la cantidad. Ejemplo para 1 taza (250 mL) USTED VE Para utilizar AUTO REHEAT, siga estos pasos: 1. TOQUE Ejemplo para 1 1 taza (250 mL) 4.
COMO UTILIZAR ULTRA DEFROST (DESCONGELACION VELOZ) Usted puede descongelar los alimentos eligiendo una categofia y fijando un peso. ULTRA DEFROST TM puede ser usando solo para una descongelacion de alimentos congelados en las categofias de came, aves o pescado. Para la descongelation de alimentos o pesos no alistados, ajuste manualmente un tiempo de descongelacion usando una potencia del 30%. ULTRA DEFROST TM tiene tiempos e intensidades de coccion para 3 categorias (vea el siguiente cuadro).
ii!i!i_i !!!! !ii ii!i !i!!ii fill ii;! ll!!!i iiiiil!i: iii/ii ll!!!! !i!! iiili !!!i!!i! _ilii ii!!! Iiii i!ii !i!!i liiiiiZ iii !Ii iiiLi!iil ii!!iii! !!! !!iii!i!!!il !!iiiiii!! !_ !ii! !!i i iiili¸iI ii!!!!i !ii!iiii!iif! i!iiiii! !ii!i;!!il il!ii!!iii!! _!i i COMO UTILIZAR ULTRA DEFROST • La forma del paquete afecta el grado de rapidez con que los alimentos se van a descongelar. Los paquetes poco profundos se descongelaran con mas rapidez que un bloque profundo.
CUADRO ULTRA DEFROSTTM (DESCONGELACION VELOZ) (CONT) ALIMENTO INSTRUCCIONES ESPECIALES Polio Entero (hasta 9-1/_Ibs (4.3 kg) En piezas Coloque el polio con la pechuga hacia arriba en una parrilla especial para rostizar para microondas. Termine de descongelarlo sumergiendolo en agua fria. Retire las menudencias cuando el polio este parcialmente descongelado. Coloquelo en una parrilla para rostizar en microondas. Termine de descongelarlo sumergiendolo en agua fria.
ii CONSEJOS ii!iiil;:il __I! i_!!!iii _i!!W ii!!!i! !_!iii_i_ ¸ii i ii:!!l i _l!ii!ii!!ii ii!i_!iilii̧i!!:i_ _iii_!i!iZ !:_i! DE DESCONGELADO ,, Cuando utilice ULTRA DEFROST TM, (Descongelacion veloz), necesita introducir el peso neto (el peso del alimento menos el del recipiente). Introduzca el peso Io mas cercano a K0 Ib (45 g). ,, Solo utilice el ULTRA DEFROST TM para alimentos crudos. ULTRA DEFROST TM le brinda los mejores resultados cuando el alimento a descongelar ester completamente congelado.
i ;;iiiiil il:iiiiYiiil_i_ i !iiii_iiiii_iiiiiiilili_;iiiT! i_'iiiii:!i_liiiiii! !;li_iiii:iiiiiiiii:i;l_i_ii!_iiiiiiiiiiiii_ii! ¸?!i! i_i i'_iili iii_iii!iiiill iiiiii_iiii!!i i;!_!i;_i!!! COMO UTILIZAR BREAD DEFROST (DESCONGELACION DE PAN) descongelacibn aparecer& en la pantalla. El tiempo indicado en la pantalla comienza la cuenta regresiva. 1. Toque el botbn BREAD DEFROST para ingresar la funcibn de descongelacibn de pan. I_TRA i BR_ t DEFROST_..J una vez La pantalla le pedira que indique el peso.
C(SMO UTILIZAR SOFTEN (ABLANDAR) El homo usa una potencia baja para ablandar alimentos (mantequilla, queso crema, helado o jugo congelado). Vea la tabla siguiente. 1. Coloque el alimento cierre la puerta. en el horno y 2. Toque el botbn SOFTEN la funcibn de ablander. 3. Seleccione ablandar. (Toque una vez para mantequilla, dos veces para helado, 3 veces para queso crema, o 4 veces para jugo congelado). el alimento I Seleccione la cantidad.
iiii!i;i_i ii!ii_!:?iiiiiiii¸_i!! il !l!i_iiii_!i!!!_i i!_iil!ii! _lil I iiiil;:::i _i'_iii!' :iiiii:ii! ii!_:ii!_i! _ii_!_ !ii/il_i:i _ii;i_i_!l! !_ii!ii_!ii !!_ MELT CHART CONT.) ALIMENTO TOQUE SOFTEN OTOQUE NUMERO DEL PANEL CANTIDADESA ESCOGER Marshmallows 4 veces 4 5 o 10 onzas AL FINAL DE LA COCClON Se puede usar malvaviscos grandes o miniaturas. Remueve al final de la coccion para derretir completamente. i COMO UTILIZAR BEVERAGE 1.
COMO UTILIZAR SURE SIMMER COCClON SEGURA A FUEGO LENTO) (CONT.) 4. Toque START/ENTER. TOQUE USTED VE El horn© Ilevara los alimentos al punt© de ebullicion. Luego los alimentos herviran a fuego lento durante el tiempo que usted fije. i, : :,: ::: ©S :: :: S ©::::i: ::© 1: S : Use un recipiente con capacidad suficiente para que el agua cubra los alimentos por completo durante la cocci©n, como una cacerola de 3 cuartos (12 tazas [2.84 I]) con tapa.
COCClON POR SENSOR (CONT.) _/ i!iii_iiii!!!!iC,i_!;!!i_i_ ii_::!iii C_iiiiiiiiii_!i!!!_i!_iii_!:!;_iiiiiiCii_ii!!!_ 1 El que tan bien se hagan las palomitas depende del tipo de palomitas y de la cantidad de grasa que contengan. Experimente con diferentes tipos de palomitas de maiz para decidir curries se hacen mejor. Para un mejor resultado utilice paquetes de palomitas de maiz mas frescos. i.................................................................................................................
COMO UTILIZAR HOLD WARM (Mantener Caliente) Peligro de Intoxicacion Alimentaria No deje sus alimentos en el horno por mas de una hora antes o despues de su coccion, No seguir esta instruccion puede ocasionar intoxicacion alimentaria o enfermedad. Usted puede conservar calientes los alimentos cocinados en su homo de microondas. Puede utilizar HOLD WARM por s[ solo, o bien seguido automaticamente por un ciclo de coccion. NOTAS: " Abrir la puerta del horno cancela HOLD WARM.
Cbmo cuidar su horno de microondas Para asegurarse de que su homo de microondas se vea y funcione bien por mucho tiempo, debe darle el mantenimiento apropiado. Para un cuidado adecuado, pot favor siga cuidadosamente estas instrucciones. Para las superficies interiores: Lave frecuentemente con agua tibia jabonosa y una esponja o lienzo suave. Utilice solamente jabones suaves, no abrasivos o un detergente suave.
COMO INSTALAR Y CUIDAR LOS FILTROS Peligro de Choque Desconecte el suministro de quitar los filtros. El_ctrico de energia antes Vuelva a colocar todos los paneles antes de hacer funcionar. No seguir estas instrucciones puede ocasionar la muerte o choque el_ctrico. Se deben quitar con frecuencia los filtros de grasa (aluminio) para limpiarlos, al menos una vez al mes. Puede ordenar refacciones (N0mero de parte 8184001) disponibles en el centro de servicio Sears mas cercano.
ii!ii!!i_ !i!i: i!i!i!!__!!_l!i_i::!_i ii _iiUiiiiiiii; i _ii:!!l iliiil :I!;iiiii i!i!iii!iii!_! ii!iiii_ii_ iiiiiii!: i_iiiil;;ii_!i:iiii_ _!:iii_!!iiii!!!!!ii_! C(SMO CAMBIAR LAS LUCES DEL HORNO Y DE LA SUPERFICIE DE COCCION 1. Desenchufe el horno de microondas o desconecte el suministro de energfa. 3. Recorre el filtro 3M hacia adelante y levantelo para quitarlo. 2. Quite el tornillo de montaje de la cubierta del foco y retirela con cuidado. 4. Levante la cubierta del foco.
COMO CAMBIAR LAS LUCES DEL HORNO Y DE LA SUPERFICIE PARA PREPARACION DE ALIMENTOS (CONT.) 7. Deslice el filtro 3M a su lugar. NOTA: Vea el borde del filtro de carbon para la ori_l_ _ entacion correcta. 8. Deslice la parte superior de la rejilla de I Toque entilacion a suinferior lugar. la parte hasta que quede perfectamente colocada. 9. Enchufe el horno de microondas suministro de energ[a.
G" pa coci r CONSEJOS PARA COCINAR CON EL HORNO DE MICROONDAS i _,: : • Si usted aumenta o disminuye la cantidad de alimentos que prepara, el tiempo requerido para cocinarlos tambien cambiar& Per ejemplo, si usted usa el doble de una receta, agregue un poco mas de la mitad del tiempo de coccion original. Verifique si ester cocido y, si es necesario, agregue mas tiempo en incrementos peque_os.
CONSEJOS PARA COCINAR CON EL HORNO DE MICROONDAS (CONT.) = Cuando cocina alimentos con forma o espesor irregular, tales como pechugas de polio, coloque las partes mas pequefias y delgadas hacia el centro del plato donde se calentaran en L_ltimo lugar. • Siempre quite la tapa para evitar que el horno se da_e. • Apile las rodajas delgadas otra. ° El recipiente la mitad. de came una sobre • Use solo recipientes que no est_tn da_ados. • No use recipientes mas altos de _ de pulg (1.9 cm).
Preguntas y respuestas PREGUNTAS RESPUESTAS 4,Puedo hacer funcionar mi horno de microondas sin la bandeja giratoria o voltear la bandeja giratoria para acomodar un plato mas grande? No. Si usted saca o da vuelta a la bandeja giratoria, tendra resultados de coccion insatisfactorios. Los platos que use en su horno deben caber en la bandeja giratoria.
m | n6sti Y [] C| f pPo La mayoria de losproblemas alcocinara menudo son causados pot peque_as cosas que ustedpuede encontrar y arreglar sin herramientas de ningt3n tipo. Revise las siguientes listas detalladas a continuaci6n yen la pr6xima p_gina antes de pedir ayuda o servicio. Si usted a0n necesita ayuda, vea los n0meros telef6nicos gratuitos de Sears, que se encuentran en la contraportada. EL HORNO DE MICROONDAS NO FUNCIONA PROBLEMA CAUSA Nada funciona.
ii!!!!iiiii'iJ! ii__ii_ii_!_ _Iiiii_i_ :i:i!!!!il i!'Jii _iiiii:iii;i iliiili; _il'_'¸ ii_!!!ii_ i;iiii;i iiiiiiiil !ilii_iiiii: :i'll iiii_i! i'!!i'fill iii_iiiiii _! iiiii_i ilill i!ii_iill !i_!_ ii!!_i!ill _!i i::_iiii!!!_i li_i BANDEJA GIRATORIA PROBLEMA CAUSA La bandeja giratoria no funciona, • La bandeja giratoria no esta en su debido lugar. Su posicion correcta debe ser con el lado piano hacia arriba y bien asentada en el eje central. • El soporte no esta funcionando correctamente.
For repair of major brand appliances in yourown iiiiiiiiiiiiiiiiiiiiiiiiiiiiiiiiiiii nomatterwhomadeit, iiiiiiiiiiiiiiiiiiii iiiiiiiiiiiiiiiiiiii iiiiiiiiiiiiiiiiiiii ®Anytime, dayornight (1-800-469-4663) i:i:i:i:i:i:i:i:i:i:i:i:i:i:i:i:i:i: iiiiiiiiiiiiiiiiiiiiii nomatterwhosoldit! i:i:i:i:i:i:i:i:i:i:i:i:i:i:i:i:i:i:1-800-4-MY-HOME iiiiiiiiiiiiiiiiiiiiiiiiiiiiiiiiiiii home... (U.S.A. andCanada) www.sears.com iiiiiiiiiiiiiiiiiiii www.sears.