Use & Care Guide Guide d’Utilisation et d’Entretien English / French Models/Modèles: 795.7248* Bottom Freezer Refrigerator Congélateur Inférieur Réfrigérateur * = color number, le numéro de la couleur Sears Brands Management Corporation Hoffman Estates, IL 60179 U.S.A. www.kenmore.com www.sears.com Sears Canada Inc. Toronto, Ontario, Canada M5B 2C3 www.sears.
TABLE OF CONTENTS Warranty............................................................................. 3 Freezer Section Protection Agreements .............................................. 4 CustomChill™ Drawer ................................. 30 Important Safety Instructions ........................... 5-7 Pullout Drawers ............................................ 30 Electrical & Grounding Requirements .............. 7 Durabase ........................................................
WARRANTY REFRIGERATOR WARRANTY Kenmore Elite Limited Warranty When this appliance is installed, operated and maintained according to all supplied instructions, the following warranty coverage applies. To arrange for warranty service, call 1-800-4-MY-HOME® (1-800-469-4663). • One Year Limited Warranty on Appliance For one year from the date of purchase, free repair will be provided if any non-consumable part of this appliance fails due to defects in material or workmanship.
PROTECTION AGREEMENTS Master Protection Agreements • Power surge protection against electrical damage due to power fluctuations. Congratulations on making a smart purchase. Your new Kenmore Elite® product is designed and manufactured for years of dependable operation. But like all products, it may require preventive maintenance or repair from time to time. That’s when having a Master Protection Agreement can save you money and aggravation.
IMPORTANT SAFETY INSTRUCTIONS BASIC SAFETY PRECAUTIONS This guide contains many important safety messages. Always read and obey all safety messages. This is the safety alert symbol. It alerts you to safety messages that inform you of hazards that can kill or hurt you or others, or cause damage to the product. All safety messages will be preceded by the safety alert symbol and the hazard signal word DANGER, WARNING or CAUTION.
WARNING • Before replacing a burned-out or broken light bulb, unplug the refrigerator or turn off power at the circuit breaker or fuse box in order to avoid contact with a live wire filament. (A burned-out light bulb may break when being replaced, exposing the wire filament.) • DO NOT touch the automatic ice making mechanism while the refrigerator is plugged in. • DO NOT refreeze frozen foods which have thawed completely. The United States Department of Agriculture in Home and Garden Bulletin No.
CFC/HCFC DISPOSAL Your old refrigerator may have a cooling system that used CFCs or HCFCs (chlorofluorocarbons or hydrochlorofluorocarbons). CFCs and HCFCs are believed to harm stratospheric ozone if released to the atmosphere. Other refrigerants may also cause harm to the environment if released to the atmosphere. If you are throwing away your old refrigerator, make sure the refrigerant is removed for proper disposal by a qualified technician.
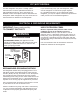
PARTS AND FEATURES J A K L B M C N D O E B E F P O G Q B R H S I T U R Use this page to become more familiar with the parts and features of your refrigerator. NOTE: This guide covers several different models. The refrigerator you have purchased may have some or all of the items listed below. The locations of the features shown below may not match your model.
REFRIGERATOR INSTALLATION WARNING WARNING Excessive Weight Hazard: Excessive Weight Hazard: Your refrigerator is heavy. When moving the refrigerator for cleaning or service, be sure to protect the floor. Always pull the refrigerator straight out when moving it. Do not wiggle or walk the refrigerator when trying to move it, as floor damage could occur. Use two or more people to move and install the refrigerator. Failure to do so can result in back or other injury.
REFRIGERATOR INSTALLATION INSTALLATION (continued) PRIOR TO USE 1. Clean your refrigerator thoroughly and wipe off all dust that accumulated during shipping. 1. To avoid noise and vibration, the unit must be leveled and installed on a solidly constructed floor. If required, adjust the leveling legs to compensate for unevenness of the floor. The front should be slightly higher than the rear to aid in door closing. Leveling legs can be turned easily by tipping the cabinet slightly.
REFRIGERATOR INSTALLATION NOTE: Removing the doors is always recommended when it is necessary to move the refrigerator through a narrow opening. If it is necessary to remove the handles, follow the directions below. HOW TO REMOVE REFRIGERATOR DOOR HANDLES Mounting Fasteners NOTE: Handle appearance may vary from the illustrations on this page. Removing Refrigerator Handles Set Screw Loosen the set screws with a 3/32 in. Allen wrench and remove the handle.
REFRIGERATOR INSTALLATION NOTE: Removing the doors is always recommended when it is necessary to move the refrigerator through a narrow opening. If it is necessary to remove the handles, follow the directions below. HOW TO REMOVE FREEZER DOOR HANDLES NOTE: Handle appearance may vary from the illustrations on this page. Removing Freezer Drawer Handles Loosen the set screws located on the lower side of the handle with a ⅛ in. Allen wrench and remove the handle.
REFRIGERATOR INSTALLATION REMOVING AND REPLACING REFRIGERATOR DOORS CAUTION: Before you begin, remove food and bins from the doors. (2) WARNING (1) Excessive Weight Hazard: Use two or more people to remove and install the refrigerator doors. Failure to do so can result in back or other injury. (3) (4) (5) (6) WARNING (7) Electrical Shock Hazard (8) 1. Open the door. Remove the top hinge cover screw (1). Lift up the cover (2). 2. Remove the cover. 3. Pull out the tube (3). 4.
REFRIGERATOR INSTALLATION Reinstalling the Refrigerator Door Left Door Right Door 1. Lower the door onto the middle hinge pin (9). 2. Fit the top hinge (4) over the hinge lever latch (5) and into place. Rotate the lever (3) counterclockwise to secure the hinge. 3. Hook the tabs on the right side of the hinge cover (2) under the edge of the top hinge (4) and position the cover in place. Insert and tighten the cover screw (1). 1. Lower the door onto the middle hinge pin (10). 2.
REFRIGERATOR INSTALLATION HOW TO REMOVE THE CUSTOMCHILL™ DRAWER HOW TO INSTALL THE CUSTOMCHILL™ DRAWER 1. Pull the drawer open to full extension. Remove the basket by lifting the basket from the rail system. 1. Grasp the door on each side and lower it into place on the rail system. NOTE : Before removing the CustomChill™ drawer, it must be disconnected from the temperature control. 2.
REFRIGERATOR INSTALLATION HOW TO REMOVE THE FREEZER DRAWER 3. Remove the middle drawer by pulling the drawer out to full extension. Lift the front of the drawer up, then pull it straight out. WARNING: • Use two or more people to remove and install the freezer drawer. Failure to do so can result in back or other injury. • Do not sit or stand on the freezer drawer. • To prevent accidental entrapment or suffocation, keep children and pets away from the drawer. Do not leave the drawer open.
REFRIGERATOR INSTALLATION HOW TO INSTALL THE FREEZER DRAWER 4. Insert the top pullout drawer into the frame, and push the drawer back into place until you hear a click. 1. Pull out both rails simultaneously until both rails are fully extended. 5. Slightly tilt up the front of the middle drawer, insert the drawer into the frame, and push it back into place. 2. Grasp the drawer on each side and hook the drawer supports into the rail tabs located on both sides.
REFRIGERATOR INSTALLATION LEVELING AND DOOR ALIGNMENT 2. Open both doors again and check to make sure that they close easily. If the doors do not close easily, tilt the refrigerator slightly more to the rear by turning both leveling legs to the left. It may take several more turns, and you should turn both leveling legs the same amount. Leveling After installing, plug the refrigerator’s power cord into a 3-prong grounded outlet and push the refrigerator into the final position.
USING YOUR REFRIGERATOR SETTING THE CONTROLS Temperature • The Refrigerator Temp Control ranges from 33°F to 46°F (1°C to 8°C). Press the Refrigerator Temp button to cycle through the available temperature settings one increment at a time. • The Freezer Temp Control range is from -6°F to 8°F (-21°C to -13°C). Press the Freezer Temp button to cycle through the available temperature settings one increment at a time. NOTE: When changing control settings, wait 24 hours before making additional adjustments.
USING YOUR REFRIGERATOR Accent Light ⁄ Light Sensor Air Filter This light has three settings: On, Off and Auto. If the light is set to the Auto mode, the Accent Light will automatically turn on and off according to the brightness of the room, as detected by the light sensor. The Air Filter helps remove odors from the refrigerator. The Air Filter has two settings, Auto and MAX. In Auto mode, the Air Filter will cycle on and off in increments of ten minutes on and one hundred and ten minutes off.
USING YOUR REFRIGERATOR Door Alarm Demo Mode (For Store Use Only) The Demo Mode disables all cooling in the refrigerator and freezer sections to conserve energy while on display in a retail store. When activated, OFF will display on the control panel. • When power is connected to the refrigerator, the door alarm is initially set to ON. When you press the Door Alarm button, the display will change to OFF and the Door Alarm function will deactivate.
USING YOUR REFRIGERATOR IN-DOOR ICE BIN CAUTION Keep hands and tools out of the ice compartment door and dispenser chute. Failure to do so may result in damage or personal injury. 2. To remove the in-door ice bin, grip the front handle, slightly lift the lower part, and slowly pull out the bin as shown. The icemaker will stop producing ice when the in-door ice bin is full. If you need more ice, empty the ice bin into the extra ice bin in the freezer compartment.
USING YOUR REFRIGERATOR AUTOMATIC ICEMAKER Ice is made in the automatic icemaker and sent to the dispenser. The icemaker will produce 70-210 cubes in a 24-hour period, depending on freezer compartment temperature, room temperature, number of door openings and other operating conditions. WARNING Personal Injury Hazard DO NOT place fingers or hands on the automatic ice making mechanism while the refrigerator is plugged in.
USING YOUR REFRIGERATOR AUTOMATIC ICEMAKER (continued) CAUTION WHEN YOU SHOULD SET THE ICEMAKER POWER SWITCH TO OFF (O) • The first ice and water dispensed may include particles or odor from the water supply line or the water tank. • When the water supply will be shut off for several hours. • When the ice bin is removed for more than one or two minutes. • When the refrigerator will not be used for several days.
USING YOUR REFRIGERATOR FOOD STORAGE GUIDE Wrap or store food in the refrigerator in airtight and moisture-proof material unless otherwise noted. This prevents food odor and taste transfer throughout the refrigerator. For dated products, check date code to ensure freshness. Items STORING FROZEN FOOD NOTE: Check a freezer guide or a reliable cookbook for further information about preparing food for freezing or food storage times. Freezing Your freezer will not quick-freeze a large quantity of food.
USING YOUR REFRIGERATOR REFRIGERATOR SECTION WATER DISPENSER WARNING: Do not put your fingers up the ice chute opening. Doing so can result in severe injury. To dispense cold water, push on the dispenser switch with a glass. CAUTION: Do not dispense ice into fine china or crystal glasses. China or crystal can break. NOTE: The dispenser is equipped with a light that turns on when the dispenser pad is engaged. Dispenser Switch Push Some dripping may occur after dispensing.
USING YOUR REFRIGERATOR REFRIGERATOR SHELVES The shelves in your refrigerator are adjustable to meet your individual storage needs. Your model may have glass or wire shelves. Adjusting the shelves to fit items of different heights will make finding the exact item you want easier. Doing so will also reduce the amount of time the refrigerator door is open which will save energy. IMPORTANT: Do not clean glass shelves with warm water while they are cold.
USING YOUR REFRIGERATOR HUMIDITY CONTROLLED CRISPER To remove the glass 1. Lift up the glass under the crisper cover. 2. Pull the glass up and out. The crispers provide fresher tasting fruit and vegetables by letting you easily control humidity inside the drawer. NOTE: Pantry drawer not shown for clarity. You can control the amount of humidity in the moisturesealed crispers by adjusting the control to any setting between VEGETABLES and FRUIT.
USING YOUR REFRIGERATOR REMOVING THE CONVENIENCE BIN LID 1. Open the lid about half way 1 . 2. Lift the lid up and pull out 2 . DOOR BIN The door bins are removable for easy cleaning and adjustment. REPLACING THE AIR FILTER It is recommended that you replace the air filter: • Approximately every six months. • When the CHANGE AIR FILTER light turns on. 1. Remove the Old Filter Turn the filter cover to the left to detach it from the refrigerator wall.
USING YOUR REFRIGERATOR FREEZER SECTION PULLOUT DRAWERS CUSTOMCHILL™ DRAWER Top Drawer 1. To remove, pull the drawer out to full extension. On the left rail, use a flat blade screwdriver to push in on the tab to release the drawer from the rail, as shown below. Once the left side is loose, push the tab on the right side with your finger to release the drawer. Lift the front of the drawer up, then pull it straight out.
USING YOUR REFRIGERATOR DURABASE Middle Drawer 1. To remove, pull the drawer out to full extension. Lift the front of the drawer up, then pull it straight out. 1. To remove the Durabase, push it to the back as much as possible. Tilt up the front of the Durabase and pull straight out. 2. To replace, insert the Durabase in the rail assembly. 1 2. To replace, slightly tilt up the front of the drawer, insert the drawer into the frame, and push it back into place.
WATER FILTER WATER FILTER 2. Replace with a new water filter. NOTE : This refrigerator does not require a filter bypass plug when the filter is not in place. • Insert the new filter into the filter head and rotate it clockwise until the arrow on the new filter lines up with the arrow on the filter head. Swing the filter back into the compartment. It is recommended that you replace the water filter: • • • • Approximately every six months. When the water filter indicator turns on.
WATER FILTER Performance Data Sheet The concentration of the indicated substances in water entering the system was reduced to a concentration less than or equal to the permissible limit for water leaving the system as specified in NSF/ANSI Standard 42 and Standard 53. System tested and certified by NSF International against NSF/ANSI Standard 42 and Standard 53 for the reduction of substances listed below.
WATER FILTER WARNING Application Guidelines/Water Supply Parameters Service Flow 0.5 gpm (1.9 lpm) Water Supply Potable Water Water Pressure 20-120 psi (138 - 827 kPa) Water Temperature 33°F - 100°F (0.6°C - 37.8°C) To reduce the risk associated with ingestion of contaminants: Do not use with water that is microbiologically unsafe or of unknown quality without adequate disinfection before and after of the system.
WATER FILTER California Department of Public Health Certification 14-3015 35
CARE AND CLEANING INSIDE WALLS (allow the freezer to warm up so the cloth will not stick) To help remove odors, you can wash the inside of the refrigerator with a mixture of baking soda and warm water. Mix 2 tablespoons of baking soda to 1 quart of water (26 g soda to 1 liter water.) Be sure the baking soda is completely dissolved so it does not scratch the surfaces of the refrigerator. WARNING Explosion Hazard CAUTION: While cleaning the inside of the refrigerator, do not spray water.
CARE AND CLEANING WHEN YOU MOVE When you are moving your refrigerator to a new home, follow these steps to prepare it for the move. LIGHT BULB REPLACEMENT WARNING 1. Remove all food from the refrigerator and pack all frozen food in dry ice. 2. Unplug the refrigerator. 3. Clean, wipe and dry thoroughly. 4. Take out all removable parts, wrap them well and tape them together so they do not shift and rattle during the move. Refer to the Using your Refrigerator section for removal instructions. 5.
CONNECTING THE WATER LINE WHAT YOU WILL NEED • Copper Tubing, ¼ in. outer diameter, to connect the refrigerator to the water supply. Be sure both ends of the tubing are cut square. • To determine how much tubing you need: measure the distance from the water valve on the back of the refrigerator to the water supply pipe. Then, add 8 feet (2.4 m). Be sure there is sufficient extra tubing (about 8 feet [2.4 m] coiled into 3 turns of about 10 in.
CONNECTING THE WATER LINE INSTALLATION INSTRUCTIONS 5. TIGHTEN THE PIPE CLAMP Tighten the clamp screws until the sealing washer begins to swell. NOTE: Do not overtighten the clamp or you may crush the tubing. Washer Install the shutoff valve on the nearest frequently used drinking water line. 1. SHUT OFF THE MAIN WATER SUPPLY Turn on the nearest faucet to relieve the pressure on the line. Pipe Clamp 2. CHOOSE THE VALVE LOCATION Choose a location for the valve that is easily accessible.
CONNECTING THE WATER LINE 8. FLUSH OUT THE TUBING Turn the main water supply on and flush out the tubing until the water is clear. Shut the water off at the water valve after about one quart of water has been flushed through the tubing. 9. CONNECT THE TUBING TO THE REFRIGERATOR NOTE: Before making the connection to the refrigerator, be sure that the refrigerator power cord is not plugged into the wall outlet. 1. Remove the plastic flexible cap from the water valve. 2.
TROUBLESHOOTING GUIDE Before conducting troubleshooting, make sure that the following basic requirements are met: Service Flow Water Supply Water Pressure Operating Ambient Temperature Limits 0.5 gpm (1.9 lpm) Potable Water 20-120 psi (138 - 827 kPa) Electrical Ratings 115 Volts, 60 Hz, AC only, and fused at 15 or 20 amperes. 55°F - 110°F COOLING Problem Refrigerator and Freezer section are not cooling. Possible Causes The refrigerator control is set to OFF (some models).
TROUBLESHOOTING GUIDE COOLING Problem Possible Causes Refrigerator or Refrigerator was recently installed. Freezer section is too warm. Air vents are blocked. Doors are opened often or for long periods of time. Unit is installed in a hot location. A large amount of food or hot food was added to either compartment. Interior moisture buildup. Solutions It may take up to 24 hours for each compartment to reach the desired temperature. Rearrange items to allow air to flow throughout the compartment.
TROUBLESHOOTING GUIDE COOLING/ICE & WATER Problem Food is freezing in the refrigerator compartment. Possible Causes Food with high water content was placed near an air vent. Refrigerator temperature control is set incorrectly. Solutions Rearrange items with high water content away from air vents. If the temperature is too cold, adjust the control one increment at a time and wait for the temperature to stabilize.
TROUBLESHOOTING GUIDE ICE & WATER Problem Icemaker is not making enough ice (continued). Possible Causes Doors are opened often or for long periods of time. Doors are not closed completely. The temperature setting for the freezer is too warm. Dispensing water slowly. Water filter has been exhausted. Reverse osmosis filtration system is used. Low house water supply pressure. Not dispensing ice. Doors are not closed completely. Infrequent use of the dispenser.
TROUBLESHOOTING GUIDE ICE & WATER Problem Icemaker is not making ice. Possible Causes Refrigerator was recently installed or icemaker recently connected. Icemaker not turned on. Solutions It may take up to 24 hours for each compartment to reach the desired temperature and for the icemaker to begin making ice. Locate the icemaker ON/OFF switch and confirm that it is in the ON (I) position. The ice detecting sensor is obstructed.
TROUBLESHOOTING GUIDE ICE & WATER Problem Ice has bad taste or odor. Possible Causes Water supply contains minerals such as sulfur. Icemaker was recently installed. Ice has been stored for too long. The food has not been stored properly in either compartment. The interior of the refrigerator needs to be cleaned. The ice storage bin needs to be cleaned. Dispensing warm water. Refrigerator was recently installed. The water dispenser has been used recently and the storage tank was exhausted.
TROUBLESHOOTING GUIDE NOISE Problem Clicking Rattling Whooshing Gurgling Popping Sizzling Vibrating Dripping Pulsating or HighPitched Sound Possible Causes The defrost control will click when the automatic defrost cycle begins and ends. The thermostat control (or refrigerator control on some models) will also click when cycling on and off. Rattling noises may come from the flow of refrigerant, the water line on the back of the unit, or items stored on top of or around the refrigerator.
TROUBLESHOOTING GUIDE PARTS & FEATURES Problem Doors will not close correctly or pop open. Possible Causes Food packages are blocking the door open. Ice bin, crisper cover, pans, shelves, door bins, or baskets are out of position. The doors were removed during product installation and not properly replaced. Refrigerator is not leveled properly. Solutions Rearrange food containers to clear the door and door shelves.
Kenmore Connect™ System Kenmore Connect™ (On some models) 3. Hold the mouthpiece of your phone in front of the speaker that is located on the right hinge of the refrigerator door, when instructed to do so by the call center. Should you experience any problems with your refrigerator, it has the capability of transmitting data via your telephone to the Kenmore Connect™ Team. This gives you the capability of directly to our trained specialists.
TABLE DES MATIÈRES Garantie ...............................................................................99 Section congélateur Contrats de protection............................................. 100 Tiroir à customchill™...................................126 Consignes de sécurité importantes ........101-103 Tiroir coulissant.............................................126 Conditions électriques et de mise à la masse ........................................................................
GARANTIE GARANTIE DU RÉFRIGÉRATEUR Garantie limitée de Kenmore Elite Lorsque cet appareil est installé, utilisé et entretenu selon toutes les instructions fournies la couverture de garantie suivante s’applique. Pour obtenir le service sous garantie, appelez le 1-800-4-MY-HOME® (1-800-469-4663).
CONTRATS DE PROTECTION Contrats de protection étendue Nous vous remercions d’avoir choisi notre produit. Votre nouveau produit Kenmore Elite® est conçu et fabriqué pour garantir des années de fiabilité. Mais comme tous les produits, il peut nécessiter à l’occasion un entretien préventif ou une réparation. C’est pourquoi un contrat de protection étendue peut vous permettre d’économiser de l’argent et d’éviter toute aggravation.
CONSIGNES DE SÉCURITÉ IMPORTANTES PRÉCAUTIONS DE SÉCURITÉ DE BASE Ce guide contient des consignes de sécurité importantes. Lisez et observez toujours toutes les consignes de sécurité. Voici le symbole d’alerte de sécurité. Il signale les messages de sécurité qui vous informent des dangers de mort ou de blessures, ou des risques de dommages du produit. Tous les messages de sécurité seront précédés du symbole d’alerte de sécurité et des mots DANGER, AVERTISSEMENT ou ATTENTION.
AVERTISSEMENT • Avant de remplacer une ampoule d’éclairage grillée ou cassée, débranchez le réfrigérateur ou coupez l’alimentation électrique au niveau du disjoncteur ou de la boîte de fusibles pour éviter tout contact avec un fil sous tension. (Une ampoule d’éclairage grillée peut éclater lors de son remplacement exposant alors le filament.) REMARQUE : Certains modèles sont dotés d’un éclairage intérieur LED dont l’entretien doit être confié à un technicien qualifié.
ÉLIMINATION DES CFC Votre ancien réfrigérateur peut comporter un système de refroidissement qui utilisait des CFC (chlorofluorocarbures). Les scientifiques estiment que les CFC endommagent l’ozone stratosphérique. Si vous mettez au rebut votre ancien réfrigérateur, assurezvous que le réfrigérant CFC est retiré en vue d’une élimination appropriée par un technicien qualifié.
PIÈCES ET FONCTIONNALITÉS J A K L B M C N D O E B E F P O G Q B R H S I T U R Utilisez cette page pour vous familiariser avec les pièces et les fonctionnalités du réfrigérateur. Des renvois aux pages sont inclus pour simplifier la consultation. REMARQUE : Ce guide couvre plusieurs modèles. Le réfrigérateur que vous avez acheté peut comporter tous les éléments répertoriés ci-dessous ou seulement une partie.
INSTALLATION DU RÉFRIGÉRATEUR AVERTISSEMENT AVERTISSEMENT Risques liés au poids excessif : Risques liés au poids excessif : Faites appel à au moins deux personnes pour déplacer et installer le réfrigérateur. Sinon, il y a risque de blessures au dos ou d’autres blessures. Le réfrigérateur est lourd. Lors du déplacement du réfrigérateur à des fins de nettoyage ou d’entretien, veillez à protéger le sol. Tirez toujours le réfrigérateur en le maintenant bien droit à la verticale lorsque vous le déplacez.
INSTALLATION DU RÉFRIGÉRATEUR AVANT L’UTILISATION 1. Nettoyez complètement le réfrigérateur et essuyez la poussière accumulée pendant l’expédition. 2. Installez les accessoires tels que le bac à glaçons, les tiroirs, les étagères, etc., à leurs positions appropriées. Ces éléments sont emballés ensemble pour éviter d’éventuels dommages pendant l’expédition. 3. Laissez le réfrigérateur fonctionner pendant au moins deux à trois heures avant d’y placer des aliments.
INSTALLATION DU RÉFRIGÉRATEUR REMARQUE : Le retrait des portes est toujours recommandé lorsqu’il faut faire passer le réfrigérateur par une ouverture étroite. S’il faut retirer les poignées, procédez comme suit. COMMENT RETIRER LA POIGNÉE DE LA PORTE DU RÉFRIGÉRATEUR REMARQUE :L’aspect de la poignée peut être différent de celui des illustrations sur cette page. Attaches de montage Vis de pression Retrait de la poignée du réfrigérateur Desserrez les vis pression avec une clé hexagonale de 3/32 po.
INSTALLATION DU RÉFRIGÉRATEUR REMARQUE : Le retrait des portes est toujours recommandé lorsqu’il faut faire passer le réfrigérateur par une ouverture étroite. S’il faut retirer les poignées, procédez comme suit. DÉMONTAGE DES POIGNÉES DE PORTE DU CONGÉLATEUR REMARQUE : L’aspect de la poignée peut être différent de celui des illustrations sur cette page. Retrait des poignées de porte du congélateur Desserrez les vis pression situées du côté inférieur de la poignée avec une clé hexagonale de ⅛ po.
INSTALLATION DU RÉFRIGÉRATEUR RETRAIT ET REMISE EN PLACE DES PORTES DU RÉFRIGÉRATEUR ATTENTION : Avant de commencer, retirez des portes les aliments et les bacs. (1) (2) AVERTISSEMENT Risques liés au poids excessif : Faites appel à au moins deux personnes pour retirer et installer le réfrigérateur. Sinon, il y a risque de blessures au dos ou d’autres blessures. (3) (4) (5) (6) (7) AVERTISSEMENT (8) 1. Ouvrez la porte. Retirez la vis du couvercle de la charnière supérieure (1). 2.
INSTALLATION DU RÉFRIGÉRATEUR Réinstallation de la porte du réfrigérateur Porte droite Porte gauche 1. Posez la porte sur la tige d’articulation du milieu (9). 2. Placez la charnière supérieure (4) sur le levier de fermeture de la charnière (5) et en position. Faites pivoter le levier (3) dans le sens inverse des aiguilles d’une montre pour fixer la charnière. 3.
INSTALLATION DU RÉFRIGÉRATEUR RETRAIT DU TIROIR CUSTOMCHILL™ INSTALLATION DU TIROIR CUSTOMCHILL™ 1. Retirez le tiroir à pleine extension. Retirez le panier en soulevant le panier du système de rails. 1. Saisissez la porte de chaque côté et abaissez-la jusqu'à ce qu'elle soit bien en place sur les rails. REMARQUE : Avant de retirer le tiroir CustomChill™, vous devez le débrancher du contrôle de la température. 2.
INSTALLATION DU RÉFRIGÉRATEUR COMMENT RETIRER LE TIROIR DU CONGÉLATEUR 3. Retirez le tiroir du milieu en tirant le tiroir pour l'ouvrir à pleine extension. Soulevez l'avant du tiroir, puis retirez-le tout droit. VERTISSEMENT: • Faites-vous aider par deux personnes au moins pour démonter et remonter le tiroir du congélateur. Sinon, vous risquez de vous faire mal au dos ou de vous blesser. • Ne vous asseyez pas et ne vous mettez pas debout sur le tiroir du congélateur.
INSTALLATION DU RÉFRIGÉRATEUR COMMENT INSTALLER LE TIROIR DU CONGÉLATEUR 4. Insérez le tiroir gigogne du haut dans le cadre, et poussez le tiroir en place jusqu'à ce que vous entendiez un clic. 1. Saisissez les deux rails et tirez-les simultanément pour les sortir complètement. 5. Inclinez le devant du tiroir du milieu légèrement vers le haut, insérez le tiroir dans le cadre, repoussez-le en place. 2.
INSTALLATION DU RÉFRIGÉRATEUR MISE À NIVEAU ET ALIGNEMENT DES PORTES Mise à niveau Après l’installation, branchez le cordon d’alimentation du réfrigérateur sur une prise à 3 connecteurs mise à la terre et poussez le réfrigérateur en position finale. Le réfrigérateur comporte deux cales de réglage à l’avant, une du côté droit, l’autre du côté gauche. Ajustez les cales de réglage pour modifier l’inclinaison avant-arrière ou côté à côté.
UTILISATION DU RÉFRIGÉRATEUR RÉGLAGE DES CONTRÔLES Température • Le contrôle Refrigerator Temp va de 33°F à 46°F (1°C à 8°C). Appuyez sur le bouton Refrigerator Temp pour parcourir les réglages de température disponibles un incrément à la fois. • Le contrôle Freezer Temp va de -6°F à 8°F (-21°C à -13°C). Appuyez sur le bouton Freezer Temp pour parcourir les réglages de température disponibles un incrément à la fois.
UTILISATION DU RÉFRIGÉRATEUR Filtre d’air Le filtre à air aide à retirer les odeurs du réfrigérateur. Le filtre à air a deux réglages, automatique et MAX. En mode Automatique, le filtre à air cyclera à marche et arrêt en incréments de dix minutes de marche et cent dix minutes d’arrêt. Si réglé en mode MAX, le filtre à air restera en marche continuellement pendant quatre heures, passant de marche à arrêt en incréments de dix minutes de marche et cinq minutes d’arrêt.
UTILISATION DU RÉFRIGÉRATEUR Alarme de porte Le mode Démonstration (pour utilisation en magasin seulement) Le mode Démonstration désactive tout refroidissement dans les sections réfrigérateur et congélateur pour préserver l’énergie alors que l’affichage est activé chez un détaillant. Lorsque cette fonction est activée, OFF s’affiche sur le panneau de commande. • Lorsqu’une alimentation électrique est connectée au réfrigérateur, l’alarme de la porte est initialement activée.
UTILISATION DU RÉFRIGÉRATEUR BAC À GLAÇONS DANS LA PORTE ATTENTION : Maintenez les mains et les outils loin de la porte du compartiment à glaçons et du déversoir du distributeur. Sinon, vous risquez d’endommager l’appareil ou de vous blesser. 2. Pour retirer le bac à glaçons de la porte, saisissez la poignée avant, soulevez légèrement la partie inférieure, et tirez lentement le bac pour l’extraire comme illustré.
UTILISATION DU RÉFRIGÉRATEUR MACHINE À GLAÇONS AUTOMATIQUE La glace est fabriquée dans la machine à glaçons automatique et envoyée dans le distributeur. La fabrique de glace produit entre 70 et 210 glaçons par période de 24 heures en fonction de la température du compartiment congélateur, de la température ambiante, du nombre d'ouvertures de la porte et d'autres conditions de fonctionnement.
UTILISATION DU RÉFRIGÉRATEUR MACHINE À GLAÇONS AUTOMATIQUE (suite) ATTENTION QUAND CONVIENT-IL DE RÉGLER L’INTERRUPTEUR DE LA MACHINE À GLAÇONS AUTOMATIQUE SUR OFF (O) • Les tout premiers glaçons et la première eau distribuée peuvent comporter des particules ou présenter une odeur provenant du circuit d’approvisionnement d’eau ou du réservoir d’eau. • Lorsque l’approvisionnement en eau sera coupé pendant plusieurs heures. • Lorsque le bac à glace est retiré pendant plus qu’une ou deux minutes.
UTILISATION DU RÉFRIGÉRATEUR STOCKAGE DES ALIMENTS CONGELÉS REMARQUE : Consultez un guide sur la congélation ou un livre de cuisine fiable pour obtenir d’autres informations sur la préparation des aliments en vue d’une congélation ou sur les durées de conservation des aliments. GUIDE DE STOCKAGE DES ALIMENTS Enveloppez ou stocker la nourriture dans le réfrigérateur dans une matière hermétique à l’épreuve de l’humidité sauf indication contraire.
UTILISATION DU RÉFRIGÉRATEUR SECTION RÉFRIGÉRATEUR AVERTISSEMENT : Ne mettez pas les doigts dans le déversoir de glaçons. Vous pourriez gravement vous blesser. DISTRIBUTEUR D’EAU Pour obtenir de l’eau froide, poussez l’interrupteur de distribution avec un verre. ATTENTION : Ne déversez pas la glace dans des tasses en porcelaine ou des verres en cristal. La porcelaine ou le cristal pourrait se casser.
UTILISATION DU RÉFRIGÉRATEUR ÉTAGÈRES DU RÉFRIGÉRATEUR Les étagères du réfrigérateur sont ajustables en fonction de vos besoins. Votre modèle peut comporter des étagères en verre ou en treillis métallique. En réglant la hauteur des clayettes pour y placer des aliments de différentes tailles, vous retrouverez plus facilement ce que vous cherchez. Cela permet également de réduire les temps d’ouverture des portes du réfrigérateur et d’ainsi économiser de l’énergie.
UTILISATION DU RÉFRIGÉRATEUR BAC À LÉGUMES À HUMIDITÉ CONTRÔLÉE Les bacs à légumes préservent le goût des fruits et des légumes en vous laissant contrôler facilement l’humidité à l’intérieur du tiroir. Vous pouvez contrôler la quantité d’humidité dans les bacs à légumes étanches en ajustant le contrôle à un réglage compris entre VEGETABLES et FRUIT. Pour retirer le verre 1. Soulevez le verre sous le couvercle du bac à légumes. 2. Tirez le verre vers le haut et sortez-le.
UTILISATION DU RÉFRIGÉRATEUR REMPLACEMENT DU FILTRE D’AIR ENLEVER LE COUVERCLE 1. Ouvrez le couvercle à mi-chemin 1 2. Soulever le couvercle et retirer . 2 . Il est conseillé de remplacer le filtre d’air: • Tous les six mois. • Quand le symbôle CHANGE AIR FILTER (Changer le filtre d’air) s’allume. 1. Retirer le filtre utilisé Tournez le couvercle du filtre vers la gauche pour le détacher de la paroi du réfrigérateur. Le filtre se trouve à l’intérieur du couvercle du filtre.
UTILISATION DU RÉFRIGÉRATEUR SECTION CONGÉLATEUR TIROIR COULISSANT TIROIR À CUSTOMCHILL™ Caisson supérieur 1. Pour retirer, sortez le tiroir jusqu’au bout. Sur le rail gauche, utilisez un tournevis à lame plate pour enfoncer la languette afin de dégager le tiroir du rail, comme indiqué plus bas. Lorsque le côté gauche est dégagé, enfoncez la languette du côté droit du doigt pour dégager le tiroir. Soulevez l’avant du tiroir puis tirez pour le sortir.
UTILISATION DU RÉFRIGÉRATEUR Caisson de milieu 1. Pour retirer le caisson, tirer complètement dehors. Lever le devant du caisson et tirer complètement, tout droit. DURABASE 1. Pour retirer le Durabase, poussez-le vers l’arrière le plus loin possible. Inclinez l’avant du Durabase et tirez-le vers l’extérieur. 2. Pour le remettre en place, insérez le Durabase dans le rail. 1 2.
FILTRE À EAU FILTRE À EAU 2. Remplacer avec un nouveau filtre. REMARQUE: Ce réfrigérateur ne nécessite pas une prise de dérivation de filtre, lorsque le filtre n'est pas en place. • Insérez le nouveau filtre dans l'embout et faites-le pivoter dans le sens des aiguilles d'une montre pour que la flèche du filtre soit alignée avec la flèche sur l'embout du filtre. Replacez le filtre dans son compartiment. Il est recommandé de remplacer le filtre à eau : • • • • Environ tous les 6 mois.
FILTRE À EAU Fiche technique de performances La concentration des substances indiquées dans l’eau entrant dans le système a été réduite à une concentration inférieure ou égale à la limite autorisée pour l’eau sortant du système, telle que spécifiée dans la norme NSF/ANSI 42 et la norme 53. Système testé et certifié par NSF International par rapport aux normes NSF/ANSI 42 et 53 pour la réduction des substances répertoriées ci-dessous.
Directives d’application/Paramètres d’approvisionnement d’eau Débit d’utilisation 0,5 gpm (1,9 lpm) Approvisionnement d’eau Eau potable Pression de l’eau 20-120 psi (138 - 827 kPa) Température de l’eau 33°F - 100°F (0,6°C - 37,8°C) AVERTISSEMENT Pour réduire les risques associés à l’ingestion de contaminants : N’utilisez pas d’eau présentant une insécurité microbiologique ou de qualité inconnue sans une désinfection préalable avant et après le système.
FILTRE À EAU California Department of Public Health Certification 14-3015 131
ENTRETIEN ET NETTOYAGE PAROIS INTÉRIEURES (laissez le congélateur se réchauffer afin d’éviter que le chiffon ne colle à la surface) Pour faciliter l’élimination des odeurs, vous pouvez laver l’intérieur du réfrigérateur avec un mélange de bicarbonate de soude et d’eau chaude. Mélangez 2 cuillerées à table de bicarbonate de soude à une pinte d’eau (26 g de bicarbonate de soude à 1 litre d’eau.
CONNEXION DU TUYAU D’EAU LORSQUE VOUS DÉMÉNAGEZ Lorsque vous déménagez votre réfrigérateur dans une nouvelle maison, procédez comme suit pour le préparer au déménagement. REMPLACEMENT D’UNE AMPOULE D’ÉCLAIRAGE AVERTISSEMENT Risque d’électrocution 1. Retirez tous les aliments du réfrigérateur et emballez-les dans de la glace sèche. 2. Débranchez le réfrigérateur. 3. Nettoyez, essuyez et séchez complètement. 4.
CONNEXION DU TUYAU D’EAU AVANT DE COMMENCER Cette installation de raccordement d’eau n’est pas couverte par la garantie de ce réfrigérateur. Suivez attentivement ces instructions pour minimiser les risques de coûteux dégâts des eaux. Des coups de bélier (brusques déplacements d’eau dans les tuyaux) dans une plomberie domestique peuvent endommager les pièces du réfrigérateur et provoquer des fuites d’eau ou des dégâts des eaux.
CONNEXION DU TUYAU D’EAU INSTRUCTIONS D’INSTALLATION 5. SERREZ LE COLLIER DE SERRAGE Serrez les vis du collier de serrage jusqu’à ce que la rondelle d’étanchéité commence à gonfler. REMARQUE : Ne serrez pas trop le collier de serrage, vous pourriez écraser le tuyau. Rondelle Collier pour Entrée tuyaux Vis de serrage Installez la vanne d’arrêt sur la conduite d’eau potable fréquemment utilisé le plus proche. 1.
CONNEXION DU TUYAU D’EAU 8. LAVEZ LA TUYAUTERIE Ouvrez l’approvisionnement d’eau principal et laissez couler l’eau jusqu’à ce que l’eau soit propre. Arrêtez l’eau au niveau de la vanne d’eau après avoir laissé s’écouler environ une pinte d’eau par la tuyauterie. 9. RACCORDEZ LE TUYAU AU RÉFRIGÉRATEUR REMARQUE : Avant d’établir le raccordement au réfrigérateur, assurez-vous que le cordon d’alimentation du réfrigérateur n’est pas branché sur la prise murale. 1.
GUIDE DE DÉPANNAGE Avant d’entreprendre des opérations de dépannage, veuillez vous assurer que les conditions basiques de fonctionnement suivantes sont respectées : Débit Opérationnel Arrivée d’Eau Pression Hydraulique Limites de Températures Ambiantes de Fonctionnement Valeurs Électriques 0.5 gpm (1.
GUIDE DE DÉPANNAGE REFROIDISSEMENT Problème Le compartiment Réfrigérateur ou Congélateur est trop chaud Solutions Causes possibles Le réfrigérateur a été installé récemment Les bouches d’aération sont obstruées Les portes sont souvent ouvertes ou restent ouvertes pendant longtemps.
GUIDE DE DÉPANNAGE REFROIDISSEMENT / GLACE & EAU Problème Les aliments congèlent dans le compartiment réfrigérateur Solutions Causes possibles Des aliments avec une teneur en eau importante ont été placés à proximité des bouches d’aération Le contrôle de la température du réfrigérateur est mal réglé Réorganisez les aliments avec une teneur en eau importante loin des bouches d’aération Le réfrigérateur est installé dans un endroit froid Du givre ou des cristaux La porte est souvent ouverte ou reste de g
GUIDE DE DÉPANNAGE GLACE & EAU Problème Le distributeur de glace ne produit pas suffisamment de glace (suite) Solutions Causes possibles Les portes sont trop souvent ouvertes ou restent ouvertes trop longtemps Les portes ne se ferment pas complètement Le réglage de la température du congélateur est trop chaud.
GUIDE DE DÉPANNAGE GLACE & EAU Problème Le distributeur de glace ne produit pas de glace Solutions Causes possibles Le réfrigérateur vient d’être installé ou le distributeur de glace vient d’être branché Le distributeur de glace n’est pas mis en marche Le détecteur de glace est obstrué Le contrôle (levier ou capteur) du distributeur de glace est obstrué Le système de filtrage par osmose inversée est connecté à votre arrivée d’eau froide.
GUIDE DE DÉPANNAGE GLACE & EAU Problème La glace a un mauvais goût ou une mauvaise odeur Solutions Causes possibles L’arrivée d’eau contient des minéraux comme L’installation d’un filtre à eau est peut-être nécessaire pour du soufre éliminer les problèmes de goût et d’odeur.
GUIDE DE DÉPANNAGE BRUIT Problème Clic Cliquetis Solutions Causes possibles Le contrôle du dégivrage cliquète lorsque le cycle de dégivrage automatique se met en route. Le contrôle de thermostat (ou le contrôle du réfrigérateur sur certains modèles) cliquète aussi en début et en fin de cycle.
GUIDE DE DÉPANNAGE PIÈCES & FONCTIONS Problème Solutions Causes possibles Les portes ne se ferment pas complètement ou s’ouvrent toutes seules Des emballages alimentaires bloquent la fermeture de la porte Le bac à glace, le couvercle du bac à légume, les bacs, les étagères, les tiroirs ou les paniers ne sont pas positionnés correctement.
Système Kenmore Connect™ Kenmore Connect™ (certains modèles uniquement) Si vous rencontrez un problème avec votre réfrigérateur, vous pouvez transmettre des informations via votre téléphone en contactant l'équipe Kenmore Connect™. Vous pourrez ainsi parler directement à l'un de nos techniciens. Le technicien enregistre les informations transmises par votre réfrigérateur et s'en sert pour analyser le problème, offrant un diagnostic rapide et efficace. 3.
Get it fixed, at your home or ours! Your Home For troubleshooting, product manuals and expert advice: www.managemylife.com For repair – in your home – of all major brand appliances, lawn and garden equipment, or heating and cooling systems, no matter who made it, no matter who sold it! For the replacement parts, accessories and owner’s manuals that you need to do-it-yourself. For Sears professional installation of home appliances and items like garage door openers and water heaters.