
Installation guide


GAS
COOKTOP
INSTALLATION
INSTRUCTIONS
3)
LP/Propane
Gas
Conversion
This
appliance
can
be
used
with
Natural
gas
or
LP/
Propane
gas.
It
is
shipped
from
the
factory
for
use
with
natural
gas.
A
kit
for
converting
to
LP
gas
is
supplied
with
your
cooktop.
The
kit
is
marked
"FOR
LP/PROPANE
GAS
CONVERSION".
The
conversion
must
be
performed
by
a
qualified
service
technician
in
accordance
with
the
kit
instructions
and
all
local
codes
and
requirements.
Failure
to
follow
instructions
could
result
in
serious
injury
or
property
damage.
The
qualified
agency
performing
this
work
assumes
responsibility
for
the
conversion.
PAO)
Failure
to
make
the
appropriate
conversion
can
result
in
serious
personal
injury
and
property
damage.
NOTE:
Purchase
a
new
flexible
line.
DO
NOT
USE
AN
OLD
PREVIOUSLY
USED
LINE.
Important:
Remove
all
packing
material
and
literature
from
cooktop
before
connecting
gas
and
electrical
supply
to
cooktop.
©
Model
and
Serial
Number
Location
The
serial
plate
is
located
on
the
underside
of
the
cooktop.
When
ordering
parts
for
or
making
inquires
about
your
cooktop,
always
be sure
to
include
the
model
and
serial
numbers
and
a
lot
number
or
letter
from
the
serial
plate
of
your
cooktop.
Your
serial
plate
also
tells
you
the
rating
of
the
burners,
the
type
of
fuel
and
the
pressure
the
cooktop
was
adjusted
for
when
it
left
the
factory.
5)
Electrical
Requirements
PN
O
Te]
120
volt,
60
Hertz,
properly
grounded
branch
circuit
protected
by
a
15
amp
circuit
breaker
or
time
delay
fuse.
DO
NOT
use
an
extension
cord
with
this
cooktop.
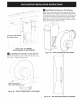
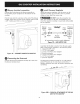
Grounding
Instructions
IMPORTANT
Please
read
carefully.
PW
ite]
For
personal
safety,
this
appliance
must
be
properly
grounded.
The
power
cord
of this
appliance
is
equipped
with
a
3-prong
(grounding)
plug
which
mates
with
a
standard
3-prong
grounding
wall
receptacle
(see
Figure
4)
to
minimize
the
possibility
of
electric
shock
hazard
from
the
appliance.
The
wall
receptacle
and
circuit
should
be
checked
by
a
qualified
electrician
to
make
sure
the
receptacle
is
properly
grounded.
Where
a
standard
2-prong
wall
receptacle
is
installed,
it
is
the
personal
responsibility
and
obligation
of
the
consumer
to
have
it
replaced
by
a
properly
grounded
3-prong
wall
receptacle.
Preferred
Method
DO
NOT,
under
any
circumstances,
cul,
remove,
or
bypass
the
grounding
prong.
Grounding
type
wall
receptacle
Power
supply
cord
with
3-prong
grounding
plug.
Figure
4
DO
NOT,
under
any
circumstances,
cut
or
remove
the
third
(ground)
prong
from
the
power
cord.
T
WENSTIN
Te]
Disconnect
electrical
supply
cord
from
wall
receptacle
before
servicing
cooktop.
©
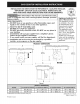
Positioning
the
Cooktop
The
exhaust
vent
from
the
cooktop
must
be
located
between
wall
studs
or
floor
joists
so
that
the
ductwork
may
be
installed
properly
&
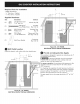
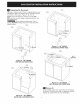
Prepare
Base
Cabinet
This
cooktop
is
designed
to
fit
easily
into
a
variety
of
cabinets.
However,
some
cabinets
may
require
modifications.
Preparing
a
Cabinet
with
Drawers
If
the
cabinet
has
drawers,
the
drawers
must
be
removed
and
the
drawer
fronts
attached
to
the
front
of
the
cabinet.
Verify
internal
length
and
width
of
base
cabinet
In
some
cabinets,
the
sides
or
back
wall
may
need
to
be
cut
out,
and
the
corner
braces
removed
in
order
to
accommodate
the
unit.
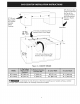
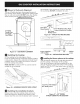
Countertop
Cutout
Countertops
with
a
rolled
front
edge
and
radius
at
the
base
of
the
backsplash
may
not
provide
the
flat
surface
area
required
to
accommodate
the
cooktop.
Cut
countertop
opening
according
to
the
dimensions
shown
in
Figure
2.
The
opening
must
be
cut
squarely
with
sides
parallel
to
each
other,
front
and
rear
perpendicular
to
the
sides.