
Installation guide


GAS
COOKTOP
INSTALLATION
INSTRUCTIONS
Blower
to
Ductwork
Alignment
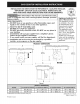
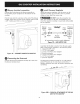
The
use
of
flexible
ducting
is
discouraged
because
it
can
severely
restrict
airflow.
If
the
blower
outlet
and
the
floor
or
wall
duct
location
DO
NOT
align,
then
flexible
METAL
ducting
can
be
used
to
adapt
to
an
offset.
rie
|
6"
MAX.
Center
line
To
Center
line
Offset
|
>
-
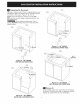
Figure
13
—
DUCTWORK
ALIGNMENT
@
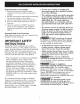
Installing
the
Cooktop
Lift
the
cooktop
by
the
side
edges
as
shown.
Lower
the
cooktop
into
the
countertop
opening,
guiding
it
into
position.
Support
the
underside
and
lower
slowly.
Carefully
remove
your
fingers
one
corner
at
a
time
to
lower
the
cooktop
into
position.
NOTE:
DO
NOT
use
Silicone
RTV
or
caulk
to
seal
the
cooktop
to
the
countertop.
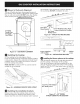
Figure
14
—
LOWERING
COOKTOP
INTO
CUTOUT
®
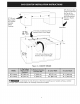
Installing
the
installation
brackets
Remove
screws
from
the
cooktop
chassis
and
use
to
attach
the
hold
down
bracket
to
the
bottom
of
the
chassis.
Insert
the
screw
into
the
bracket
until
it
contacts
the
backside
of
the
countertop.
To
prevent
damage
to
the
countertop,
DO
NOT
overtighten
the
screw.
Two
#8-18
Black
Hex
Head
Screws
Attached
to
Cooktop
Down
Bracket
One
Long
Phillips
Screw
Figure
15
—
ATTACH
THE
TWO
BRACKETS
at
FS
\_|
~
WV
VVAVAAVYS
Countertop
Cooktop
ber
pts
screw
Screws
Supplied
with
Cooktop
Figure
16
—
INSTALLATION
BRACKETS
©
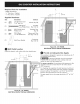
Installing
the
blower
plenum
to
the
cooktop
With
the
blower
opening
on
the
right slide
the
plenum
into
the
opening
in
the
bottom
of
the
cooktop.
Push
up
on
the
plenum
until
the
mounting
rails
on
the
sides
of
the
plenum
contact
the
bottom
of
the
cooktop.
Install
four
#8-18
x
3/8”
sheet
metal
screws
to
hold
the
plenum
in
place.
Install
Four
#8-18
Black’
|
Hex
Head
Screws
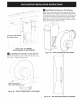
Figure
17
—
30"
MODEL
ATTACH
PLENUM
TO
THE
COOKTOP