
Installation guide
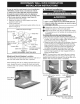
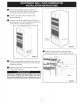
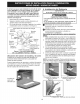

OLevelingtheWallOven
1. Installanoven
rackinthe center
ofthe loweroven
(seeFigure11).
2. Placealevelon
therack.Take
2 readingswith
thelevelplaced
diagonallyinone
directionand
thentheother.
Usewoodshimsunderthewallovento levelif
necessary.
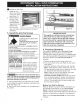
5. Install the Anti-Tip Screws
Tip Over Hazard
Figure 11
- A child or adult can tip the oven
and be killed.
- Install the anti=tip device to oven
and/or structure per installation
instructions.
- Ensure the antbtip device is re=engaged when the
oven is moved.
- Do not operate the oven without the antbtip device
in place and engaged.
- Failure to follow these instructions can result in
death or serious burns to children and adults.
Refer to the installation
instructions supplied with your
appliance for proper installa-
tion.
Anti-tip mounting holes
Check for proper installation
with a visual check that the
anti-tip screws are present.
Test the installation with light
downward pressure on the
open oven door. The oven
should not tip forward.
The wall oven can tip when the door is
open. The anti=tip mounting screws supplied with the
wall oven must be installed to prevent tipping of the
wall oven and injury to persons.
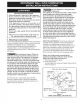
A. The mounting holes in the side trims may be used
as a template to locate the appliance mounting screw
holes (see Figure 10).
B. Use the two screws supplied to fix the appliance to
the cabinet.
Figure 10
IMPORTANT NOTE
This appliance contains internal cooling fans.
These fans will run after the appliance has
been on for a period of time and will continue
to cool the unit for a period after the unit has
been turned off. These fans will run during
self=clean (some models) and continue to run
after the cycle has completed.
6. Checking Operation
Your model is equipped with an Electronic Oven
Control. Each of the functions has been factory
checked before shipping. However, it is suggested that
you verify the operation of the electronic oven controls
once more. Refer to the Use and Care Guide for
operation,
.
2.
.
Remove all items from the inside of the oven.
Turn on the power to the oven (Refer to your Use &
Care Guide.)
Verify the operation of the electronic oven controls:
Bake- Verify that this function makes the oven hot.
20 seconds after turning oven on, open the door and
you should feel heat coming from the oven.
Broil= When the oven is set to BROIL, the upper
element in the oven should become red.
Convection (some models)-When the oven is set
for a convection baking or roasting, both elements
cycle on and off alternately and the convection fan
will run. The convection fan will stop running when
the oven door is opened.
Before You Call for Service
Read the "Before You Call for Service Checklist" and
the "Operating Instructions" in your Use and Care
Guide. It may save you time and expense. The list
includes common occurrences that are not the result of
defective workmanship or materials in this appliance.
Refer to your Use and Care Guide for service phone
numbers.