Use & Care Guide Manual de Uso y Cuidado English /Español 2.2 Cu. Ft., 2.2 Pies.Cúbicos, Models / Modelos : 204.79399610 - Black / Negro 204.79393610 - Stainless Steel /Acero Inoxidable/Negro Customer Assistance / Asistencia al Cliente 1-800-657-6119 Sears Brands Management Corporation Hoffman Estates, IL 60179 U.S.A. www.kenmore.com www.sears.com www.kmart.
PRECAUTIONS TO AVOID POSSIBLE EXPOSURE TO EXCESSIVE MICROWAVE ENERGY (a) Do not attempt to operate this oven with the door open since this can result in harmful exposure to microwave energy. It is important not to defeat or tamper with the safety interlocks. (b) Do not place any object between the oven front face and the door or allow soil or cleaner residue to accumulate on sealing surfaces. (c) Do not operate this oven if it is damaged.
IMPORTANT SAFETY INSTRUCTIONS WARNING To reduce the risk of burns, electric shock, fire, injury to persons or exposure to excessive microwave oven energy when using your appliance, follow basic safety precautions, including the following: 1. Read all instructions before using the appliance. 2. Read and follow the specific: "PRECAUTIONS TO AVOID POSSIBLE EXPOSURE TO EXCESSIVE MICROWAVE ENERGY " found on page 1. 3.
21. Liquids, such as water, coffee, or tea are able to be overheated beyond the boiling point without appearing to be boiling. Visible bubbling or boiling when the container is removed from the microwave oven is not always present. THIS COULD RESULT IN VERY HOT LIQUIDS SUDDENLY BOILING OVER WHEN THE CONTAINER IS DISTURBED OR A SPOON OR OTHER UTENSIL IS INSERTED INTO THE LIQUID. i) Do not overheat the liquid. ii) Stir the liquid both before and halfway through heating it.
1. A short power-supply cord is provided to reduce the risks resulting from becoming entangled in or tripping over a longer cord. 2. Longer cord sets or extension cords are available and may be used if care is exercised in their use. 3. If a long cord sets or extension cord is used: i) The marked electrical rating of the cord set or extension marked electrical rating of the cord set or extension cord should be at least as great as the electrical rating of the appliance.
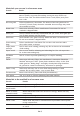
Materials you can use in microwave oven Utensils Rmarks A luminum foil Shieldin g only. Small smooth pieces can be used to cover thin parts of meat or poultry to prevent overcooking. Arcing can occur if foil is too close to oven walls. The foil should be at least 1 inch (2.5cm) away from oven walls. Follow manufacturer’s instructions. The bottom of browning dish must be at least 3/16 inch (5 mm) above the turntable. Incorrect usage may cause the turntable to break. Microwave-safe only.
SETTING UP YOUR OVEN Names of oven Parts and Accessories Remove the oven and all materials from the carton and oven cavity. Your oven comes with the following accessories: Glass tray 1 Turntable ring 1 1 Use & Care Guide F E G D C A B A) Control panel B) Turntable shaft C) Turntable ring D) Glass tray E) Observation window F) Oven Door G) Safety interlock system Turntable Installation Hub (underside) a. Never place the glass tray upside down. The glass tray should never be restricted. b.
Countertop Installation Cabinet: Remove any protective film found on the microwave oven cabinet surface. Do not remove the light brown Mica cover that is attached to the oven cavity to protect the magnetron. Remove all packing materi al and accessories. Examine the oven for any damage such as dents or broken door. Do not install if oven is damaged. Installation 1. (3) Blocking the intake and/or outlet openings can damage the oven. (4) Place the oven as far away from radios and TV as possible.
OPERATION Control Panel and Features (12) (3) (1) (2) (7) (8) (9) (10) (4) (5) (11) (6) (1) Sensor Menu ( Sensor Reheat, Sensor Cook, Potato, Pizza, Frozen Veg, Frozen Pizza, Frozen Entrée) Sensor Menu items automatically program correct cooking time and power based on sensor assessment of the amount of steam emitted from food early in the cooking cycle. (2) Auto Menu (Popcorn, Beverage, Soften/Melt) Auto Menu items allow you to easily program cooking time based on food quantity.
OPERATION CLOCK SETTING When the microwave oven is plugged into an outlet, "00:00" will display. (1) Press Timer/Clock, "Hr12" and “CLOCK” will appear in the display. (2) Press the number pads and enter the current clock time. For example, if the time is now 8:30, press "8, 3, 0" in order and "8:30" and "CLOCK" will display. (3) Press Timer/Clock to finish clock setting, ":" will flash and the numbers will appear as a clock time in the display.
c. Press Power Level , then press "5" to select 50% microwave power. d. Press to start cooking, "COOK" will display and system starts to count down. Note: In the process of setting, if the pad is pressed or if there is no operation within 25 seconds, the oven will automatically return to standby mode. STANDING TIME "Standing time" means that after the timed cooking period ends, food should be allowed to stand either inside or outside the oven to completely finish cooking.
(3) Press to start defrosting and the cooking time remaining will be displayed. Note: When half of the defrost time passes, the oven will pause defrost and beep twice to remind you to turn over the food. Turn over food, close door and press to resume defrost cycle. If there is no operation within 25 seconds during the setting process, the oven will automatically return to standby mode.
Food Menu button Weight/Portion Potato Pizza 1-3potatoes 4-16oz 7-32oz 1pc=4oz Frozen Veg Frozen Pizza Frozen Entrée 7-21oz 5-16oz 7-21oz Example: Sensor Reheat Pad 1) After placing food into oven, press Sensor Reheat pad and " Sr -1" and "SENSOR" will display. 2) Press the same pad repeatedly, "Sr-1", "Sr-2", "Sr-3" and "SENSOR" will display in order. When your choice is in the display, wait a moment for "SENS" and "SENSOR" to display, and cooking will s tart.
POPCORN (1) Place a 3.2 oz package of popcorn in oven and close door. Press Popcorn pad and cooking starts immediately. Remaining time will display with "AUTO". Oven beeps 4 times when cooking is finished. (2) Follow package instructions, using Time Cook if the package is less than 3.2 oz or larger than 3.2 oz. Place the package of popcorn in the center of the microwave. BEVERAGE Press Beverage pad, "1" and "AUTO" will display. Press Beverage pad repeatedly, "1", "2", "3" cup will display in order.
MULTI-STAGE COOKING At most 2 stages can be set for cooking. Note: SENSOR MENU, AUTO MENU, DEFROST and ONE TOUCH START cannot be used in multi-stage cooking. Example: 80% power level for 5 minutes followed by 60% power level for 10 minutes; a. Press Time Cook once, then press "5", "0" and "0" to set first stage cook time. b. Press Power Level once, then press "8" to choose 80% first stage cooking power and "MEM" will display. c.
Mai ntenance Troubleshooting Check your problem by using the chart below and try the solutions for each problem . If the microwave oven still does not work properly, contact the following number for customer assistance: 1-800-657-6119. TROUBLE POSSIBLE CAUSE POSSIBLE REMEDY Oven will not start a. Electrical cord for oven is not plugged in. b. Door is open. c. Wrong operation is set. a. Plug into the outlet. b. Close the door and try again. c. Check instructions. Arcing or sparking a.
PRECAUCIONES PARA EVITAR POSIBLE EXPOSICIÓN A EXCESIVA ENERGÍA DE MICROONDAS (a) (b) (c) (d) No intente operar este horno con la puerta abierta ya que esto puede causar una exposición dañina a energía de microondas. Es importante no quebrar u obstruir los cierres de seguridad. No ubicar ningún objeto entre la pared frontal del horno y la puerta ni permitir que residuos de suciedad o limpiadores se acumulen en los bordes. No operar el horno si está dañado.
INSTRUCCIONES DE SEGURIDAD IMPORTANTES el fin de reducir el riesgo de que se produ z can queADVERTENCIA Con maduras, una descarga eléctrica, un incendio, lesiones o exposiciones a la energía microondas excesiva al momento de usar este electrodoméstico, siga las siguientes precauciones de seguridad básicas: 1. Lea todas las instrucciones antes de por ejemplo frascos de vidrio, podrían utilizar el electrodoméstico. explotar por lo que no deben calentarse en este horno. 2.
19. NO coma los alimentos inmediatamente después que se terminen de cocinar. Alimentos calentados, especialmente pizza pueden quemar su boca. Deje que los alimentos se enfríen a una temperatura segura antes de comer. 20. Esta aplicación se dedica solamente para el uso privadoy doméstico. 21. Los líquidos, tales como el agua, café o té pueden sobrecalentarsemásallá del punto de ebullición sin parecer haber hervido.
1. Un cable de abastecimiento corto reduce los riesgos derivados de enredarse o tropezarse con un cable mas largo. 2. Cordones más largos o cables de más extensión están disponibles y pueden ser ser utilizados si se ejerce el cuidado en su uso. 3.
Materiales que se pueden usar en el horno a microondas Observaciones Lámina de aluminio Bandeja doradora Elementos para comida Jarras de vidrio Cristalería Bolsas para cocinar en horno Platos y vasos de papel Servilletasdepapel Pergaminodepapel Plásticos Cubiertas plásticas Termómetros Papel encerado Solamente como protección. Pequeñas piezas lisas pueden ser usadas para cubrir partes delgadas de carne o pollo para prevenir sobre cocción.
PREPARANDO SU HORNO A MICROONDAS Nombres de las partes y accesorios Retire el horno y todos los materiales de su caja y de la cavidad del horno.
Previo a la instalación Retire todo el material de embalaje y los accesorios. Examine el horno para descubrir si este tiene algún daño como ser abolladuras o la puerta desviada o rota. Instalación 1. Elija una superficie nivelada que provea suficiente espacio abierto para la entrada y /o salida de aire para ventilación. 30cm 7.5cm LIBRE 7.5cm Gabinete:Quite todo el film protector que encuentre en la superficie del gabinete.
FUNCIONAMIENTO Panel de control y funciones (12) (3) (1) (2) (7) (8) (9) (10) (4) (5) (11) (6) (1) (2) (3) (4) (5) (6) (7) (8) (9) (10) (11) (12) Menú de sensor (sensor de recalentar, sensor de cocinar, papas, pizza, vegetales congelados, pizza congelada, entrée congelado).
OPERACIÓN AJUSTE DEL RELOJ Cuando conecte el horno microondas a un enchufe aparecerá "00:00" en la pantalla. (1) Presione Temporizador/Reloj, aparecerá en la pantalla "Hr12" y "CLOCK". (2) Use el teclado numérico para entrar la hora. Por ejemplo si son las 8:30, presione "8, 3, 0" en ese orden y aparecerá en la pantalla "8:30 " y "CLOCK". (3) Presione Temporizador/Reloj para completar el ajuste del reloj. Se mostrará ":" y aparecerán los números como la hora en la pantalla.
c. Presione Nivel De Potencia, luego presione "5" para seleccionar un. nivel de potencia de 50%. d. Presione el botón para comenzar a cocinar, aparecerá en la pantalla "COOK" y el sistema comenzará el conteo regresivo. Aviso: Si mientras usa el teclado numérico, presione el botón o no presiona un botón en 25 segundos, la pantalla automáticamente regresará al mode de espera.
El peso debe oscilar entre 1onzas y 5 libras. Si el peso entrado no oscila entre 1onzas y 5 libras, será ignorado. El horno no funcionará hasta que se entren números válidos. (3) Presione para comenzar a descongelar y aparecerá en la pantalla el tiempo de cocción restante. Note: Una vez transcurridos dos tercios del tiempo de descongelación, el horno pausará el proceso y emitirá dos pitidos para recordarle que tiene que girar los alimentos.
Aviso: Perfore la superficie de cada papa varias veces con un tenedor antes de cocinar. Alimento botón del menú Peso/ Porción Vegetales Pizza Entrée congelados congelada congelado Pizza Papa 1-3 papas 4-16 onzas 7-32 onzas 1pc=4 onzas 7-21 onzas 5-16 onzas 7-21 onzas Ejemplo: botón de recalentar por sensor 1) Después de colocar los alimentos en el horno, presione el botón Recalentar por sensor y aparecerá "Sr -1" y "SENSOR" en la pantalla.
PALOMITAS DE MAÍZ (1) Coloque un paquete de 3.2 onzas de palomitas de maíz en el horno y cierre la puerta. Presione el botón Popcorn y se comenzará a cocinar inmediatamente. El tiempo restante aparecerá en la pantalla como "AUTO". El horno emitirá cuatro pitidos cuando termine de cocinar. (2) Si el paquete de palomitas de maíz pesa menos de o más de 3.2 onzas, siga las instrucciones en el paquete. Coloque el paquete de palomitas en el centro del horno microondas.
COCCIÓN DE MÚLTIPLES ETAPAS Puede programar un máximo de dos etapas de cocción. Aviso: Las funciones menú del sensor, menú automático, descongelar y cocción rápida no se pueden usar en la cocción de múltiples etapas. Ejemplo: Cocinar con un nivel de potencia de 80% por cinco minutos, seguido de un nivel de potencia de 60% por 10 minutos; a. Presione tiempo de cocción, luego entre "5", "0" y "0" para fijar el tiempo de cocción de la primera etapa. b.
MANTENIMIENTO localización de defectos Esta guía de mantenimiento y problemas ha sido desarrollada para que el usuario pueda referirse a ella en caso de que algún problema se presente con el aparato. Usted debe revisar esta guía antes de llamar a servicio técnico y determinar que lo que esta presentado el horno no sea posible resolverlo por medio de estas instrucciones.
KENMORE LIMITED WARRANTY FOR ONE YEAR from the date of sale this appliance is warranted against defects in material or workmanship when it is correctly installed, operated and maintained according to all supplied instructions. WITH PROOF OF SALE a defective appliance will be replaced free of charge. For warranty coverage details to obtain free replacement, visit the web page: www.kenmore.