TABLE OF CONTENTS WORTHY ovens sss 3 Protection Agreements wm 4 Important Safety Instructions coven 5-7 Electrical & Grounding Parts and Features... Refrigerator Installation Unpacking Your Refrigerator. Installation wen Removing, Replacing Your Refrigerator and Freezer Handles and Doors... 11-15 Leveling and Door Alignment Using Your Refrigerator...
WARRANTY REFRIGERATOR WARRANTY Kenmore Elite Limited Warranty When installed, operated and maintained according to all instructions supplied with the product, if any non-consumable part of this appliance, other thin the sealed refrigerant system, fails due to a defect in material and workmanship within one year from the date of purchase, call 1-800-4-MY-HOME® to arrange for free repair.
PROTECTION AGREEMENTS Master Protection Agreements Congratulations on making a smart purchase, Your new Kenmore Elite? product is designed and manufactured far years of dependable operation. But like oll products, it may require preventive maintenance or repair from time to time. That's when having a Master Protection Agreement can save you money and aggravation. The Master Protection Agreement also helps extend the life of your new product.
IMPORTANT SAFETY IN [0] 1) BASIC SAFETY PRECAUTIONS This guide contains many important safety messages. Always read and obey ofl safety messages. This is the safety alert symbol. It alerts you to safety messages that inform you of hazards they can kill ar hurt you ar others, ar course damage ta the product. All safety messages will be preceded by the safety alert symbol and the hazard signal word DANGER, WARNING or CAUTION.
GONE = Before replacing a burned-out or broken light bulb, unplug the refrigerator or turn off power at the circuit breaker or fuse box in order to avoid contact with a live wire filament, (4 burned-out light bulb may break when being replaced exposing the wire filament.) NOTE: Some models have LED interior lighting rind service should be performed by a qualified technician, WARNING: Setting either or both controls to the OFF position does not remove power to the light circuit.
(lately oT NB Your old refrigerator may have a cooling system that used Cf Cs (chlorofluorocarbon. Cf Cs are believed to harm stratospheric ozone. ELECTRICAL & GROUNDING REQUIREMENTS IF you ore throwing away your ald refrigerator, mike sure the CFC refrigerant is removed for proper disposal by a qualified technician. If you intentionally release this CFC refrigerant, you may be subject to fines and imprisonment under provisions of environmental legislation. IMPORTANT: Please read carefully.
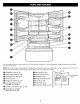
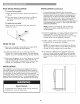
CYRIL DR Tong 1 2 Use this page to become more familiar with the parts and features of your refrigerator. Page references are included for your convenience. MOTE: This guide covers several different models. The refrigerator you have purchased moy hove some or all of the items listed below. The locations of the features shown below may not match your model. 3 Refrigerator Light {p. 33} & Extra Ice Bin (p. 26) foe Bin & Water Filter (Inside) {p. 28) & pullout Drawer (p.
REFRIGERATOR INSTALLATION LG Excessive Weight Howard: Use two or more people to move and install the refrigerator. Failure to do so con result in back or other injury. UNPACKING YOUR REFRIGERATOR Remove tape and any temporary labels from your refrigerator before using. Do not remove any warning. type labels, the model and serial number label, or the Tech Sheet that is located under the front of the refrigerator, behind the base grille.
BASE GRILLE INSTALLATION To remove the base grille: INSTALLATION (continued) 1. To avoid noise and vibration, the unit must be 1} Open the Freezer Drawer. (Drawer not shown for clarity.) 2) Once the drawer is open, and there is sufficient clearance, remove the screws on the op of leveled and installed on o solidly constructed floor. If required, adjust the leveling legs to compensate for unevenness of the floor. The front should be slightly higher than the rear to aid in door closing.
NOTE: Removing the doors is always recommended when if is necessary to move the refrigerator through a narrow opening. If it is necessary to remove the handles, follow the directions below. HOW TO REMOVE REFRIGERATOR DOOR HANDLE Mounting Fasteners NOTE: Handle appearance may vary from illustrations on this page. Set Screw Removing Refrigerator Handle Loosen the set screws with a 3/32 In. {2.5 mm} Allen wrench and remove the handle.
| REFRIGERATOR INSTALLATION Ge NOTE: Removing the doors is always recommended when it is necessary to move the refrigerator through a narrow opening. If it is necessary to remove the handles, follow the directions below. HOW TO REMOVE FREEZER DOOR HANDLE NOTE: Handle appearance may vary from illustrations on this page. Removing Freezer Drawer Handle Loosen the set screws located on the lower side of the handle with a Ya in. (3.
REMOVING AND REPLACING REFRIGERATOR DOORS LGN Excessive Weight Howard: Use two or more people to remove and install the refrigerator doors. Failure to do so con result in back or other injury. Electrical Shock Hazard « Disconnect the electrical supply to the refrigerator before installing. Failure to do so could result in serious injury or death. « Do not put hands, feet or other objects into the air vents, Bose grille, or bottom of the refrigerator. You may be injured or receive an electrical shock.
| REFRIGERATOR INSTALLATION Reinstalling the Refrigerator Door # Loft Door 1. Lower the door onto middle hinge pin {10}. 2. Fit top hinge {7} over hinge lever latch (8) and into place. Rotate lever {8} clockwise to secure hinge. Install the grounding screw (5) and connect the two wire harnesses (4). . Push the water tube (3) looted at the top of the left door into the hole beside the left hinge on the top of the cabinet until it exits through the back. .
HOW TO REMOVE THE FREEZER DRAWER HOW TO INSTALL THE FREEZER DRAWER A WARNING: Use two or more people to remove and install the freezer drawer. Failure to do so can result in back or other injury. A. CAUTION: Do not hold the handle when removing or replacing the drawer. The handle may come off and it could cause personal injury. ‘With both hands, hold the center bar and pull it out until both rails are fully extended.
RE ne LEVELING AND DOOR ALIGNMENT Leveling After installing, plug the refrigerators power cord into o 3-prong grounded outlet and push the refrigerator into the final position. Your refrigerator has two front leveling legs—one on the right and one an the left. Adjust the legs to alter the tilt from front-to-back or side-to-side.
ING YOUR REFRIGERATOR SETTING THE CONTROLS The refrigerator control functions as the thermostat for the entire appliance (refrigerator and freezer sections}. The colder the setting, the longer the compressor will run to keep the temperature colder. The freezer control adjusts the cold alr flow from the freezer to the refrigerator.
AEE Energy Saver 9 The Energy Saver function disables the mullion heater located on the refrigerator door in order to conserve electricity. Press and hold the Energy Saver button for 3 seconds to activate or deactivate this function. NOTE: Discontinue using the Energy Saver function if excessive moisture begins to collect on the door mullion.
IN-DOOR ICE BIN & CAUTION Keep hands ond tools out of the ice compartment road and dispenser chute. Failure to do so may result in damage or personal injury. The ice maker will stop producing ice when the in-door ice bin is full. If you need more ice, empty the ice bin into the extra ice bin in the freezer compartment. During use, the ice can become uneven causing the ice maker to misread the amount of ice cubes and stop producing ice. Shaking the ice bin to level the ice within it can reduce this problem.
AEE AUTOMATIC ICE MAKER lee is made in the automatic ice maker and sent to the dispenser. The ice maker will produce 10 cubes per cycle approximately 100 cubes in a 24-hair period, depending on freezer compartment temperature, room temperature, number of door openings and other operating conditions. * it takes about 12 to 24 hours for a newly installed refrigerator to begin making ice. Wait 72 hours for full ice production to occur ¢ Ice making stops when the in-door ice bin is full.
AUTOMATIC ICE MAKER (continued) CAUTION + The first ice and water dispensed may include particles or odor from the water supply line or the water tank. + Throw away the first few batches of ice (about 24 cubes). This is also necessary if the refrigerator has not been used for a long time. * Never store beverage cans or other items in the ice bin for the purpose of rapid cooling.
EE FOOD STORAGE GUIDE Wrap or store food in the refrigerator in airtight and moisture-proof material unless otherwise noted. This prevents food ado and taste transfer throughout the refrigerator. For dated products, check date code to ensure freshness.
REFRIGERATOR SECTION WATER DISPENSER To dispense cold water, push on the dispenser switch with a gloss. Some dripping may occur softer dispensing. Hold your cup beneath the dispenser for a few seconds after dispensing to catch all of the drops. A WARNING: Do not put your fingers up the ice chute opening. Doing so can result in severe injury. bh CAUTION: Do not dispense ice into fine china or crystal glasses. China or crystal can break. 23 Press down on either of the front corners to remove the tray.
SLING OUR FEE EER CRATE i ih REFRIGERATOR SHELVES The shelves in your refrigerator are adjustable to meet your individual storage needs. Your model may have gloss or wire shelves. Adjusting the shelves to fit different heights of items will make finding the exact item you want easier. Doing so will alas reduce the amount of time the refrigerator door is open which will save energy. IMPORTANT: Do not clean glass shelves with warm water while they are cold.
HUMIDITY CONTROLLED CRISPER The crisper provide fresher tasting fruit and vegetables by letting you easily control humidity inside the drawer. You can control the amount of humidity in the moisture sealed crisper by adjusting the contra to any setting between VEGETABLE and FRUIT. © VEGETABLE keeps moist air in the crisper for best storage of fresh, leafy vegetables. FRUIT lets moist air out of the crisper for best storage of fruit. HUMIDITY SETTING VEGETABLE OF FRUIT REMOVING HUMIDITY CONTROLLED CRISPER 1.
Pres ad rr DOOR BIN FREEZER SECTION The door bins are removable for easy cleaning and EXTRA ICE BIN adjustment. 1. Pull the Freezer Drawer and the Pullout Drawer out as far as possible to remove the Extra ice Bin, 2. Gently lift and pull aut the ice bin. 1. Ta remove the bin, simply lift the bin up ond pull straight out. 2. To replace the bin, slide it in above the desired support and push down until it snips into place. 3.
Mini DURABLE PULLOUT DRAWER 1. To remove the Durable, push it to the back as much 1. To remove, pull the drawer out to full extension. Lift the as possible. Tilt up the front of the Durable ond pull front of the dower up, then pull it straight out. straight out. 2. To replace, insert the Durable in rail assembly. 2. To replace, slightly tit up the drawer front, insert drawer into the frame, and push drawer back into DURABLE DIVIDER place.
LYNN 2 WATER Surer WEE FLIER it is recommended tho you replace the water filter: ¢ Approximately every 6 months. * When the water filter indicator Turns on. + When the water dispenser output decreases. © When the ice cubes are smaller than normal, 1. Remove the old water filter. ¢ Lower or remove the top left shelf to allow the water filter to rotate all the way down. * Press the push button to open the water filter cover, NOTE: Replacing the water filter causes a small amount of water {around drain.
Performance Data Sheet io EE ETE The concentration of the indicated substances in water entering the stern was reduced fo of concentration less than or equal to the permissible limit for water leaving the system as specified in NSF/ANS! Standard 42 and Standard 53. System tested and certified by NSF International against NSF/ANSI Standard 42 and Standard 53 for the reduction of substances listed below. Average Max Permissible . . .
Application Guidelines /\Doter Supply Spectrometers Service Flow 0.5 gpm (19 lpm) Water Supply Potable Water Water Pressure 40-120 psi (138 827 kPa) Water Temperature 33°F 100°F (0.6°C 38°C) it is essential that the manufacturer's recommended installation, maintenance and water filter replacement requirements be carried out for the product to perform as advertised. NOTE: While the testing was performed under standard laboratory conditions, actual performance may vary.
ARE AND CLEANING WARNING Explosion Hazard Use non-flammable cleaner. Failure to do so can result in fire, explosion, or death. Both the refrigerator and freezer sections defrost automatically; however, clean both sections about once a month to prevent odors. Wipe up spills immediately. GENERAL CLEANING TIPS + Unplug refrigerator or disconnect power. * Remove all removable parts, such as shelves, crisper, ete. Refer to sections in Using Your Refrigerator for removal instructions.
LIGHT BULB REPLACEMENT INGE Electrical Shock Hazard Before replacing a Compartment Lamp, either unplug the refrigerator or turn off power af the circuit breaker or fuse box. NOTE: The refrigerator and freezer compartment lights are LED interior lighting, and service should be performed by a qualified technician, POWER INTERRUPTIONS 1. If the power will be out for 24 hours or less, keep dll refrigerator doors closed ta help foods sty cold and frozen. 2.
CONNECTING THE WATER LIN BEFORE YOU BEGIN This water line installation is not covered by the refrigerator warranty. Follow these instructions carefully to minimize the risk of expensive water damage. ‘Water hammer (water banging in the pipes) in house plumbing can course damage fo refrigerator parts and con lead to water leakage or flooding. Call a qualified plumber to correct water hammer before installing the water supply fine to the refrigerator.
INSTALLATION INSTRUCTIONS 5, TIGHTEN THE PIPE CLAMP Tighten the clamp screws until the sealing washer Install the shutoff valve on the nearest frequently used begins fo swell. drinking water line, 1. SHUT OFF THE MAIN WATER SUPPLY Turn on the nearest faucet to relieve the pressure on the ine, 2. CHOOSE THE VALVE LOCATION Pipe Clamp a Choose a location for the valve that is Clamp Screw — A easily accessible. It is best to connect = nl into the side of a vertical water pipe.
OE Rena 8. FLUSH QUT THE TUBING 10. TURN THE WATER ON AT THE SHUTOFF VALVE Turn the main water supply on and Tighten any connections that leak. flush out the tubing until the water is clear. Shut the water off af the water valve after about one quart of writer has been flushed through the tubing. 9. CONNECT THE TUBING TO THE REFRIGERATOR NOTE: Before making the connection to the refrigerator, be sure that the refrigerator power cord is not plugged info the wall outlet. 1.
TROUBLESHOOTING GUI UNDERSTANDING SOUNDS YOU MAY HEAR Your new refrigerator may make sounds that your old one did not make. Most of the new sounds are normal. Hard surfaces, like the floor, wills and cabinets, con make the sounds seem louder than they actually are. The following describes the kinds of sounds you may hear and what may be causing them. Clicking: The defrost control will click when the automatic defrost cycle begins and ends.
Gen rue Ne een SHOOTING Problem Possible Causes Solutions Lights do not work. The power supply cord is unplugged. Firmly plug the cord into oi live outlet with proper voltage (refer to Electrical & Grounding Requirements). A light bulb is loose in the socket, Unplug the refrigerator or turn off power at the circuit breaker or fuse bax. Gently remove the bulb and reinsert {refer to Light Bulb Replacement for instructions on removing your light bulb}. Reconnect power and reset the refrigerator control.
Ei aa Problem Possible Conses Elisions Doors will not close | The refrigerator is not level. See the Leveling and Door Alignment section, completely. Food packages are blocking the door open. Rearrange food containers to clear door and door shelves. The ice bin, crisper cover, pans, shelves, door bins or baskets are aut of position. Push bins aff the way in and put crisper cover, pans, shelves and baskets into their correct positions, See the Using Your Refrigerator section for mare information.
Problem Possible Causes Solutions The refrigerator seems to make too much noise. The sounds may be normal for your refrigerator. Refer to the Understanding Sounds You May Hear section for more information, The ice maker is not producing ice or not enough ice. New installation. Wait 12 to 24 hours after ice maker installation for ice production to begin. Wait 72 hours for full ice production. The refrigerator is nat connected to o water supply or the supply shutoff valve is not turned on.
TROUBLESHOOTING EMILE | Problem Possible Causes solutions 1 Not dispensing ice. tot all of the doors are closed completely. Ice will not dispense if any of the refrigerator doors are left open. The dispenser display is locked. Press and hold the Lock button for 3 seconds to unlock the control panel and dispenser. Ice is not selected on the dispenser. The dispenser can be set for ice or water. Make certain that the control panel is set for the proper operation.
Problem Possible Causes Solutions Not dispensing water. The dispenser panel is locked. Press and hold the Lock button for 3 seconds to unlock the control panel and dispenser. Hew installation. Flush and fill the water system, Refrigerator or freezer doors ore not closed properly. Water will not dispense if any of the refrigerator doors are left open. The refrigerator is nat connected ta o water supply or the supply shutoff valve is not turned on.
Ere aT Problem Possible Causes Solutions Temperature is too warm or there is interior moisture buildup. The air vents are blocked. Cold air circulates farm the freezer to the fresh food section and back again through air vents in the wall dividing the two sections. Locate air vents by using your hand to sense airflow and move oll packages that block vents and restrict airflow. {See air flow diagram below.) The doors are opened offend.
Your Home For troubleshooting, product manuals and expert advice: @ manageability www.managemylife.com For repair — in your home — of all major brand appliances, lawn and garden equipment, or heating and cooling systems, no matter who made it, no matter who sold it! For the replacement parts, accessories and owner's manuals that you need to do-it-yourself. For Sears professional installation of home appliances and items like garage door openers and water heaters.