Use & Care Guide Manual de Uso y Cuspidor Guide utilization et veniremen English / Espalier / French Models/Modelos/Modéles: 795.
TABLE OF CONTENTS WORTHY ovens sss 3 Protection Agreements wm 4 Important Safety Instructions coven 5-7 Electrical & Grounding Parts and Features... Refrigerator Installation Unpacking Your Refrigerator. Installation wen Removing, Replacing Your Refrigerator and Freezer Handles, Doors and Drawers... 11-15 Leveling and Door Alignment 16 Using Your Refrigerator...
WARRANTY REFRIGERATOR WARRANTY En. (Kenmore Elite Warranty \ When this appliance is installed, operated and maintained according to all supplied instructions, the following warranty coverage applies. To arrange for warranty service, call 1-800-4-MY-HOME® (1-800-~ 469-4663). « One Year Limited Warranty on Appliance For ane yer from the date of purchase, free repair will be provided if any Nan-consumaoble part of this appliance fails due to defects in material or workmanship.
PROTECTION AGREEMENTS Master Protection Agreements Congratulations on making a smart purchase, Your new Kenmore Elite? product is designed and manufactured far years of dependable operation. But like oll products, it may require preventive maintenance or repair from time to time. That's when having a Master Protection Agreement can save you money and aggravation. The Master Protection Agreement also helps extend the life of your new product.
IMPORTANT SAFETY IN [0] 1) BASIC SAFETY PRECAUTIONS This guide contains many important safety messages. Always read and obey ofl safety messages. This is the safety alert symbol. It alerts you to safety messages that inform you of hazards they can kill ar hurt you ar others, ar course damage ta the product. All safety messages will be preceded by the safety alert symbol and the hazard signal word DANGER, WARNING or CAUTION.
GONE = Before replacing a burned-out or broken light bulb, unplug the refrigerator or turn off power at the circuit breaker or fuse box in order to avoid contact with a live wire filament, (4 burned-out light bulb may break when being replaced exposing the wire filament.) NOTE: Some models have LED interior lighting rind service should be performed by a qualified technician, WARNING: Setting either or both controls to the OFF position does not remove power to the light circuit.
oof] loll] 10 )7.1 Your old refrigerator may have a cooling system that used Cf Cs or RFCs (chlorofluorocarbons or hydrochlarofiucrocarbans). Cf Cs and RFCs are believed to harm stratospheric ozone if released to the atmosphere, Other refrigerants may loos cause harm to the environment if released to the atmosphere. ELECTRICAL & GROUNDING REQUIREMENTS IF you ore throwing away your ald refrigerator, mike sure the refrigerant is removed for proper disposal by a qualified technician.
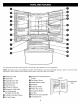
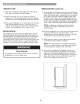
UVR DR Tov 2 ?PRPP0%°? Use this page to become more familiar with the parts and features of your refrigerator. NOTE: This guide covers several different models, The refrigerator you have purchased may have some or off of the items listed below. The locations of the features shown below may not match your model.
REFRIGERATOR INSTALLATION LG Excessive Weight Howard: Use two or more people to move and install the refrigerator. Failure to do so con result in back or other injury. UNPACKING YOUR REFRIGERATOR Remove tape and any temporary labels from your refrigerator before using. Do not remove any warning. type labels, the model and serial number label, or the Tech Sheet that is located under the front of the refrigerator. To remove ony remaining tape or glue, rub the area briskly with your thumb.
PRIOR TO USE 1. Clean your refrigerator thoroughly ond wipe off ofl dust that accumulated during shipping. . Install accessories such as ice cube bin, drawers, shelves, enc, in their proper places. They are packed together to prevent possible damage during shipment. . Allow your refrigerator to run for at least two to three hours before putting food in it. Check the flow of cold air in the freezer compartment 10 ensure proper cooling. Your refrigerator is now ready for use.
NOTE: Removing the doors is always recommended when if is necessary to move the refrigerator through a narrow opening. If it is necessary to remove the handles, follow the directions below. HOW TO REMOVE REFRIGERATOR DOOR HANDLE Mounting Fasteners NOTE: Handle appearance may vary from illustrations on this page. Set Screw Removing Refrigerator Handle Loosen the set screws with a 3/32 in. Allen wrench and remove the handle, NOTE: If the handle mounting fasteners need to be tightened or removed, use a Va in.
EERIE ATO REEL ATI : man nl NOTE: Removing the doors is always recommended when it is necessary to move the refrigerator through a narrow opening. If it is necessary to remove the handles, follow the directions below. HOW TO REMOVE FREEZER DOOR HANDLE NOTE: Handle nonappearance may vary from illustrations on this page. Removing Freezer Drawer Handle Loosen the set screws located on the lower side of the handle with a V4 in. Allen wrench and remove the handle.
REMOVING AND REPLACING REFRIGERATOR DOORS LGN Excessive Weight Howard: Use two or more people to remove and install the refrigerator doors. Failure to do so con result in back or other injury. NCU Electrical Shock Hazard « Disconnect the electrical supply to the refrigerator before installing. Failure to do so could result in serious injury or death. « Do not put hands, feet or other objects into the air vents or hat tom of the refrigerator. You moy be injured or receive an electrical shock.
| REFRIGERATOR INSTALLATION Reinstalling the Refrigerator Door # Loft Door 1. 2. 3 Lower the door onto middle hinge pin (10). Fit top hinge {7} over hinge lever latch (8) and into place. Rotate lever {8} clockwise to secure hinge. Install the grounding screw (5) and connect the two wire harnesses (4). . Push the water tube (3) looted at the top of the left door into the hole beside the left hinge on the top of the cabinet until it exits through the back. .
HOW TO REMOVE THE FREEZER DRAWER HOW TO INSTALL THE FREEZER DRAWER A WARNING: Use two or more people to remove and install the freezer drawer. Failure to do so can result in back or other injury. A. CAUTION: Do not hold the handle when removing or replacing the drawer. The handle may come off and it could cause personal injury. Pull out each rail to full extension. NOTE: in the following figures, the Pullout Drawer located above the freezer drawer is not shown for clarity.
RE ne LEVELING AND DOOR ALIGNMENT Leveling After installing, plug the refrigerators power cord into o 3-prong grounded outlet and push the refrigerator into the final position. Your refrigerator has two front leveling legs—one on the right and one an the left. Adjust the legs to alter the tilt from front-to-back or side-to-side.
ING YOUR REFRIGERATOR SETTING THE CONTROLS AIRFLOW Be sure not ta block vents while packing your refrigerator. Doing so will restrict airflow and may cause the refrigerator temperature to become too warm or cause interior moisture buildup. {See air flow diagram below.) 17 Temperature im . 5 Pad The Refrigerator Temp Control ranges from 33°F to 46°F (0°C to 8°C). Press the Refrigerator Temp button to cycle through the available temperature settings one increment of a Hume.
po ALTO ie en pees USING Young Air Filter This light has three settings: On, OF and Auto, If the light is set ta the Auto mods, the Accent Light will automatically turn on and off according to the brightness of room, as detected by the light sensor. The Air Filter helps remove odors from the refrigerator. The Air Filter has two settings, Auto and MAX. In Auto mode, the Air Filter will cycle an and off in increments of ten minutes on and one hundred and ten minutes off.
Boor Alarm (0 + ‘When power is connected to the refrigerator, the door alarm is initially set to ON. When you press the Door Alarm button, the display will change to OFF and the Door Alarm function will deactivate. When either the refrigerator or the freezer door is left open for more than 60 seconds, the alarm tone will sound to let you know that the door is open. When you case the door, the road alarm will stop.
aaa AEE IN-DOOR ICE BIN 2. To remove the in-door ice bin, grip the front handle, £ CAUTION slightly life the lower part, and slowly pull out the bin Keep hands ond tools out of the ice compartment road and dispenser chute. Failure to do so may result in damage or personal injury. / The ice maker will stop producing ice when the in-door ice bin is full. If you need more ice, empty the ice bin into the extra ice bin in the freezer compartment.
AUTOMATIC ICE MAKER Ice is made in the automatic ice maker and sent to the dispenser. The ice maker will produce 70-210 cubes in a 24-hour period, depending on freezer compartment temperature, room temperature, number of door openings and other operating conditions. it takes about 12 to 24 hours for a newly installed refrigerator to begin making ice. Wait 72 hours for full ice production to occur ice making stops when the in-doer ice bin is full.
AUTOMATIC ICE MAKER (continued) CAUTION The first ice and water dispensed may include particles or odor from the water supply line or the water tank. Throw away the first few batches of ice. This is also necessary if the refrigerator has not been used for o tong time. Never stare beverage cons or other items in the ice bin for the purpose of rapid cooling. Doing so may damage the ice maker or the containers may burst if discolored ice is dispensed, check the water filter and water supply.
FOOD STORAGE GUIDE Wrap or store food in the refrigerator in airtight and moisture-proof material unless otherwise noted. This prevents food ado and taste transfer throughout the refrigerator. For dated products, check date code to ensure freshness.
TE da REFRIGERATOR SECTION WATER DISPENSER WATER TRAY To dispense cold water, push on the dispenser switch 9 Press down on either of the front corners to remove with a gloss. the tray. NOTE: The dispenser is equipped with a light that NOTE: There is no drain beneath the tray. You may turns on when the dispenser pad is engaged. need to empty the tray of any liquid tho collects in it. Dispenser Switch Push Some dripping may occur after dispensing.
REFRIGERATOR SHELVES The shelves in your refrigerator are adjustable to meet your individual storage needs. Your model may have gloss or wire shelves. Adjusting the shelves to fit different heights of items will make finding the exact item you want easier. Doing so will alas reduce the amount of time the refrigerator door is open which will save energy. IMPORTANT: Do not clean glass shelves with warm water while they are cold. Shelves may break if exposed to sudden temperature changes or impact.
Pres ad rr HUMIDITY CONTROLLED CRISPER CONVENIENCE BIN The crisper provide fresher tasting fruit and vegetables by Open and close by pulling the handle of the lid. letting you easily control humidity inside the drawer. You can control the amount of humidity in the moisture sealed crisper by adjusting the contra to any setting between VEGETABLE and FRUIT. ¢ VEGETABLE keeps moist air in the crisper for best storage of fresh, leafy vegetables.
sme SE DOOR BIN After changing the filter, push and hold the Air Filter . . tron for thr nds to reset the filter sensor. The door bins are removable for easy cleaning and button fo @ seconds fo reset the filter sens adjustment. NOTE: To purchase a replacement oir filler (part number: ADEQUACY 3214402) visit a Sears store or call 1-800-4-MY HOMES. Also, you may order on-line ot: parts direct 1. To remove the bin, simply sift the bin up and pull straight out. 2.
pps pr Ere PULLOUT DRAWERS 2. To replace, slightly flit up the front of the drawer, insert the drawer into the frame, and push it back into Top Drawer place. 1. To remove, pull the drawer out to full extension. On the left rail, use o flat bind screwdriver to push in on the tab to release the drawer from the rail, as shown below. Once the left side is loose, push the tab on the right side with your finger to release the drawer. Lift the front of the drawer up, then pull it straight out. DURABLE 1.
WATER FILTER WATER Surer It is recommended that you replace the water filter: ¢ Approximately every six months. * When the water filter indicator Turns on. + ‘When the water dispenser output decreases.
— a SL Performance Data Sheet The concentration of the indicated substances in water entering the stern was reduced fo of concentration less than or equal to the permissible limit for water leaving the system as specified in NSF/ANS! Standard 42 and Standard 53. System tested and certified by NSF International against NSF/ANSI Standard 42 and Standard 53 for the reduction of substances listed below. Average Max Permissible . . .
Application Guidelines /\Doter Supply Spectrometers WARNING Service Flow 0.5 gpm (19 lpm) Water Supply Potable Water To reduce the risk associated with ingestion of Doter Pressure 40-120 poi [138 827 kPa) contaminants: Deo not use with water that is micro biologically unsafe or of unknown quality without adequate disinfection before und after of the it is essential that the manufacturer's recommended system.
State of California Department of Public Health Water Treatment Device Certificate Number 09-2019 Date Issued: December 13, 2009 Manufacturer: Sears Roebuck ahdi€o.' we © The water treatment dedicates} listed o Gi this certificate Have mit the {eating' Requirements pursuant to Section 116830 of the Health, and Safety Code for the following health related contaminants: Microbiological Contaminants and Turbidity ol Knox, audiological Contaminants Cysts Organic Contaminants = Ses 2.
ARE AND CLEANING WARNING Explosion Hazard Use non-flammable cleaner. Failure to do so can result in fire, explosion, or death. Both the refrigerator and freezer sections defrost automatically; however, clean both sections about once a month to prevent odors. Wipe up spills immediately. GENERAL CLEANING TIPS + Unplug refrigerator or disconnect power. * Remove all removable parts, such as shelves, crisper, ete. Refer to sections in Using Your Refrigerator for removal instructions.
LIGHT BULB REPLACEMENT WHEN YOU MOVE When you are macing your refrigerator to a new home, AH WARNING follow these steps to prepare it for the move. Electrical Shock Hazard 1. Remove all food from the refrigerator and pack all frozen food in dry ice. Before replacing a Compartment Lamp, either unplug . the refrigerator or turn off power af the circuit breaker 2. Unplug the refrigerator. or fuse box. 3, Clean, wipe and dry thoroughly.
[ood agp ey TRAN gE BEFORE YOU BEGIN This water line installation is not covered by the refrigerator warranty. Follow these instructions carefully to minimize the risk of expensive water damage. ‘Water hammer (water banging in the pipes) in house plumbing can course damage fo refrigerator parts and con lead to water leakage or flooding. Call a qualified plumber to correct water hammer before installing the water supply fine to the refrigerator.
STS a INSTALLATION INSTRUCTIONS Install the shutoff valve on the nearest frequently used drinking water line, 5. TIGHTEN THE PIPE CLAMP Tighten the clamp screws until the sealing washer begins fo swell, 1. SHUT OFF THE MAIN WATER SUPPLY Turn on the nearest faucet to relieve the pressure on the line, 2. CHOOSE THE VALVE LOCATION Choose a location for the valve that is easily accessible. It is best to connect into the side of a vertical water pipe.
LEE 8. FLUSH QUT THE TUBING 10. TURN THE WATER ON AT THE SHUTOFF VALVE Turn the main water supply on and Tighten any connections that leak. flush out the tubing until the water is clear. Shut the water off af the water valve after about one quart of writer has been flushed through the tubing. 9. CONNECT THE TUBING TO THE REFRIGERATOR NOTE: Before making the connection to the refrigerator, be sure that the refrigerator power cord is not plugged info the wall outlet. 1.
TROUBLESHOOTING GUI Before conducting troubleshooting, make sure that the following basic requirements are meh: Service Flow 0.5 gpm (1.9 lpm} Water Supply Potable Water Water Pressure 40-120 psi (138 827 kPa) Operating Ambient 55°F 110°F Temperature Limits 115 Volts, 60 Hz, AC only, and fused amperes. Electrical Ratings BE uncool Problem Possible Causes 4 Solutions Refrigerator and The refrigerator control is set to OFF | Turn the control ON.
RT EET coo Ling EEE Friable [ Possible Causes 1 Solutions Refrigerator or freezer section is tao warm, Refrigerator was recently installed. It moy take up to 24 hours for each compartment to reach the desired temperature, Air vents are blocked. Rearrange items to allow air to flow throughout the compartment, Refer to the Airflow diagram in the Using Your Refrigerator section. Doors are opened often or for long periods of time.
Ba COOLING/ICE & WATER RES Problem Possible Causes I Solutions Food is freezing in the refrigerator compartment, Food with high water content was placed near an air vent. Rearrange items with high water content away from air vents, Refrigerator temperature control is set incorrectly. if the temperature is too cold, adjust the control one increment otf a time and wait for the temperature to stabilize. Refer fo the Setting the Controls section for mare information.
ice & water [EIR Problem Possible Causes i Solutions nonsmoker is not making enough ice {continued}. Doors are opened often or for long periods of time. If the doors of the unit are opened often, ambient air will warm the refrigerator which will prevent the unit from maintaining the set temperature. Lowering the refrigerator temperature can help, as well as not opening the doors as frequently. Doors are not closed completely. If the doors are not properly closed, ice production will be effected.
BE icebreaker Problem Possible Souses i Solutions Ice maker is not making ice. Refrigerator was recently installed or ice maker recently connected. It may take up to 24 hours far each compartment to reach the desired temperature and for the ice maker to begin making ice. pacemaker not turned on, Locate the ice maker ON/OFF switch and confirm that it is in the ON (I) position. The ice detecting sensor is obstructed. Foreign substances or frost on the ice-detecting sensor can interrupt ice production.
ICE & water [EEE Problem Possible Causes : 1 Solutions lee hos bod taste or odor. Water supply contains minerals such as sulfur, A water filter may need ta be installed to eliminate taste and odor problems. NOTE: In some cases, o filter moy not help. If may not be possible to remove all minerals / odor / taste in alt water supplies. pacemaker was recently installed. Discard the first few batches of ice to avoid discolored or bad tasting ice. Ice has been stored for too long.
Problem Passable Navies : Solutions Clicking The defrost control will click when the automatic defrost cycle begins and ends. The thermostat control {or refrigerator control on some models) will also click when cycling on and off. Normal Operation Rattling Ra tiling noises moy come from the flow of refrigerant, the water line on the back of the unit, or items stored on top of or around the refrigerator. Normal Operation Refrigerator is not resting solidly on the floor.
RST A PARTS & FEATURES EE Problem Possible Causes ! Solutions Doors will not close correctly or pop open. Food prick ages are blocking the door open. Rearrange food containers fo clear the door and door shelves, Ice bin, crisper cover, pans, shelves, door bins, or baskets are out of position, Push bins all the way in and put crisper caver, pins, shelves and baskets Into their correct positions.
Ct a Should you experience any problems with your if you experience problems with your refrigerator, call refrigerator, it has the capability of transmitting date vin 1-800-4-MY-HOME®, Only use the Kenmore Connect your telephone to the Kenmore Connect Team. This gives System feature when instructed the Kenmore you the capability of speaking directly to aur trained Connect Team. The transmission sounds that you will hear specialists.
Your Home For troubleshooting, product manuals and expert advice: @ manageability www.managemylife.com For repair — in your home — of all major brand appliances, lawn and garden equipment, or heating and cooling systems, no matter who made it, no matter who sold it! For the replacement parts, accessories and owner's manuals that you need to do-it-yourself. For Sears professional installation of home appliances and items like garage door openers and water heaters.