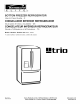
E L ! T E _R_ BOTTOM FREEZER REFRIGERATOR Use & Care Guide o 2 CONGELADOR INFERIOR REFRIGERADOR Guia para el Uso y Cuidado ° 36 CONGCLATEUR Guide d'Utifisation INFCRIEUR RCFRIGCRATEUR et d'Entretien o 70 Models / Modelos / Modeles 795.7875;!-_, 7876;!-_ ;!-_=color number, nOmero de color, numero de couleur ==trio MFL37933511 Printed in Korea Sears, Roebuck and Co., Hoffman Estates, IL 60179 U.S.A. Sears Canada, Inc., Toronto, Ontario, Canada M5B 2B8 www.sears.com www.sears.
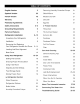
English Version Spanish 2 Version French Version Grounding Modular 21 Parts And Features Unpacking Installation Leveling Dairy Bin 21 4 Egg Box 21 Handles And Doors And Door Alignment Base Cover D,-Freezer Tilting Door 22 7 Tilt-Out Door Basket 22 Extra ice Bin 22 8 Durabase 23 8 Durabase 9-14 15 Divider 23 Pull Out Drawer 23 Filter 24 Care And Cleaning 25-26 15 General Using Your Refrigerator 16-24 Setting The Controls 16 Ensuring 16 Proper Air Circulation Us
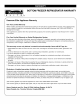
BOTTOM FREEZER REFRIGERATOR WARRANTY E L l E T J® f Kenmore Elite Appliance One Year Limited Warranty Warranty When installed, operated and maintained according to all instructions supplied with the product, if this appliance fails due to a defect in material or workmanship within one year from the date of purchase, call 1-800-4-MY-HOME _ to arrange for free repair. If this appliance is used for other than private family purposes, this warranty applies for only 90 days from the date of purchase.
Master Protection Agreements Congratulations on making a smart purchase. Your new Kenmore ® product is designed and manufactured for years of dependable opera-tion. But like all products, it may require preventive maintenance or repair from time to time. That's when having a Master Protection Agreement can save you money and aggravation. The Master Protection Agreement also helps extend the life of your new product.
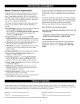
BASIC SAFETY PRECAUTIONS This guide contains many important safety messages. Always read and obey all safety messages. This is the safety alert symbol. It alerts you to safety messages that inform you of hazards that can kill or hurt you or others, or cause damage to the product. All safety messages will be preceded by the safety alert symbol and the hazard signal word DANGER, WARNING, CAUTION. These words mean: You will be killed or seriously injured if you don't follow instructions.
your old refrigerator, please follow the instructions at right BEFORE YOU THROW AWAY YOUR OLD REFRIGERATOR OR FREEZER to help prevent accidents (Child entrapment and • Take off the doors. Junked or abandoned refrigerators are dangerous...even if they will sit for just a few days. tf you are getting rid of suffocation). • Leave the shelves in place so that children may not easily climb inside. Your old refrigerator may have a cooling system that used CFCs (chlorofluorocarbons).
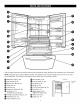
Usethispageto becomemorefamiliarwiththepartsandfeatures.Pagereferences areincludedforyourconvenience. NOTE:Thisguidecoversseveraldifferentmodels.Therefrigerator youhavepurchased mayhavesomeor allofthe itemslistedbelow.Thelocationsofthefeaturesshownbelowmaynotmatchyourmodel. Q Refrigerator Light(p.25) O Filter(Inside)(p.24) ModularDoorBins(p.21) Tiltingdoorbin Fixeddoorbin Refrigerator Shelves(p.20) IceRoom(p.17) (IceMakerandIceBucket) HumidityControlled Crisper(p.21) O Glide'N'Serve (p.21) CubeIceMaker(p.
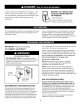
INSTALLATION Excessive Weight Hazard Use two or more people to move and install refrigerator. Failure to do so can result in back or other injury. UNPACKING YOUR REFRIGERATOR Remove tape and any temporary labels from your refrigerator before using. Do not remove any warning-type labels, the model and serial number label, or the TechSheet that is attached to back wall of the refrigerator. To remove any remaining tape or glue, rub the area briskly with your thumb.
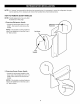
NOTE:It is "always"recommend thatthedoorsberemovedwhenit is necessary tomovetherefrigerator througha narrowopening.If it is necessary to removethehandlesfollowthedirectionsbelow. HOW TO REMOVE DOOR HANDLES NOTE: Handle appearance may vary from illustrations on this page. 1. Removing Refrigerator Handle • Loosen the set screws with a 2.5 mm (3/32") Allen wrench and remove the handle. NOTE: If the handle mounting fasteners need to be tightened or removed, use a 1/4" Allen wrench.
HOW TO REPLACE DOOR HANDLES NOTE: Handle appearance may vary from illustrations on this page. 1. Replacing Refrigerator Door Handle • Place the handle on the door by adjusting handle footprints to fit mounting fastners and tighten the set screws with a 2.5 mm (3/32") Allen wrench. NOTE: If the handle mounting fasteners need to be tightened or removed use a 1/4" Allen wrench. Mounting Fasteners \ q& 2.
REMOVING AND REPLACING REFRIGERATOR DOORS To remove the right refrigerator door: F To remove the left refrigerator door: Pull the water tube out of the fitting while pressing the release ring on the fitting. When you pull out the tube, first you have to push the collet by opposite direction of arrow in the upper picture and tube pull out by direction of arrow. @ • Open the door. Remove the top hinge cover screw (1). Lift up the cover (2). • Remove the cover. • Disconnect the wire harness (3).
Reinstalling the Refrigerator Door I_ Right Door 1. Lower the door onto middle hinge pin (8). 2. Fit top hinge (5) over hinge lever latch (6) and into place. Insert hinge lever (4) under lever latch. Rotate lever counterclockwise to secure hinge. 3. Connect wire harnesses (3). 4. Hook tab on door switch side of cover under edge of wire opening in cabinet top. Position cover (2) into place. Insert and tighten cover screw (1). I_ Left Door 1. Lower the door onto middle hinge pin (9). 2.
HOW TO REMOVE AND INSTALL THE PULLOUT DRAWER • With both hands, hold both sides of the door and pull it up to separate it from the rails. J IMPORTANT: To avoid possible injury or product or property damage, you will need two people to perform the following instructions. 1. Removing Pullout Drawer • Pull the drawer open to full extension. Remove the lower basket (1) by lifting basket from rail system. (If you tilt the door, it will be easier.
HOW TO REMOVE AND INSTALL THE PULLOUT DRAWER • Make sure you have a right rail cover for each side. Rail Cover IMPORTANT: To avoid possible injury or product or property damage, you will need two people to perform the following instructions. Right Left Rail Cover 2. Installing Pullout Drawer • With both hands, hold the center bar and pull it out to let both rails out to full extension simultaneously.
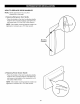
LEVELING AND DOOR ALIGNMENT 3. Open both doors again and check to make sure that they close easily. If not, tilt the refrigerator slightly more to the rear by turning both leveling legs clockwise. It may take several more turns, and you should turn both leveling legs the same amount. Leveling After installing, secure the product with the LEG not to move left or right. 4. Re-adjust if necessary. Your refrigerator has two front leveling legs--one on the right and one on the left.
SETTING Filter THE CONTROLS • Filter Reset : When the FILTER RESET icon turns on, you have to change the water filter. Press the FILTER RESET button for 3 seconds to turn the icon off. You Temperature • Your refrigerator has a control pad on the dispenser that lets you regulate the temperature in the freezer and refrigerator compartments. need to change the water filter approximately every 6 months. • Initially set the refrigerator control at 37°F (3°C) and the freezer control at 0°F (-18°C).
IN-DOOR ICE BANK 2. To remove the in-door ice bank, grip the front handle, slightly lift the lower part, and slowly pull out the bin as shown. A CAUTION • Keep hands and tools out of the ice bank door and dispenser chute. You could break something or injure yourself. f- The icemaker will stop producing ice when the ice bank is full. If you need more ice, empty the ice bank into the extra ice bin in the freezer compartment so the icemaker can keep producing ice.
ADJUSTING CONTROL SETTINGS FOOD STORAGE Give the refrigerator time to cool down completely before making final adjustments. It is best to wait 24 hours before doing this. The mid-settings indicated in the previous section should be correct for normal household refrigerator usage. The controls are set correctly when milk or juice is as cold as you like and when ice cream is firm. Wrap or store food in the refrigerator in airtight and moisture-proof material unless otherwise noted.
STORING FROZEN REFRIGERATOR FOOD NOTE: For further information about preparing food for freezing or food storage times, check a freezer guide or a reliable cookbook. SECTION WATER DISPENSER Tray can be easily removed by pressing and pulling it. Packaging Successful freezing depends on correct packaging. When you close and seal the package, it must not allow air or moisture in or out. If it does, you could have food odor and taste transfer throughout the refrigerator and also dry out frozen food.
REFRIGERATOR SHELVES A CAUTION: Make sure that shelves are level from one side to the other. Failure to do so may result in the shelf falling or spilling food. The shelves in your refrigerator are adjustable to meet your individual storage needs. Your model may have glass or wire shelves.
HUMIDITY CONTROLLED CRISPER GLIDE'N'SERVE The crispers provide fresher-tasting fruit and vegetables by letting you easily control humidity inside the drawer. The crispers include: The Glide'N'Serve provides storage space with a variable temperature control that keeps the compartment colder than refrigerator. This drawer can be used for large party trays, dell items, or beverages. A crisper drawer humidity control switch. You can control the amount of humidity in the moisture-sealed crispers.
FREEZER TILTING SECTION EXTRA ICE BIN 1. To separate the ice bin, pull out the drawer as much as possible. DOOR The tilting door provides easy access for stored foods. 2. Gently lift and pull out the ice bin. How to use 3. To install, pull out the drawer as much as possible and set the ice bin in its correct position, then push in the drawer. Tilt the door down and pull it out.
DURABASE PULL OUT DRAWER 1. To remove the Durabase, push it back to the end as much as possible. Tilt up the front of the Durabase and pull straight out. To separate the drawer, push the front left and right hooks in _) direction to pull up and remove. Then gently lift the gear part of rear left and right side of the drawer and pull it out in (_ direction. 2. To install, insert the Durabase in rail assembly.
FILTER 2. Replace with a new cartridge. Take the new cartridge out of its packaging and remove protective cover from the o-rings. It is recommended that you replace the filter when the water filter indicator icon turns on or your water dispenser or ice maker performance decreases noticeably. With cartridge knob in the vertical position, push the new filter cartridge into the cover until it stops.
CONDENSER COILS Remove Back cover. Use a vacuum cleaner with an extended attachment to clean condenser coils. Vacuum coils when dusty or dirty. Coils may need to be cleaned as often as every other month. Explosion Use non-flammable Hazard LIGHT cleaner. BULB REPLACEMENT Failure to do so can result in death, explosion, or fire. Both the refrigerator and freezer sections defrost automatically. However, clean both sections about once a month to prevent odors. Wipe up spills immediately.
To change freezer Compartment WHEN YOU GO ON VACATION Lamp NOTE: Some models have LED interior lighting and service should be performed by a qualified technician. 1. Unplug refrigerator power cord form outlet. If you choose to leave the refrigerator on while you are away, follow these steps to prepare your refrigerator before you leave. 2. Remove screw with direver. 1. Use up any perishables and freeze other items. 3. Grasp the cover Lamp, pull the cover downward. 2. Empty the ice bin. 3.
AUTOMATIC ICEMAKER Ice is made in the automatic icemaker and sent to the dispenser. The automatic icemaker can make 6 ice cubes at a time, 80-130 cubes per 24-hour period. This quantity may vary by circumstance, including freezer compartment temperature, room temperature, number of door openings, freezer load, and other operating conditions. Personal Injury Hazard Avoid contact with the moving parts of the ejector mechanism, or with the heating element that releases the cubes.
WHEN _, CAUTIONS YOU SHOULD SET THE ICEMAKER POWER SWITCH TO O (OFF) • The first ice and water may include particles or odor from the water supply line or the water tank. • When the water supply will be shut off for several hours. • Throw away the first few batches of ice (about 20 pieces) and purge for 2 minutes that are dispensed after refrigerator installation. • When the ice storage bin is removed for more than a minute or two. • When the refrigerator will not be used for several days.
BEFORE YOU BEGIN • If your existing copper water line has a flared fitting at the end, you will need an adapter (available at plumbing supply stores) to connect the water line to the This water line installation is not warranted by the refrigerator or icemaker manufacturer. Follow these instructions carefully to minimize the risk of expensive water damage. Water hammer (water banging in the pipes) in house plumbing can cause damage to refrigerator parts and lead to water leakage or flooding.
INSTALLATION INSTRUCTIONS 7. CONNECT (CONTINUED) 4. FASTEN THE SHUTOFF THE TUBING TO THE VALVE Place the compression nut and ferrule (sleeve) for copper tubing onto the end of the tubing and connect it to the shutoff valve. Make sure the tubing is fully inserted into the valve. Tighten the compression nut securely. VALVE Fasten the shutoff valve to the cold water pipe with the pipe clamp. Pipe Clamp Saddle-Type Shutoff Valve _ Saddle-Type Shutoff Valve .
9. CONNECT THE TUBING REFRIGERATOR TO THE 10. TURN THE WATER ON AT THE SHUTOFF VALVE NOTE: Tighten any connections that leak. • Before making the connection to the refrigerator, be sure the refrigerator power cord is not plugged into the wall outlet. Reattach the compressor compartment access cover. 1. Remove the plastic flexible cap from the water valve. 2. Place the compression nut and ferrule (sleeve) onto the end of the tubing as shown. 3.
UNDERSTANDING SOUNDS • The defrost timer will click when the automatic defrost cycle begins and ends. The thermostat control (or refrigerator control, depending on the model) will also click when cycling on and off. YOU MAY HEAR Your new refrigerator may make sounds that your old one didn't make. Because the sounds are new to you, you might be concerned about them. Most of the new sounds are normal.
COMPRESSOR MOTOR SEEMS TO RUN TOO MUCH Check if... Then... The refrigerator that was replaced was an older model, Modern refrigerators with more storage space require more operating time. The room temperature is hotter than normal. The motor will run longer under warm conditions. At normal room temperatures, expect your motor to run about 40% to 80% of the time. Under warmer conditions, expect it to run even more often. The door is opened often or a large amount of food has just been added.
ICE HAS OFF-TASTE OR ODOR Check if... Then... The icemaker was recently installed. Discard first few batches of ice to avoid discolored or offflavored ice. The ice has been stored for too long. Throw away old ice and make new supply. The food has not been wrapped tightly in either compartment, Rewrap foods since odors may migrate to the ice if food is not wrapped properly. The water supply contains minerals such as sulfur. A filter may need to be installed to eliminate taste and odor problems.
THE DOORS ARE DIFFICULT TO OPEN Check if... Then... The gaskets are dirty or sticky. Clean gaskets and the surfaces that they touch. Rub a thin coat of appliance polish or kitchen wax on the gaskets after cleaning. The door is reopened within a short time after having been opened. When you open the door, warmer air enters the refrigerator. As the warm air cools, it can create a vacuum.
.... You r Ho me For expert troubleshooting and home solutions advice: e www.ma.agomyhome.com For repair- in your home - of all major brand appliances, lawn and garden equipment, or heating and cooling systems, no matter who made it, no matter who sold it! .................. For the replacement parts, accessories and owner's manuals that you need to do-it-yourself. .................. For Sears professional installation of home appliances and items like garage door openers and water heaters. 1..