E L I T E _M 30" Convection Self-Cleaning Double Electric Models Built=In Wall Oven 911.49012, 49013, l, -- .... --- 7 T ii I I ' ................. 49014, I ii II I[ IIII II Jl I IJ II 49019 J J , (SR-10433) , i I I I IIII I Jlll_ IIIql IIII itlll, NIII||I,IIIIII,III 22904020P232-2 i i n Hn n Seam, Roebuck and Co., Hoffman Estates, IL 60179 U.S.A. www.sears.
E L I T SELF-CLEANING DOUBLECONVECTION OVEN E TABLEOF CONTENTS Oven Safety ....................... 3-4 Self-Cleaning Cycle ...... 26-27 Control Panel ...................... 28 Broiler Pan and Grid .............. 28 Self-Clean Oven Interior ........ 28 Oven Door Glass ................ 28 Door Vent Trim ........................ 28 Stainless Steel .............. 28 Oven Light Bulbs ................. 29 Oven Racks ............................ 29 Oven Door ..............................
E L i T IMPORTANT SAFETY INSTRUCTIONS E SAVE THESE INSTRUCTIONS Read all instructions before using this appliance, When using gas or electrical appliances, basic safety precautions should be followed, including the following: ° NEVER LEAVE containers of fat or drippings in your oven, • ALWAYS KEEP the oven area free from things that will burn Food, wooden utensils, and grease buildup couid catch fire Plastic utensils could melt and canned foods could explode° Your alSpliance should never be used as a
E L ! • DO NOT USE oven cleaners - No commercial oven cleaner or protective coating of any kind should be used in or around any part of the oven E IMPORTANT SAFETY INSTRUCTIONS • IF THE SELF-CLEANING mode malfunctions, turn the oven off and disconnect the power supply Have it serviced by a qualified technician. IMPORTANT SAFETY . PLACE OVEN RACKS in the desired position while the oven is cool. If racks must be moved while oven is hot, do not let potholder contact the hot oven element.
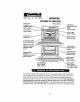
E L I T E OPERATION FEATURESOF YOUROVEN Oven Vent Oven Control (both ovens) Dven Light (both ovens) Broiler Pan and Grid Convection Fan and Self-Clean Broil Element (both ovens) Bake Model and Serial Number Location (behind upper door) Oven Rack Guides (both ovens) Self-Cleaning Interior (both ovens) Hidden Bake Element (under oven floor) (both ovens) Removable Door (both ovens) Removable Oven Racks (3 in upper oven, 2 in lower oven) Setf-Cldaning Door Gasket (both ovens) To remove the ad
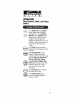
E ! T OPERATION OvenControl,Clock, and Timer E l@@f@@ ® .-.,®®..-. ® @@ I Your new touch pad oven control will allow you to set various functions with ease Below are the different types of functions and a description of each. BAKE - Cooks foods oven with a temperature to 550°F. in the traditional range Cooks of 170°F FAVORITE RECIPE (upper oven) Lets you preset up to five temperature/ cooking time combinations.
E ! T E OPERATION Oven Control, Clock, and Timer (cont.) The TEMP UP and DOWN arrow pads set the oven temperature The HOURI MIN UP and DOWN arrow pads set the time of day, length of cooking time, length of cleaning time, the delayed start time, and the time set on the Kitchen Timer. The START pad must be touched to activate any oven function° The CLEARIOFF pad is used to cancel any oven function and the end of cycle tone It will not cancel the Clock or Kitchen Timer.
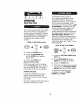
E L I T E OPERATION Control Display Oven Temperature Indicators Set Indicator Multi-Stage Indicator .=n Function Indicators On Indicator Cooking Indicator Timed Oven Function Function Indicators Indicators The Control Display is an easy reference for using your oven control.
E L I- T The Kitchen Timer is used to time cooking processes or other household activities. It does not control the oven. It can be set for up to 9 hours and 59 minutes, It wil! count down in minutes until the LAST 60 SECONDS is reached, then the control will beep once When the countdown reaches ZERO, the control will beep 3 times, followed by one beep every 6 seconds until the KITCHEN TIMER ON/OFF pad is touched, The 6-second beep can be removed for future cycles if desired.
4. Touch the START pad to cancel the 6-second beep and leave the special feature mode. E L ! T E OPERATION OvenControl,Clock, and Timer Your new control has a series of tones that will sound at different times.
E ! T Opening the door often to check foods will cause heat toss and poor baking result& OPERATION Oven Cooking Tips Preheating is bringing the oven temperature up to the temperature you will be using during baking Let the oven preheat when recipes call for preheating.
E L I if baking with more than one pan, place the pans so each has at least 1 to 1V2"of air space around it If baking four cake layers at the same time, place two layers on rack 2 and two layers on rack 4 Stagger pans on the rack so one is not directly above the other T OPERATION OvenCookingTips(cont.) Most recipes for baking have been developed using high-fat products such as butter or margarine (80% fat by weight--the federal requirement for products labeled "margarine").
E L 1 TM E You may feet that your new oven cooks differently than the oven it replaced, We recommend that you use your new oven a few weeks to become more familiar with it, following the times given in your recipes as a guide, If you feel your oven is too hot or too coot for your cooking preference, see Do-k-Yourself Temperature Adjustment in the back of this manual to make the adjustment_ OPERATION OvenCookingTips(cont.
@ E L i T 3. Touch the COOK TIME pad. E m OPERATION G Baking Touch the HOUR/MIN UP and/or DOWN arrow pads to set the amount of cooking time, 5. Touch (_1. the START pad. Touch the BAKE pad Touch the TEMP UP or 2, DOWN arrow pads to set the oven temperature you prefer to use,, You can set the oven to turn on at a later time of day, cook for a specific amount of time, and turn off automatically Make sure the clock is set correctly,, 3. Touch the START pad, 1. Touch the BAKE pad.
careful not to burn your hand on the door when using a rack in the lowest position (1). E L ! T E OPERATION When using 2 racks, place the two racks in positions 2 and 4 ConvectionBakingTips (UpperOven) When using 3 racks, place the racks in positions 2, 4, and 6. Convection Baking uses heated air that is circulated over and around foods by the convection fan located in the back of the oven When convection baking, cooking temperatures used in recipes should be reduced 25°F.
E L i T E OPERATION ConvectionRoastingTips (UpperOven) During Convection Roasting, heat comes from the top element, The convection fan circulates the heat evenly around When you are Convection Roasting, you should use the broiler pan and grid that came with your new oven The pan is used to catch grease spills and the grid is used to prevent grease splatters "To use the Pan and Grid a. Place the oven rack in the lowest rack position b.
E L 1 T E OPERATION ConvectionRoastingTips(UpperOven)(cont.) *The US Department MINJLB. OVEN TEMP. (°F) of Agriculture recommends Rib (3 to 5 lbs.
E L I T E OPERATION ConvectionBakingand Roasting(UpperOven) You can set the oven to turn on at a later time of day, cook for a specific amount of time, and turn off automatically. Make sure the clock is set correctly.
Touch the COOK TIME pad E L ! T Touchthe HOUR/MIN UP or DOWN arrow pads to set the cook time E OPERATION Cooking Time Savers St (UpperOven) Touch the FAVORITE RECIPE pad The display shows "Save" Touch the FAVORITE RECIPE pad again and the new recipe is saved.
2. E L 1 T pad "DEL" will show in ouch the CLEARIOFF the display E OPERATION RECIPE to delete 3. Touch thepad FAVORITE the recipe CookingTimeSavers (Upper Oven)(cont.) to the exit CLEAR/OFF from the Favorite 4. pad Touch Recipe feature. To change or replace a favorite recipe (cont.) Touch the BAKE, CONVECTION BAKE, or 2. CONVECTION ROAST pad, G You can set the oven to cook your recipes that require two-stage cooking.
NOTES: L I • Add your estimated preheat time to your first cooking time. At the preheat tone, put your food in the oven When the first cooking stage is complete, the control will display the second temperature and cooking time that you have chosen The oven will cut off T OPERATION CookingTimeSavers (UpperOven)(cont.) @ t when the second stage of cooking is complete, but the beep wil! continue until you !ouch the CLEAR/OFF pad.
these temperatures against food-borne E L I T The closer you place foods to the broil element, the faster foods brown on the outside yet remain red to pink in the center E OPERATION Broiling Moving meats away from the element wil! allow the meat to cook to the center while browning on the outside, Cook side 1 at least 2 minutes longer than side 2, tf your oven is connected to 208 volts, you may want to use a higher rack position and/or broil foods longer Broiling is cooking by direct heat from the
E L I T E OPERATION Broiling(cont.) la. Touch the BROIL pad, (This wi!l automatically set HI BROIL.) lb. While the set indicator is flashing in the display, touch the BROIL pad again if you prefer to use Lo Broil, Use Lo BroiI to cook foods such as poultry or thick cuts of meat thoroughly without over-browning them, 2.
2. E L ! T E (b) Touch Setting SpecialFeatures 3. Your new touch pad control has additional features that you may choose to use After making your selection, if you want to change that setting, follow the steps until the display shows your choice, 2_ Touch and hold, at the same time, the BAKE and BROIL pads for 3 seconds, until the display shows "SF" Touch the START Your oven control pad. (a) Touch the CLOCK pad, The display shows "12hr." If this is your choice, touch the START pad.
t E I E or Touch OPERATION (cont.) 4. has a cook and and hold, at the same time, the BAKE and BROIL for 3 seconds, until the display shows "SF" DOWN arrow Touch the START down pad The control will allow you to lock the touch pads so they cannot be activated when pressed, tf you're worried about leaving the oven unsupervised, activate this feature_ hold feature for timed cooking only that will keep hot cooked foods warm up to 3 hours after the timed cooking is finished.
E ! E CAREANDCLEANING Self-Cleaning Cycle The gasket is designed to have a 5"-6' gap at the bottom of the door This allows for proper air circulation. Door Panel 1. Remove the broiler pan and grid, oven racks, utensils, and any foil that may be in the oven. 2, Soil on the front frame and outside the gasket of the doortiner will need to be cleaned by hand.
(approx 1 hour) before open the door, L I T attempting to E CAREAND CLEANING After the cycle, you may notice some white ash in the oven Just wipe it up with a damp cloth or sponge_ Self-Cleaning Cycle (cont.
E L ! T TO CLEAN E For everyday cleaning, use glass cleaner and a paper towel For stubborn soil, use paste of baking soda and water, Rinse thoroughly, CAREANDCLEANING Cleaning CLEANING CLEANING MATERIALS • Dishwashing • Warm water • Soft cloth o Soft abrasive detergent • • • • cleaner • Sponge-scrubber Do not use hard cleaners, or bleach. Do not use abrasive cleaners, industrial cleaners, or bleach.
TO REPLACE E ! T 1. Wrap bulb with cotton cloth or bulb packaging material. Don't touch bulb with your fingers E CAREANDCLEANING 2. Push bulb straight into receptacle all the way, Use only a 120-volt, 35-watt Halogen bulb 3. Place the tabs of the glass cover into the grooves of the socket 4. Turn the glass cover clockwise V4 turn. RemovableParts iiii ii,ljlll[ -q _ circuit 5.
TO REPLACE E L ! T E CAREAND CLEANING RemovableParts(conL) 2. Lift the front of the rack until the raised back slides under the bump of the rack guides 3. Slide the rack all the way back, Broil Stop Position Hinge TO REMOVE 1. Open the door to the broil stop position, 1. Make sure the hinge arms are in the broil stop position 2, Lift the door by the sides 3. Line up the slots at the bottom edge of the door with the hinge arms 4. Slide the door down onto the hinge arms as far as it will go. 5.
E L I T E BEFORECALLINGFORSERVICE To save you time and money, before making a service call check the list below for any problem you may feel you have with the performance of your oven. If the problem is something you cannot fix, use the Consumer Service Numbers located at the back of this manuaf When making any calls, have the Model No., Serial No., Repair Parts List, Use and Care Guide, and the Date of Purchase available.
E L 1 T E PROBLEM I' I j, i, Oven smokes, ! j tM BEFORECALLING FORSERVICE POSSIBLE CAUSE POSSIBLE a. Dirty oven a. Check for heavy spitlover b, Use of ioil not recommended b. Improper use of atuminum foil_ c. Broiler pan containing grease left in the oven ..... i Oven emits odor. i, c. Clean pan and grid after each use illll H i illI ii _E_JJjjlIIII iii II I a, Oven insulation may emit odor during the first few usages a.
E L ! T PROBLEM II1'1 E BEFORECALLINGFORSERVICE POSSIBLE CAUSE a, Improper position rack POSSIBLE SOLUTION .......... Foods do not broil properly. b, Oven preheated. c, Improper use of foil a, Check broil pan placement; see broiling section.. b. Do not preheat when broiling c, Do not let foil cover slits in the grid; this will prevent grease drainage d, Oven door closed during broiling d, Open door to broil stop position; see broiling section. e, Low voltage (208) e.
E L ! T G G E "DO-IT-YOURSELF" TEMPERATURE ADJUSTMENT Touch and hold down both the BAKE and BROIL pads for 3 seconds, until the display shows "SF" + You may feel that your new oven cooks differently than the oven it replaced. We recommend that you use your new oven a few weeks to become more familiar with it, following the times given in your recipes as a guide. 2_ Touch the BAKE pad, A factory set 2-digit number will show in the display, usually "0O" 3a.
E L T E BUILT-IN WALLOVENWARRANTY If, withinoneyearfrom thedateof installation,anypartfailstofunctionproperlydueto a defectin materialor workmanship,Searswill repairor replaceit, atour option,freeof charge If this productis subjectedto otherthanprivatefamilyuse,theabovewarrantyis effectivefor only 90 days WARRANTY SERVICEISAVAILABLEBYCONTACTING THENEAREST SEARSSERVICECENTER INTHEUNITEDSTATES. This warrantygivesyouspecificlegalrights,andyou mayalsohaveother rightswhichvaryfrom statetostate. %,.
For in-home major brand repair service: Call 24 hours a day, 7 days a week 1-800-4-MY-HOME '" (1-800-469-4663) Para pedir servicio de reparacibn - 1-800-676-5811 Au Canada pour tout le service 1-877-LE-FOYER 'M (1-877-533-6937) For the repair or replacement parts you need: Call 6 a.m. - 11 p.m. CST, 7 days a week PartsDirect 1-800-366-PART (1-800-366-7278) www.sears.
E L I T E TM Horno de Pared Empotrado El_ctrico Doble de 30" a Convecci6n con Autolimpieza Modelos 911.49012, 49013, 49014, 49019 It .... c .................. ,!1 iiii ii i1,11, i, i, i I I 22904o2oP232-2 (SR-10433) Seam, Roebuck and Co., Hoffman Estates, IL 60179 U.S.A.
E L I T HORNOA CONVECCION DOBLECONAUTOLIMPIEZA E INDICE Seguridad en el uso de ta estufa ................................ El ciclo de autolimpieza Panel de control ............ Cacerola y parrilfa para asar a la parrilla .............................. Interior del homo con autolimpieza ..................... Vidrio de la puerta del homo Moldura de la ventilaciOn del homo ........................... Acero inoxidable ............ COmo reemplazar el foco de la luz del homo ...............
E L I E GUARDE INSTRUCCIONES BE SEGURIDADIMPORTANTES ESTAS INSTRUCCIONES Lea todas las instrucciones antes de usar esta estufa.
E L ! T • NO USE limpiadores para hornos - No se deberia usar ninguna clase de limpiador para homos o cremas protectoras dentro o alrededor de cualquier parle del homo E • SI LA FUNOtON de AUTOLIMPIEZA faiia, apague el homo y clesconecte la electricidad H_gale un servicio por un t_cnico calificado INSTRUCCIONES DE SEGURIDAD IMPORTANTES ;ADVERTENCIA DE SEGURIDAD IMPORTANTE! California Safe Drinking Water and Toxic Enforcement Act requiere que el gobernador de California publique una lista de substanc
E L I T E OPERACION CARACTERISTICAS DE SU HORNO Ventilaci6n del homo (detr_s de la rejilla ambos hornos) "-, Control del homo -_ Luz del hor (ambos hornos) Cerrojo automdtico para pieza (ambos hornos) Luz del homo (ambos hornos) Cacerola y parrilla para asar a la parrilla Eiemento Ventiladory elemento de horneara convecci6n para asar a la (ambos hornos) Ubicaci6n del ndmero de modelo y serie (detrds de la puerta superior) Guias para parrillas del (ambos hornos) Elemento para hornear € (debajo
OPERACION E L T I _ ControlDel Homo, Reloj, Y Cron6metroDe La Cocina E I IW M m _ @ _ _ l_ Iv t @ @@@@ ® _* @@ @@ Su nuevo control de homo a botones le permitir& programar las varias funciones del homo con facilidad M&s abajo est&n ios diferentes tipos de lunciones y la descripciOn cada uno, de HORNEAR A CONVECCION - Ideal para alimentos horneados sobre parfillas m01tipJes,Bueno para grandes cantidades de comida HORNEAR - Cocina los alimentos en el homo tradicional a una temperatura que v
E ! T OPERACION Control Del Homo, Reloj, Y CronSmetroDe La Cocina (cont.
OPERACION Panel De Control Indicador de Funcibn Indicador de Temperatura Horno del de Nivel Mdltiple Indicador lndica Funci6n del Horno e Cocinado a Convecci6n Encendido El Dial de Control es una referencia f,_cil Indicador de Funci6n del Horno INDICADOR DE LA HORA - Muestra la hora del dia, fa cantidad de tiempo para cocinar, la hora para comenzar una funci6n demorada para cocinar, limpiar, o la hora programada en el cron6metro de la cocina para utilizar el control del homo, M&s abajo estb,n las d
E L i T El cronOmetro de la cocina se usa para med# el tiempo de los procesos para cocinar u otras actividades del hogar, No controla el horno. Se puede programar hasta 9 horas y 59 minutos Contar_ hacia aires en minutos hasta que Ilegue a los ULTIMOS 60 SEGUNDOS, entonces el control sonar_ una vez Cuando ta cuenta Ilegue a CERO, el control sonar_ 3 veces seguido de un sonido cada 6 segundos hasta que el bot6n KITCHEN TIMER ON/ OFF se toque.
4. Toque el bot6n START, para cancelar el tono y salir de este m6duto especial. E L I T Si desea regresar a los tonos de 6 segundos, repita los pasos de arriba hasta que el dial muestre su sefecci6n y empuje el bot6n para el comienzo (start) E OPERACION TONO DE ATENCtON - Este tono sonar_ si hace un error u omite algo mientras programa una funci6n del homo ControlDel Homo, Reloj Y CronSmetro Unos ejemplos serian: a.
E L I T Si abre la puerta frecuentemente para mira[ los alimentos, causar& una p¢rdida de calor y malos resultados cuando hornee E OPERACION ConsejosPara CocinarEnE1 Homo El precalentamiento es subir la homo temperatura a ta lemperatura que va a usa[ cuando hornee Permita que el homo se precaliente cuando las recetas requieren precalentamiento Es normal sentir un poco de o!or cuando use su homo por primera vez, Para ayudar a eliminar este olor, ventile la habitaci6n abriendo una ventana o usando una
IE 1 T E Si est& horneando con m,_s de un utensilio, col6quelos de manera que cada uno tenga pot lo menos de !" a 11/2"de espacio de aire a su alrededor Si estt= horneando cuatro queques al mismo tiempo, co!oque dos queques en la parrilla 2 y dos queques en la parrilfa 4 Coloque los moldes en zigzag para que no queden directamente uno encima del otro. OPERACION ConsejosParaCocinarEnEl Homo(cont.
E L ! T E Usted podria pensar que su homo nuevo cocina diferentemente al homo que reemplaz6 Le recomendamos que use su homo nuevo por varias semanas para que se familiarice m&s con el, siguiendo los liempos que se dan en la receta como una guia,. Si cree que su homo est& funcionando demasiado caliente o frlo para su preferencia para cocinar, yea Ajustes a la Temperatura-H_galos usted mismo en la parle de atr&s de este m_nual para hacer el ajusle OPERACION ConsejosPara CocinarEnE1 Homo(cont.
3. Toque el bot6n COOK TIME E L 1 T 4. Toque el bot6n con Ias flechas para SUBIR yio BAJAR las HORAS/ MINUTOS para seleccionar la cantidad de tiempo para cocinar E OPERACION CSmoHornear 5. Toque el bot6n START. Toque e! bot6n BAKE 1. Toque los botones con las flechas para SUBIR y/o BAJAR TEMP, para programar la temperatura del homo que desea usar. Toque el botOn START.
E L ! T IF. Cuando use dos parrillas, coloque parritlas en las posici6nes 2 y 4, OPERACiON las dos ConsejosPara HornearA ConvecciGn (Homo Superior) Cuando use 3 parrillas, coloque las parrillas en las posici6nes 2, 4, y 6. Hornear con aire caliente que es circulado sobre y atrededor de los alimentos pot el ventilador de convecci6n ubicado en la parle lrasera del homo.
! T E Use las temperaturas para asar recomendadas, No es necasario precalentar Revise los alimentos al final del tiempo sugerido. Usted podria decidir cocinar por m_.s tiempo OPERACION ConsejosPara AsarA Convecci6n (HomoSuperior) Cdmo usar la Cacerola y la Parrilla: ao Coloque ta parrilla del homo en ia posiciOn de parriila m_.s baia b.
E | T E OPERACION Consejos Para Asar A ConvecciSn (Homo Superior) GUIAS PARA ASAR A CONVECCION TEMP. CARNES Res Cerdo Jam6n Cordero Comidas de mar Ayes D£L HORNO(_ M1N/LB ,,, Costillas (3 a 5 Ibso) Crudas* Medio cocinadas Bten cocinadas Costillas sin hueso, "top sidoin" Crudo* Medio coclnados Bien cocinados "Tenderloin" de res Crudo* Medio cocinado Asado a la cacerola (21ha 3 Ibs.) "Chuck", "Rump" Con hueso (3 a 5 Ibs_) Sin hueso (3 a 5 Ibs.
E L I T E Para programar que el homo se encienda a una hora posterior det dfa, cocine pot una cantidad de tiempo especifica, y se apague autom_ticamente. Aseg0rese que el reloj estL_ puest correctamente OPERACION CdmoHornearYAsara Conveccidn (Homo Superior) 1, BAKE Toque o el ROAST bot0n CONVECOION 1. Toque el botOn con fas liechas para SUBIR o BAJAR TEMP para seleccionar ta lemperalura det homo que prefiere usar. Toque el botCn CONVECTION COOKING BAKE o ROAST.
Toque el bot6n COOK TIME. 4. EE L ! E OPERACION Toque los botones con las flechas para SUBIR o BAJAR las HORAS/ MINUTOS para programar la cantidad de tiempo para cocinar G Ayudaspara tiempos de cocinar(HomoSuperior) Toque el botSn FAVORITE RECIPE., El dial muestra "SAVE." Toque el bot6n FAVORITE RECIPE nuevamente para ahorrar la receta Usted puede preseteccionar hasta cinco combinaciones de temperatura!canlidad de tiempo para cocinar con esta funciOn.
2_ Toque el bot6n CLEAR/OFF "DEL" aparece__ en el dial E ! E 3. Toque el bot6n FAVORITE RECIPE para borrar la receta OPERACION 0 Ayudaspara tiemposde cocinar(HomoSuperior) 4. Toque el boron CLEAR]OFF parasalirde la funciOn RECETA FAVORITA (cont.) C6mo cambiar o reemplazar una receta favorita (cont.) Toque et bol6n BAKE, CONVECTION BAKE, o 2.
NOTAS: E L ! T " Agregue et tiempo de precalentamiento estimado al primer nivel de cocci6no AI tono de precalentamiento, ponga la comida en el homo Cuando et primer nivel de cocci6n est_ completo, el control mostrar_ la segunda temperatura y la cantidad de tiempo que usted ha seleccionado El homo se apagar_, cuando el segundo nivel de cocciOn se haya completado, pero el sonido continuar,'_ basra que usted toque el bot6n CLEAR/OFF E OPERACION Ayudaspara tiemposde cocinar (Homo Superior) (cont.) 6.
doraran pot afuera, pero quedando rojo o rosado en el centro E L I Colocando tas carnes lejos del elemento permitir_ que las carries se cocinen en el centro mientras se doran por afuera Usando estas posiciones, cocine el lado I por Io menos 2 minutos m_s que el lado 2 Si su homo est_ conectado a 208 voltios, usted podria usar una posicbn de parrilla m&s atta y/o cocinar los atimentos por m&s tiempo, E OPERACION CGmoAsar A La Parrilla Asar es cocinar al cator directo def elemento superior, La puerta de
E L ! T E OPERACION CGmoAsarA La Parrilla (cont.) Toque el bot6n BROIL (Esto automdticamente programa ASADO en HIALTO,) Mientras el indicador de programa pestafiea en el dial, toque nuevamente el bol6n BROIL si prefiere asar en BAJO (LO) Ase en LO (BAJO) para cocinar bien alimentos tales come aves o cortes de came gruesos sin que se doren demasiado . 3.
1, E L I T E 2. OPERACION C6moSeleccionarProgramas EspecialesDel Control Toque y sujete, al mismo tiempo, los botones BAKE y BROIL pot 3 segundos, hasta que el dial muestre "SF" (a) Toque er bot6n BROIL. Et dial del control mostrar& el signo para grado y F°. (b) Toque el bot6n BROIL nuevamente Esto cambiart_ F ° (Fahrenheit) a C ° (Cenligrado). Su nuevo control a boiones tiene caracteristicas adicionales que usted podrfa usar.
! T E OPERACION Este Programa Especial le permitir_ cambiar la velocidad, #1 significa que el cambio de velocidad es lento hasta #5 que significa que el cambio de velocidad es r_pido.
E L ! E CUIDADO YLIMPIEZA E1Ciclo De Autolimpieza D El sello est& diseSado para que tenga un espacio de 5"-6" en et rondo de la pueda.
E I T E Toque el botOn CLEARIOFF Usted necesitar_ esperar a que la temperatura del homo baje m&s que la temperatura de enganche (aprox, 1 hora) antes de tratar de abrir ia puerta CUIDADOYLIMPIEZA Ciclo De Autolimpieza (cont.) Despues del cicto usted podda nolar un poco de cenizas blancas en el homo Simplemente limpielas con un paso o esponja humeda.
PARA LIMPIAR Para limpieza diaria, use un limpiador para vidrios y una toaila de papel Para suciedad pesada, use una pasta de soda para hornear y agua Enjuague bien CUIDADOY LIMPIEZA C mo Limpiar MATERIALES DE LIMPIEZA MATERIALES • Detergente Ilquido para ptatos • Agua tibia • PaSo suave • Limpiador abrasivo suave • Esponja4regador No use limpiadores abrasivos fuertes, limpiadores industriales, o cloro.
COMO COLOCAR E L ! T 1. Envuelva el foco con un paso seco o con el material de empaque del foco. No toque el foco con los dedos. 2. Empuje comptetamente el ioco derecho dentro del recept&culo Use s61o focos de hal6geno de 120 voltios, 35 watts 3.
PARA COLOCARLA E 1. Asegurese que los brazos de tas bisagras est&n en la posici0n de tope para asar a la parrilta 2. Levante la puerta de ambos lados 3. Coloque en linea las ranuras en la ofilta del rondo del homo con los brazos de las bisagras ! L NUEVAMENTE CUIDADO YLIMPIEZA Partes Removibles(cont.) 4. Deslice la puerla hacia abajo sobre los brazos de tas bisagras to m_s posible 5.
E L I T ANTESDELLAMARPARAUN SERVICIO E Para ahorrar tiempo y dinero, antes de ltamar pera un servicio, revise la lista de m&s abajo para cuatquier probtema que usted crea que tiene con el funcionamiento de su homo_ Si el problema es algo que usted no puede reparar, use los Numeros de Servicio para et Consumidor que se encuentran al final de este manual.
E T PROBLEMA ANTESDELLAMAR PARAUN SERVICIO E POSIBLE CAUSA ,111 iii El horno humea. El horno emite tin olor. POSIBLE SOLUCION i,,, i,,,, i,,i i1,1111,1 ]1 a. Homo sucio i II I b. Mal uso de papel de atuminio c. Se de)6 la cacerola para asar con grasa dentro del homo c, Limpie la cacerola y la parrilla despues de cada uso a, El aislante del homo podfla emitir un olor durante los primeros a_ USOS, b.
E I T PROBLEMA i H il! J!!l , ii E ANTESDELLAMARPARAUN SERVICIO POSIBLE CAUSA POSIBLE SOLUCION a, Posici6n incorrecta de la parriifa, a, Revise la posici6n de las cacerolas; yea la secciOn para asar a la parrilla, bo Et homo se precalent6, b. No precaliente cuando ase a la parritla c. Mal uso de papet de aluminio, c.
E L ! T IF.. . AJUSTESDE TEMPERA TURA"HAGALOSUSTEDMISMO" + Usted podrla pensar que su nuevo homo cocina diferentemente al homo que reemplaz6 Recomendamos que use su homo nuevo unas pocas semanas para que se familiarice con el, siguiendo los tiempos que se dan en las recetas como una gula. Toque y sujete los botones BAKE y BROIL por 3 segundos, hasla que el dial muestre SF, Toque e! bot6n BAKE, Un n,Jmero puesto en f&brica de dos digitos aparecer_ en el dial, generalmente "00" 3a.
E L ! T GARANTIADELHORNODE PAREDEMPOTRADO E "_UN A_O COMPLETODE GARANTIAPARATODASLASPARTES "_ Si, dentrodeunano detalechade instataci6n,cuaiquierparledejadefuncionar adecuadamente debidoa un defectoenel materialo la obrade mane,Searsla reparar_o reemptazar& a nuestta opci6n,sin costo. Si esteproductoessometidoa un useque noseael familiarprivado,]agarantfadearribaes eleclivaper solamente90 d{as.
For in-home major brand repair service: Call 24 hours a day, 7 days a week 1-800-4-MY-HOME sM(1-800-469-4663) Para pedir servicio de reparaci6n - 1-800-676-5811 Au Canada pour tout le service 1-877_LE-FOYER sM (1-877-533-6937) For the repair or replacement parts you need: Call 6 a.m. - 11 p.m. CST, 7 days a week PartsDirect '° 1-800-366-PART (1-800-366-7278) www.sears.