Radiant Convection Self-Cleaning Freestanding Electric Range Eslula El_clrica Radiante a Convecci6n Tipo "lndependiente" con Autolimpieza m Z Models, Modelos 911.99002, 99003, 99004, 99009 Q F m ! Z J m t_ ZI O F 229C4020P252 (SR-10454) Sears, Roebuck and Co., Hoffman Estates, IL 60179 U.S.A. www.
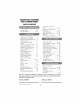
RADIANTSELF-CLEAMNG FREE-STANDINGRANGE TABLEOF CONTENTS Convection Roasting Tips ................................... 24-25 Convection Baking and Roasting ........................... 26-27 Favorite Recipe ................ 27-29 Multi-Stage Cooking ......... 29-30 Broiling ................................... 31 Setting Special Features ... 32-33 Range Safety ........................ 3-8 Anti-Tip Bracket .................... 3-4 Protecting the Cooktop ............. 8 Features of Your Range ...........
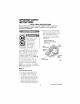
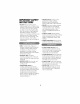
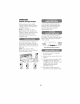
iMPORTANTSAFETY iNSTRUCTiONS SAVE THESE INSTRUCTIONS Read aiJ instructions before using this appJiance. When using gas or electrical appliances, basic safety precautions should be followed, including the following: 13.Use the bracket as a template and mark 2 hole positions on the wall and 2 hole positions on the floor. Use either the wood or concrete floor set of positions, depending on your floor type. See Fig. 1.
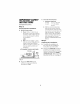
iMPORTANTSAFETY iNSTRUCTiONS C. Concrete 1, Anti-Tip Bracket (contd.) Step 2 2, Anti-tip bracket installation A, Wood Construction: 1, Floor: Drill a 1/8"pilot hole in the center of each pre-marked wood floor hole position (a nail or awl may be used if a drill is not available), AND 2. Wall: Drill an angled W' pilot hole (as shown in Fig. 2) in the center of each pre-marked wall hole position (a nail or awl may be used if a drill is not available). Step Bracket.
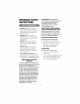
IMPORTA#TSAFETY I#STRUCTIO#S * CAUTION: NEVER STORE items of interest to children on the backguard or in cabinets above the appliance. Children climbing on the appliance could be seriously injured. * KEEP THIS book for later use. * NEVER USE your appliance for warming or heating the room. WARNJNG_ To prevent [ _J accidental tipping of the range from abnormal use, including excessive loading of the oven door, attach the range to the wail or floor by installing the Anti-Tip device supplied.
iMPORTANTSAFETY iNSTRUCTiONS * NEVER LEAVE cooking zones unattended at high settings. Boilovers result in smoking or greasy spills which could catch fire. DO NOT touch cooking zones, surfaces near them, or interior oven surfaces. These may be hot enough to cause burns even though they are dark in color. During and after use, do not touch or let clothing or flammable material contact the zones or hot surfaces until they have had time to cool.
iMPORTANTSAFETY iNSTRUCTiONS IMPORTANT: The health of some birds is extremely sensitive to the fumes given off during the self-clean cycle of any range. Move birds to another well-ventilated room. * CLEAN ONLY the parts listed in this manual. Follow all cleaning instructions. Be sure to remove broiler pan and grid before the self-clean cycle. * NEVER RUB, move, clean, or damage the door gasket on selfcleaning ranges. It is essential for a good seal.
m OPERATION Protecting the Cooktop CAUTION: When the surfacecontrolsare turned off, the Hot Surface Indicator light will remain lit until the cooktop surface has cooled to approximately 150°F. The glass ceramic surface will retain heat after the indicator light goes out. Use caution until !he cooktop surface has had time to cool. * DO NOT slide cookware across your cooktop. * DO NOT use a dishtowel or sponge to clean or wipe your cooktop.
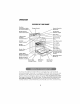
OPERATION FEATURESOF YOURRANGE Cooktop Fluorescent Lk (on some models) Control Knob for Dual Zone Range Control Hot Surface Bridge Surface Unit Control ghts 4 Removable Cooktop Control Dual Cooking Zone Ceramic Glass Cookto Oven Door Latch Oven Lights Bridge Self-Clean Oven Interior Broiler Pan Hidden Convection Bake Fan and Element on rear wal!-not shown) Bake Removable (under oven floor) Oven (3) Model and Serial Number Removable Storage Drawer Self-Clean Gasket Removable Oven Door To
OPERATION RadiantCooktopCooking Before using your new radiant cooktop, clean it with the Cooktop Cleaning Creme ®. This will leave a protective coating. NOTE: On models with white glass-ceramic, it is normal for the surface to appear discolored when cooking zones are hot. This is temporary and will disappear as the glass cools. A Hot Cooktop Indicator Light will glow when the surface temperature exceeds 150°F and will remain on until the surface has cooled to approximately 150°F.
OPERATION RadiantCooktopCooking(cont.) When the knobs are turned on, coils beneath the glass radiate heat through the glass to the cooking utensil. It will take a few moments for the coils to heat; as they do, a red glow can be seen below the surface of the cooktop (on all zones except the warmer zone). If you don't know :::d::¢Y_:_i:;Y7}:l if your cookware is flat on the bottom, try this test. Turn your pan upside down on the countertop, place the edge of a ruler flat against the surface of the pan.
OPERATION RadiantCooktopCooking(cont.) The right front element has two cooking zones: 6" Zone The surface unit on the left side of your cooktop is designed to let you heat all parts of a large utensil that is too large to fit on one surface unit. The Bridge Surface Unit is made up of a front section, a middle section, and a rear section. You can heat all sections at once, or the front and rear section separately when cooking with normal-size utensils.
OPERATION RadiantCooktopCooking(cont.) The surface warmer is used to keep hot, cooked food warm. Always start with hot food. Placing uncooked or cold food on the surface warmer could result in food-borne illness. For best results, foods placed on the surface warmer should be covered with aluminum foil or a lid. When warming pastries or breads, vent the cover to allow excess moisture to escape. Do not cover food with plastic wrap. Plastic may melt on the glass-ceramic surface.
OPERATION OvenControl,Clock,and Timer ©@ e®®®@@ Your new touch pad oven control will allow you to set various functions with ease. Below are the different types of functions and a description of each. BAKE - Cooks foods in the traditional oven with a temperature range of 170°F to 550°F, Cooks food with hot air circulated over and around foods by a convection fan, located at the back of the oven.
OPERATION The CLOCK pad is used to set the time of day. Oven Centre/, C/ock, and Timer The SURFACE LIGHT pad turns the cooktop fluorescent light on or off (on some models), (cent.) The OVEN LIGHT pad turns the lights inside the oven on or off. The TEMP arrow pads UP set or theDOWN oven (_) UP and DOWN arrow pads temperature. set the time ofThe day,HOUR/MIN length of cooking time, length of cleaning time, the delayed start time, and the time set on the Kitchen Timer.
OPERATION ControlDisplay Set indicator Oven Temperature indicator Oven Function Indicator On Indicator Function indicator Surface Warmer Indicator The Control Display is an easy reference for using your oven control. Below are descriptions of how the Control Display works. OVEN TEMPERATURE iNDiCATOR - This indicator has a multiple purpose.
OPERATION OvenControl,Clock,and Timer The Kitchen Timer is used to time cooking processes or other household activities. It does not control the oven. It can be set for up to 9 hours and 59 minutes. It will count down in minutes until the LAST 60 SECONDS is reached, then the control will beep once. When the countdown reaches ZERO, the control will beep 3 times, followed by one beep every 6 seconds until the KITCHEN TIMER ON/OFF pad is touched. The 6-second beep can be removed for future cycles if desired.
OPERATION If you would like to return the 6-second beep, repeat steps above until the display shows your choice and touch the START pad. ATTENTION TONE - This tone will sound if you make an error or an oversight is made while setting an oven function. Oven Centre/, C/ock, and Timer (cont.) Your new control has a series of tones that will sound at different times. These tones may sound while you set the control for an oven function, or at the end of the oven function.
OPERATION OvenCookingTips It is normal to have some Preheating is bringing the oven temperature up to the temperature you will be using during baking. Let the oven preheat when recipes call for preheating. odor when using your oven for the first time. To help eliminate this odor, ventilate the room by opening a window or using a vent hood. The low temperature zone of your oven (between 170°F and 200°F)is available to keep hot cooked foods warm.
OPERATION OvenCookingTips(cont.) Baking results will be better if baking pans are centered in the ] -_ __._f_"_i L_"_ oven as much as __ possible. If baking with more than one pan, place the pans so each has at least 1" to 11/2"of air space around it. If baking four cake layers at the same time, place two layers on rack 2 and two layers on rack 4. Stagger pans on the rack so one is not directly above the other.
OPERATION OvenCookingTips(cont.) You may feel that your new oven cooks differently than the oven it replaced. We recommend that you use your new oven a few weeks to become more familiar with it, following the times given in your recipes as a guide. If you feel your oven is too hot or too cool for your cooking preference, see Do-It-Yourself Temperature Adjustment in the back of this manual to make the adjustment. The oven racks are designed with stops, a convenience as well as a safety precaution.
3. TIME Touch pad. the COOK (_ Touch the BAKE pad. G (_ Touch the TEMP UP or DOWN arrow pads to set the oven temperature you prefer to use. ('S'rART'_ 4. Touch HOUR/MIN UP or the DOWN arrow pads to set the amount of cooking time. 5. Touch the START pad. Touch the START pad. You can set the oven to turn on at a later time of day, cook for a specific amount of time, and turn off automatically. Make sure the clock is set correctly. When baking is finished, touch the CLEAR/OFF pad.
OPERATION ConvectionBaking Tips When using 2 racks, place the two racks in positions 2 and 4. Convection Baking uses heated air that is circulated over and around foods by the convection fan located in the back of the oven. When convection baking, cooking temperatures used in recipes should be reduced 25°F. When using 3 racks, place the racks in positions 2, 4, and 6. METAL OR GLASS y .... Ally type cookware will work in the convection oven. However, metal pans heat faster and are recommended.
OPERATION ConvectionRoastingTips When you are Convection Roasting, you should use the broiler pan and grid that came with your new oven. The pan is used to catch grease spills and the grid is used to prevent grease splatters. To use the Pan and Grid During Convection Roasting, heat comes from the top element. The convection fan circulates the heat evenly around the food. Meats cooked in a convection oven are dark brown on the outside and tender and juicy on the inside.
OPERATION Convection RoastingTips(cont.) CONVECTION ROASTING GUIDE MEATS Beef MIN./LB, OVEN TEMP. (°F) Rib (3 to 5 Ibs.) Rare* Medium Well 20-24 24-28 28-32 325 ° 325 ° 325 ° Boneless Rib, Top Sirloin Rare* Medium Well 20-24 24-28 28-32 325 ° 325 ° 325 ° Beef Tenderloin Rare* Medium 10-14 14-18 325 ° 325 ° Pot Roast (2/_ to 3 Ibs.) Chuck, Rump 35-45 300 ° Bone-in (3 to 5 Ibs.) Boneless (3 to 5 Ibs.
OPERATION Convection Raking and Roasting You can set the oven to turn on at a later time of day, cook for a specific amount of time, and turn off automatically. Make sure the clock is set correctly. Touch the CONVECTION 1. BAKE or ROAST pad. pad. 1. BAKE Touch or theROAST CONVECTION (_ 2, DOWN Touch the TEMP or arrow padUP to set (_ the oven you prefertemperature to use. Touch the TEMP UP or DOWN arrow pad to set the oven temperature you prefer to use. Touch the COOK TIME pad. (_ 3.
OPERATION CookingTimeSavers OPERATION Convection Raking and Roasting (cont.) You can program up to five temperature/cooking time combinations with this function. You can then bake or convection bake/ roast any one of five of your favorite recipes without having to choose settings each time. NOTES: This feature will automatically convert the temperature you set for traditional baking to convection cooking. 1. Touch and hold the CONVECTION BAKE pad for 4 to 5 seconds. 2.
OPERATION CookingTimeSavers(cont.) To change recipe: Save a Favorite Recipe (cont.) pad. the COOK TIME 4, Touch (_ @ @ 5. Touch the HOUR/MIN UP or DOWN arrow pads to set the cook time. 6. Touch the FAVORITE RECIPE pad. The display shows "SAVE." Touch the FAVORITE RECIPE pad again and the new recipe is saved. G 7. Touch the START pad if you want to start cooking the recipe which you have just saved. OR @ Touch the CLEAR/OFF pad to clear the display. To use a favorite recipe: G 1.
OPERATION CookingTimeSavers(cont.) To delete a favorite recipe: Touch the FAVORITE RECIPE pad one to five times to find the recipe that you want to delete. Touch the CLEAR/OFF pad, "DEL" will show in the display. Touch the FAVORITE RECIPE pad to delete the recipe, Touch the CLEAR/OFF pad to exit from the Favorite Recipe feature. You can set the oven to cook your recipes that require two-stage cooking.
OPERATION CookingTimeSavers(cont.) Multi-Stage (_ Cooking (cont.) 7. Touch the arrow TEMP pad UP or DOWN to set the oven temperature you prefer to use. @j_E K 8. TIME Touch pad. the COOK (_) 9. Touch the HOUR/MIN UP or DOWN arrow (_ @ of timetoyou pads set prefer the amount your foods to cook during this second stage of the recipe. 10. Touch the START pad. Multi-stage cooking is cancelled if you do not touch the START pad.
Moving meats away from the element will allow the meat to cook to the center while browning on the outside. Cook side 1 at least 2 minutes longer than side 2. If your oven is connected to 208 volts, you may want to use a higher rack position and/or broil foods longer. Broiling is cooking by direct heat from the upper element. The oven door should remain open to the broil stop position during broiling.
OPERATION SettingSpecial Features 1. Touch and hold, at the same time, the BAKE and BROIL pads for 3 seconds, until the display shows "SF." Your new touch pad control has additional features that you may choose to use. After making your selection, if you want to change that setting, follow the steps until the display shows your choice. 2. (a) Touch the BROIL pad. The control display will show the degree sign and "F°." (b) Touch the BROIL pad again. This will change F ° (Fahrenheit) to C° (Celsius). 3.
OPERATION SettingSpecialFeatures(cont.) This special feature will allow you to change the speed; #1 means speed of change is slow, up to #5 which means speed of change is fast. To set the speed you prefer, follow these steps: 1. Touch and hold, at the same time, the BAKE and BROIL pads for 3 seconds, until the display shows "SF." Your control is set to automatically turn off the Surface Warmer after 3 hours should you forget and leave it on. If you want to remove this feature: 1.
CAREAHDC[EAHIHG Self-CleanCycle The gasket is designed to have a 5"-6" gap at the bottom of the door. This allows for proper air circulation. Door Panel 1. Remove the broiler pan and grid, oven racks, utensils, and any foil that may be in the oven. 2. Soil on the front frame and outside the gasket of the door liner will need to be cleaned by hand. Gasket t Door Liner Front Frame It is normal for your oven door to give the appearance of not having a good seal against the range.
CAREAND CLEANING Serf-CleanCycle(cont.) Touch the CLEAR/OFF pad. You will need to wait for the oven temperature to drop below the lock temperature (approx. 1 hour) before attempting to open the door. The Self-Clean Cycle, including cooldown time, is automatically set for 4 hours 20 minutes and automatically turns off after the set time, but you may change this from 3 hours if oven is lightly soiled, up to 5 hours if oven is heavily soiled. After the cycle, you may notice some white ash in the oven.
CAREANDCLEANING For heavy, burned-on Glass-Ceramic Cooktop Cleaning 1. Apply a few drops of cleaning creme to the cool, soiled area. Spread the creme across the entire soiled area. On models with white glass-ceramic, it is normal for the surface to appear discolored when cooking zones are hot. This is temporary and will disappear as the glass cools. Cleaning a glass-ceramic cooktop is different from cleaning a standard porcelain cooktop.
CAREAHDCLEANING Use of glass cleaner may leave an iridescent film on the cooktop. Cleaning Creme will remove this film. Glass-Ceramic Ceektep Cleaning (cent.) ,, Water stains (mineral deposits) are removable using the creme or full-strength white vinegar. ,, Do not use a dull or nicked razor blade on your cooktop. ,, Do not use abrasive cleaners or abrasive scouring pads on your cooktop.
CAREANDCLEANING Cleaning CLEANING CLEANING • Dishwashing • Warm water MATERIALS ° Dishwashing • Warm water detergent Do not use oven cleaners, cleansing powder, or harsh abrasives. If marinades, tomato sauce, basting materials, etc. should spill, wipe up as much as possible. When surfaces have cooled, thoroughly clean painted areas. Do not use abrasive cleaners, industriaJ cleaners, or bleach.
CAREANDCLEANING Removable Parts CLEANING _ MATERIALS • Dishwashing detergent • Warm water main before attempting to replace oven light bulbs. Do not touch the light bulb with bare hands. The bulb e Soft cloth Spring Clip Insert disconnect AUT|ON: electrical You must power to the oven at the circuit breaker or fuse box gets very hot very quickly. Wrap foam rubber from bulb package around bulb when installing.
CAREAND CLEANING TO REPLACE RemevableParts (cont.) 1. Place the raised back of the rack onto the rack guides. 2. Lift the front of the rack until the raised back slides under the bump of the rack guides. Replacing The Oven Light Bulbs (cont.) 3, Place the tabs of the glass cover into the grooves of the socket. 3. Slide the rack all the way back. 4, Turn the glass cover clockwise 1/4turn. 5, Reconnect electrical power to the oven at the main circuit breaker or fuse box. TO REMOVE 1.
CAREANDCLEANING Removable Parts(cont.) TO CLEAN OUTSIDE OF DOOR ,, Use soap and water to thoroughly clean the top, sides, and front of the oven door. Rinse well. You may also use a glass cleaner to clean the glass on the outside of the door. Do not let water drip into the vent openings. Removable Oven Door (cont.) TO REPLACE Bottom Edge of Hinge 1, Firmly grasp both S!ot Arm sides of the door at the top 2.
Rear drawer support is resting on top of guide rail CAREANDCLEANING Removable Parts(cont.) /_:_.?:.i._.t ÷ I_ Ill _l Drawer front panel tipped away from _ body side TO REMOVE IF DRAWER IS CROOKED 1. Pull the drawer out until it stops. 2. Lift the front of the drawer until the stops clear the guides. 3. Remove the drawer. Rear drawer support is on top of guide rail on the high side Rail Drawer front panel tipped [ to Ione side gives you space .
BEFORECALLINGFORSERVICE To save you time and money, before making a service call check the list below for any problem you may feel you have with the performance of your range. If the problem is something you cannot fix, use the Consumer Service Numbers located at the back of this manuak When making any calls, have the Model No., Serial No., Repair Parts List, Use and Care Guide, and the Date of Purchase available.
BEFORECALLINGFORSERVICE PROBLEM POSSIBLE CAUSE POSSIBLE SOLUTION Top light does not work. Switch operating the light is broken, Call for service, Cooktop cooking zones work, but oven will not turn on. Oven controls set incorrectly, Check the operation section on setting the oven control correctly. Surface units do not glow red. You may not notice the surface units glowing unless you are using a higher heat setting, NOTE: The surface warmer never glows.
BEFORECALLINGFORSERVICE PROBLEM Oven smokes, Oven emits odor, Foods do not bake properly. POSSIBLE CAUSE POSSIBLE SOLUTION a. Dirty oven. a. Check for heavy spillover. b, Improper use of aluminum foil. b, Use of foil not recommended. c. Broiler pan containing grease left in the oven. c. Clean pan and grid after each use. a. Oven insulation may emit odor during the first few uses. a. Put oven through self-clean cycle to speed up process of odor "wearing off.
BEFORECALLINGFORSERVICE PROBLEM Foods do not broil properly, POSSIBLE a. CAUSE Improper rack position, POSSIBLE SOLUTION a. Check broil pan placement; see broiling section. b, Oven preheated, b, Do not preheat when broiling. c. c. Do not let foil cover slits in the grid; this will prevent grease drainage. Improper use of foil. d, Oven door closed during broiling, d, Open door to broil stop position; see broiling section. e. Low voltage (208). e. Use higher rack position. f. f.
"DO-IT-YOURSELF" TEMPERATURE ADJUSTMENT You may feel that your new oven cooks differently than the oven it replaced. We recommend that you use your new oven a few weeks to become more familiar with it, following the times given in your recipes as a guide. 1. Touch and hold down both the BAKE and BROIL pads for 3 seconds, until the display shows "SF." 2. Touch the BAKE pad. A factory set 2-digit number will show in the display, usually "00." + f,=_,."_ (_ A,._'_ .
NOTES 48
NOTES 49
RADIANTFREE-STANDING RANGEWARRANTY ALL PARTS If,within oneyearfromthe dateof installation, anypartfailsto functionproperlyduetoadefect in materialor workmanship,Searswill repairor replaceit, atour option,freeof charge.