
Manual

Before You Start
3. Cut the shipping strap about 16 in.
(40 cm) from plug end. Look for the
words "CUT HERE." Discard end with
the cotter pins. Slide remainder of
shipping strap from the power cord.
You will use the remainder of the
shipping strap later to secure the
drain hose.
• To prevent floor damage, set the
washer onto cardboard before moving
across floor.
• Move the washer to within approximate-
ly 3 ft (90 cm) of the final location.
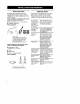
Remove Shipping Strap
Removing the shipping strap is necessary
for smooth operation. If the shipping strap
is not removed, the washer will make
excessive noise.
1. Do not cut yellow strap. Pull yellow
strap firmly, until completely removed
from washer. Depending on your
model, there will be either two or three
cotter pins on the end of the shipping
strap when it is pulled out of the
washer. The electrical plug is attached
to this shipping strap.
2. Pull firmly to remove the end of the
shipping strap that remains pinned to
the back of the washer. This will
release the rear self-leveling feet.
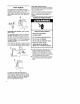
Connect Drain Hose
Proper connection of the drain hose will
protect your floors from damage due to
water leakage. To prevent the drain hose
from coming off or leaking, it must be
installed per the following instructions.
IMPORTANT: To ensure proper installa-
tion, this procedure must be followed
exactly.
1. Check the drain hose to see if it is
the proper length.
2. Wet the inside of the straight end of
the drain hose with tap water. DO
NOT USE ANY OTHER LUBRICANT.
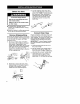
3. Squeeze ears of silver, double-wire
clamp with pliers to open. Place
clamp over the straight end of the
drain hose _,4in. (6 mm) from the end.
,/_1/4"
(6 ram)
10