
Manual


4. Tiltthewasherbackandremovethe
woodblock.Gentlylowerthewasher
tothefloor.
5. Slideto final location.
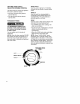
6. Check the levelness of the washer
by placing a level on the top edges
of the washer; first side-to-side, then
front-to-back.
3. Check to be sure you have all of
your tools.
4. Check to be sure that the yellow
shipping strap was removed from the
back of the washer and used to
secure the drain hose.
5.
6.
7.
Dispose/recycle all packaging
materials.
Check to be sure the water faucets
are on.
Check for leaks around faucets and
inlet hoses.
If the washer is not level, move the
washer out slightly, tip back, prop up
the front of the washer with the wood
block and adjust the feet up or down
as necessary. Repeat this step until
washer is level.
7. After the washer is in the final loca-
tion and level, use a _6in. (1.43 cm)
open-end wrench to turn the nuts on
the feet tightly against the washer
cabinet.
If the nuts are not tight against the
washer cabinet, the washer may
vibrate.
8. Tilt the washer forward until the rear
of the washer is at least 4 in. (10.2
cm) off the floor. You may hear the
self-adjusting rear feet click into
place. Lower the washer to the floor.
Complete Installation
1. Check the electrical requirements. Be
sure that you have the correct electri-
cal supply and the recommended
grounding method. (See "Electrical
Requirements.")
2. Check to be sure all parts are now
installed. If there is an extra part, go
back through the steps to see which
step was skipped.
Electrical Shock Hazard
Plug into a grounded
3 prong outlet.
Do not remove ground prong.
Do not use an adapter.
Do not use an extension cord.
Failure to follow these
instructions can result in
death, fire, or electrical shock.
8. Plug into a grounded 3 prong outlet.
9. Remove the protective film on the
console and any tape remaining on
the washer.
10. Read "Washer Use."
11. To test your washer, measure half of
the normal recommended amount of
powdered or liquid detergent and
pour it into the washer basket or
detergent dispenser (on some mod-
els). Close the lid. Select any cycle,
and then press START. Allow it to
complete one whole cycle.
13