Owner's Manual and Installation Instructions ® Three-Speed Triple Dispenser AUTOMATIC WASHERS IMPORTANT: Read and follow all safety and operating instructions before first use of this product. Your washer may look different from the washer shown. Sears, Roebuck and Co,, Hoffman Estates, IL 60179 U,S.A. www.sears.com Sears Canada Inc., Toronto, www,sears.ca 3953633A Ontario, Canada MSB 2B8 PRINTED IN U.S.A.
BEFORE USING YOUR NEW WASHER 2 KENMORE AUTOMATIC WASHER WARRANTY 3 WASHER SAFETY 4 INSTALLATION ..... INSTRUCTIONS ..... OPERATING YOUR WASHER LAUNDRY TIPS ..... ...... 21 34 CARING FOR YOUR WASHER TROUBLESHOOTING 6 ...... ........ SEARS MAINTENANCE 37 AGREEMENT Please read this manual. It will help you install and operate your new Kenmore washer in the safest and most economical way.
Limited Lifetime Warranty on White Porcelain Basket For the lifetime of the washer from the date of purchase, Sears will replace the white porcelain wash basket if it chips or rusts due to defective material or workmanship. After the first year, you will be charged for labor. Limited 10-Year Warranty on Plastic Tub* For the second through tenth year from the date of purchase, Sears will replace the plastic tub if it is defective in material or workmanship.
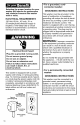
Your safety and the safety of others is very important. We have provided many important safety messages in this manual and on your appliance. Always read and obey all safety messages. This is the safety alert symbol. This symbol alerts you to hazards that can kill or hurt you and others. All safety messages will be preceded by the safety alert symbol and the word "DANGER" or "WARNING." These words mean: You will be killed or seriously injured if you don't follow instructions.
IMPORTANT SAFETY INSTRUCTIONS WARNING: To reduce the risk of fire, electric shock, or injury to persons when using your washer, follow basic precautions, including the following: • Read all instructions before using the washer. • Do not wash articles that have been previously cleaned in, washed in, soaked in, or spotted with gasoline, dry-cleaning solvents, other flammable or explosive substances as they give off vapors that could ignite or explode.
INSTALLATION OVERVIEW For a complete list of tools and parts needed, see pages 7-9. A. SELECT LOCATION FOR YOUR WASHER (pgs. 11-13) Recessed Area/ Closet Installation Instructions (p. 11) Standpipe Drain System (p, 13) 3gin (ggcm) 6 Laundry Tub Drain System (p, 12) Floor Drain System (p.
B, REMOVE SHIPPING STRAP (p. 14) \ Tools Needed: Scissors C, CONNECT Flashlight (optional depending on installation) DRAIN HOSE (pgs, 15-16) _WIST o Tools Needed: __ PaNs Needed: Pliers that open to 1 9/IGin (3.
D. CONNECT INLET HOSES TO WASHER Tools Needed: (pg. 16-17) Parts Needed: 2 water inlet hoses Pliers that open to 1_, in (3.95 cm) Flashlight (optionai depending on installation) 4 fiat water inlet hose washers E. CONNECT INLET HOSES TO WATER FAUCETS (pg. 17) Tools Needed: Parts Needed: Pliers that open to 1_'0in (3.
F, SECURE DRAIN HOSE (p. 18) Tools Needed: Parts Needed: Flashlight (optional depending on installation) G. LEVEL WASHER(p. 19) Tools Needed: Parts Needed: 9/16in (1.
• For a grounded, cordconnected washer: Selecting the proper location for your washer will improve its performance and minimize concerns like washer walk or noise. ELECTRICAL REQUIREMENTS 120-Volt, 60-Hz., AC-only, 20-ampere fused electrical required. (Time-delay fuse breaker is recommended.) individual branch circuit. 15- or supply is or circuit Connect to GROUNDING INSTRUCTIONS This washer must be grounded.
A. SELECT LOCATION FOR YOUR WASHER RECESSED AREA] CLOSET INSTALLATION INSTRUCTIONS This washer may be installed in a recessed area or closet. 3in oo - 48 in _ (310 cm _) minimum ventilation area %19 in cm) 24 in 2 (155 cm _) _ minimum ventilation area (0*0in cm) ___ 27incm) __ (68.6 . ___ 251_m (0*0in cm) __ ,:_,_l,n 8 c (2.5cm) " " FrontView (DoorNotShown) in 4in" _-(102cm) SideView (DoorShown) Front View (DoorWHhVent) * Additional clearance for wall, door and lloor moldings may be required.
LAUNDRY TUB DRAIN SYSTEM Check location where washer will be installed. This washer can be installed using one of three systems: • Laundry tub drain system (below) • Standpipe drain system (p. 13) • Floor drain system (p. 13) Grounded receptacle: Must be within 4 ft (1.2 m) of where the power cord is attached to the back of the washer. / f Do not store or operate washer at or below 32°F (0°C) (some water may remain in washer), See page 36 for winterizing information.
ALTERNATE LOCATIONS STANDPIPE AND FLOOR DRAIN SYSTEMS Siphon break: Must be purchased separately. See chart below. 39 in (99 cm) s Standpipe drain system: Needs a 2 in (5 cm) minimum diameter standpipe with minimum carry-away capacity of 17 gal (64 L) per minute. Top of standpipe must be at least 39 in (99 cm) above floor and no higher than 96 in (2.4 m) from bottom of washer. Floor drain system: Requires a siphon break, see chart below.
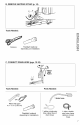
B. REMOVE SHIPPING STRAP .irloiiu0J_,_,, :I_ 1[_ _I-, STEP 2. Pull firmly to remove the end of the shipping strap that remains pinned to the back of the washer, This will release the rear self-leveling legs. Removing the shipping strap is necessary for smooth operation. If the shipping strap is not removed, the washer will make excessive noise. Pin To prevent floor damage, set washer onto cardboard before moving across floor. Move washer close to its final location. STEP 1. Do not cut yellow strap.
C. CONNECT DRAIN HOSE Proper connection of the drain hose will protect your floors from damage due to water leakage. STEP 1. To prevent the drain hose from coming off or leaking, it must be installed per the following instructions: IMPORTANT: To ensure proper installation, this procedure must be followed exactly. a. Wet the inside of the straight end of the drain hose with tap water, DO NOT USE ANY OTHER LUBRICANT. b. Squeeze ears of silver, double-wire clamp with pliers to open.
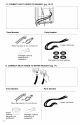
For standpipe or laundry tub drain systems: STEP 2. Open yellow, single-wire clamp with pliers and slide over hooked end of drain hose to secure the rubber and corrugated sections together. STEP 3. Put hooked end of drain hose into laundry tub or standpipe, Check for proper length of drain hose. Rotate hook to eliminate kinks. To prevent drain water from going back into the washer: • Do not straighten hooked end of drain hose and force excess drain hose into standpipe.
STEP 2. Attach the hose with the red coupling to the hot water (bottom) inlet valve. Attaching the red coupling first makes it easier to tighten connection with pliers. Screw on coupling by hand, Make an additional two4hirds turn with pliers to tighten coupling. DO NOT OVERTIGHTEN; this could damage the valves. Cold Water E. CONNECT INLET HOSES TO WATER FAUCETS STEP 1, Make sure washer basket is empty.
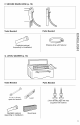
F. SECURE DRAIN HOSE Securing the drain hose properly will protect your floors from damage due to water leakage, If the water faucets and drain standpipe are recessed, put hooked end of drain hose in standpipe. Tightly wrap the shipping strap around the drain hose and water inlet hoses (not the handles or stems), Push fastener into the nearest hole in the shipping strap. STEP 1. Move washer to its final location. I STEP 2.
G. LEVEL WASHER Leveling your washer properly prevents excessive noise and vibration. To install front legs: STEP 1. Prop front of washer up about 4 in (10.2 cm), Use a wood block or another object that will support the weight of the washer. If washer was placed against a wall, move the washer out slightly before tipping it up. STEP 5. Move washer to its final location. STEP 6. Tilt washer forward until rear of washer is at least 3 in (7.6 cm) off floor.
REVIEW INSTALLATION Take a few minutes to complete this checklist. It will help assure you that you have a proper installation and increase your satisfaction with your Kenmore washer, [ [ Check electrical requirements. Be sure you have correct electrical supply and recommended grounding method. Check that you have: [ Check that: • The washer is level. • The nuts on the front legs are tight. [ Check that the water faucets are turned on.
_[seJa_IeJ_a ;I:_ n[_ _d To get the maximum cleaning and fabric care from your washer, please read and follow these instructions, LID INSTRUCTIONS These instructions are found under the lid of your washer. POWDER or LIQUID DETERGENT Fire Hazard Never place items in the washer that are dampened with gasoline or other flammable fluids. Dissolves powder or liquid detergents before applying to load. When desired add powder or liquid color safe bleach to this dispenser. No washer can completely remove oil.
1. SELECT & ADJUST ......... Make the selections for these washer controls: • WATER LEVEL Adjust to load size. • WASH/RINSE TEMP ...... Adjust to type of fabric and soil Use AUTO TEMP selections for best wash performance. • RINSE OPTIONS ........... Select to add a second rinse automatically. • SPEEDS Adjust to fabric type being washed. r_f;7_r_la';tE_f;T_ i_l,__'lll.
It's best to wash stains as soon as possible. Blood _t, _ _,_ _ detergent for 30 minutes. Rinse. Rub detergent Rinseany immediately soak Rinse in coldthoroughly. water with into remaining or stains. Chocolate, Coffee stain remover. Rinse. Wash. If stain remains, Sponge immediately or apply a prewash soll and apply awith liquid detergent Rewash. to stain or soak in warm water detergent. Cosmetics minutes. Wash with detergent and bleach in the Rub in awater prewash hottest safe stain for theremover.
STARTING YOUR WASHER STEP 1. Place a load of sorted clothes in the washer. Add measured detergent directly into dispenser (details on page 31). STEP 2. (OPTIONAL STEP) If desired, add measured liquid chlorine bleach to the liquid bleach dispenser (details on page 32). STEP 3. (OPTIONAL STEP) If desired, add measured liquid fabric softener to the fabric softener dispenser (details on page 33), STEP 4. Close washer lid, STEP 5.
WATER LEVEL CONTROL Washers with 4-position or 5-position Water Level Control: • To change to a higher water level setting after the washer has started to agitate, turn the knob to the desired new setting. This control gives you the flexibility to save water when washing small loads. taED_UM L_D Your washer lets you select a water setting based on the size of your wash load. • For normal loads, start with the MEDIUM LOAD setting. Adjust up or down depending on your load.
AUTOMATIC TEMPERATURE CONTROL (ATC) ATC takes away the worry of undissolved detergent and ensures consistent cleaning results from season to season with warm and cold washes, ATC electronically senses and maintains a uniform water temperature by regulating incoming hot and cold water. • Even in cold wash, some warm water is let into the washer to maintain a temperature minimum of W_M 1_" COLD 70°F (21 °C). In very cold water, detergent may not ._ 70" dissolve and clothes will not be cleaned completely.
SETTING YOUR CYCLE SELECTOR (TIMER) CONTROL Use this control to choose the agitation time and to start the washer. • For heavy soil and sturdy fabrics, use more time, • For light soil and delicate fabrics, use less time. PERMANENT PRESS II :FJtlt' r The PERMANENT PRESS II cycle includes a load cooling process that reduces wrinkling compared to other cycles. You can select up to 10 minutes of wash time. Add detergent to dispenser for PERMANENT PRESS II cycle.
CYCLE/OPTIONS DESCRIPTIONS You may add options to your wash cycle. The chart below shows you the proper set_ tings for your Cycle Selector Control (Timer) and RINSE OPTIONS Control. The Cycle Selector Control needs to be set where you want the cycle to start and the RINSE OPTIONS Control needs to be set where you want the cycle to stop.
UNDERSTANDING WHAT HAPPENS IN EACH CYCLE ULTRA CLEAN selected level Fill to PERMANENT PRESS II AUTO PREWASH selected level Fill to selected level Fill to Wash selected time Wash selected time Wash selected time no spin Drain - Drain Partial no spin Drain - _ Pause Spin • selected Fill to level Spin _ W Fill for • cooldown Off (reset to desired wash cycle) Wash Rinse • no spin Drain • _ W Drain • no spin Spin Spin Off or 2ND RINSE selected level Fill to Rinse AUTO SOAK selected le
SELF-CLEANING LINT FILTER Lint is filtered from the load automatically - there's no messy cleanup. Your washer features a self-cleaning filter that traps lint from the water while the washer is washing and deep rinsing the laundry. The trapped lint is flushed down the drain automatically. You don't have to clean the filter. TOTAL CARE TM AGITATOR Kenmore's exclusive TOTAL CARE TM agitator has triple action agitation to give you the most flexible fabric care for even your largest loads.
UNDERSTANDING NORMAL WASHER SOUNDS Your new washer may make sounds that your old one didn't. Because the sounds are unfamiliar, you may be concerned about them, The following describes some of the normal sounds you may hear and what causes them. During Washing When you select a small load size setting for a small wash load, your washer has a lower water level. With this lower water level, you may hear a clicking sound from the upper portion of the agitator.
USING THE LIQUID CHLORINE BLEACH DISPENSER The liquid chlorine bleach dispenser automatically dispenses bleach at the proper time in the cycle to ensure the cleanest and brightest loads. Always measure liquid chlorine bleach. Use a measuring cup. Do not guess Do not pour directly from bottle.
USING THE LIQUID FABRIC SOFTENER DISPENSER After loading the washer, measure and add the recommended amount of fabric softener into the dispenser. Follow manufacturer's directions. Liquid fabric softenerdispenser If cleaning of the liquid fabric softener dispenser is required: • Do not overfill. Dispenser holds a standard capful of fabric softener (3 oz [94 mL]). • Fabric softener is dispensed in 2nd rinse if 2ND RINSE is selected. Scrub with a brush using a liquid laundry detergent solution.
PREPARING CLOTHES FOR WASHING Follow these recommendations to help you prolong the life of your garments. • Close zippers, snaps, and hooks to avoid snagging other items. Remove pins, buckles, and other hard objects to avoid scratching the washer interior. Remove non-washable trim and ornaments. • Empty pockets and turn them inside out. • Turn down cuffs, brush away lint and dirt. • Turn synthetic knits inside out to avoid pilling. • Tie strings and sashes so they will not tangle.
LOADING LOADING SUGGESTIONS For these suggested full-sized Ioads_ set the WATER LEVEL Selector to the highest water level setting. Proper loading of your washer contributes to proper cleaning and fabric care and reduces machine noise, • Drop items into washer loosely. Fill to the top of the basket (top row of holes). Do not wrap items around the agitator. Items should move easily through wash water for best cleaning and wrinkle-free results. Items should sink and reappear later.
CLEANING YOUR WASHER Proper care of your washer can extend its life. This section explains how to care for your washer properly and safely. Exterior Wipe up detergent, bleach, and other spills with a soft, damp cloth or sponge as they occur. Occasionally wipe the outside of the washer to keep it looking like new. Do not put sharp or metal objects in your washer. They can damage the finish.
Most laundering problems are easily solved if you understand the cause. Check these lists for common laundry and washer problems. If you need further assistance, see service and assistance information on the back page. Problem Possible Cause Solution Washer Leaks Household plumbing is leaking. Repair plumbing. Inlet hoses not tight. Tighten hoses (see "Installation Instructions," Sections D & E). Inlet hose washers not properly seated. Reseat washers (see "Installation Instructions," Section D).
Problem Possible Cause Solution Won't Drain/ Won't Spin/ Wet Loads Low voltage or using an extension cord. Check electrical source or calI electrician. Do net use extension cords. (cont,) Cold rinses. Cold rinses leave loads wetter than warm rinses. This is normal. Continues to Fiil/ Continues to Drain/ Cycle Stuck Drain hose is less than 39 in (99 cm) above floor. Raise the drain hose (see "Installation Instructions," Section A). Drain hose fits tightly into standpipe.
Problem Possible Cause Solution Machine Power cord not plugged in. PIug in power cord. Stops No power at plug. Check electrical source or call electrician. Fuse blown or circuit breaker open. Replace fuse or reset circuit breaker. If problem continues, call electrician. Using an extension cord, Do not use extension cords. Timer is not lined up. Turn timer to the right slightly and pull to start. Timer knob not pulled out, Set and pull out knob.
Problem Possible Cause Solution Tearing Overloading. Improper use of washer, Loads should move freely during wash. Wash smaller loads or increase water level Improper use of chlorine bleach. Undiluted bleach will damage fabrics. Do not pour chlorine bleach directly on Ioad. Wipe up bleach spills. Sharp items not removed from pockets; fasteners not fastened. Clean out pockets before washing. Zip zippers before washing.
KENMORE WASHERS We Service What We Sell "We Service What We Sell" is our assurance you can depend on Sears for service. Your Kenmore appliance has added value when you consider that Sears has service units nationwide, staffed with professional technicians trained on all appliances Sears sells. They have the knowledge and skills, tools, parts and equipment to ensure our pledge to you that "We Service What We Sell." Maintain the value of your purchase with a Sears Maintenance Agreement.
In U.S.A. or Canada for in-home major brand repair service: Call 24 hours a day, 7 days a week 1-800-4-MY-HOME" (%800-469-4663) Pars pedir servicio de reparaci6n a domicilio - 1-800-676-5811 Au Canada pour tout le service - 1-877-LE-FOYER" For the repair or replacement (1-877-533-6937) parts you need: Call 6 a.m. - 11 p.m. CST, 7 days a week PartsDirect" 1-800-366-PART (1-800-366-7278) www.seam.